3D Tinkercad designed wardrobe cupboard
thingiverse
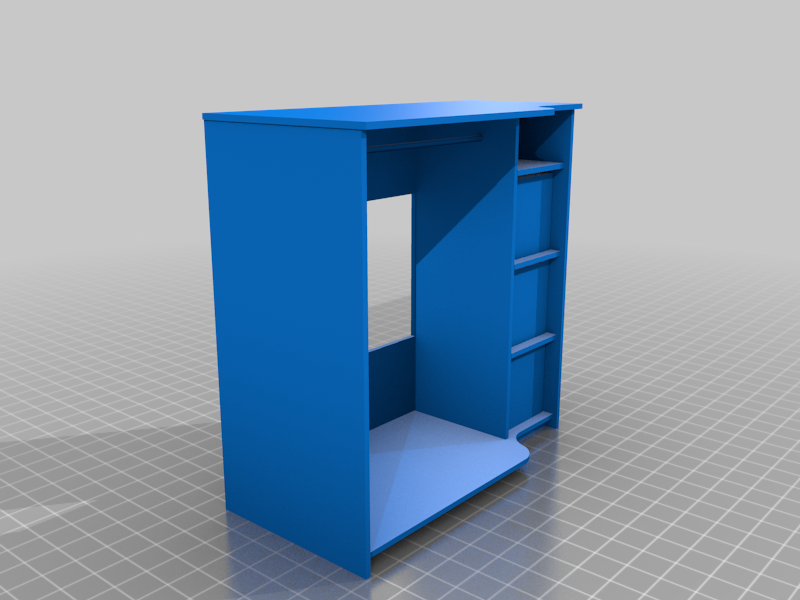
Hi, take a look at my other designs https://www.thingiverse.com/BuiltBrokenGlued/designs LINK to tinkercad design [Tinkercad](https://www.tinkercad.com/things/gX3jOnTqmIi-cupboard/edit?sharecode=NDdWFe46HUdlF4kMOmqXolV0JqAwrR_9uFjJBqT1Fnc) **Designed** Designed in tinkercad using CM measurements as whole units. Taking the measurements from tinkercad I added a 0 to the end to give me my real world cut measurements. 12 on tinkercad = 120mm size. **Project requirements** The unit is based on measurement to allow extra storage in a alcove. On the other side of the fireplace is a Ikea Malm - 6 drawer -160mm wide storage unit. I wanted this design to at match in height so both unit would look good with the eye. Storage for hanging shirts/trousers is needed but not a full size wardrobe. Small storage areas **Process** (all sizes are real world) Once the idea had been designed in tinkercad, I planned the measurements. On the tinkercad design a common size for all the parts is 1200mm, however since a MDF sheet comes in 1220mm diameter and it would save on extra cutting I used the standard board with of 1220mm. Separating all the parts in tinkercad I layed out a MDF template to arrange cutting locations. I took a screen shot and printed of the sheet to copy the measurements to it. Our local B&Q is able to cut wood in store, after purchasing 2 sheets of 18mm MDF I got them to make the main cuts and brought the items back to assemble. Finding open flat space suitable for the build is important. *I took the space of my sons room, he did complain but I informed him it is for his well being that i get it done to increase his mums happiness - he conceded.* After purchasing a dowel jig it made the sizing and drilling of the joins really straight forward. All the joins have at least 3 dowels in one length, The base board has 5 across the span and well as 2 supports that run under the board. During the building process is when I decided how it is put together. I had factored this into the Tinkercad design but it still a easy puzzle to sort. Once all the measurement marks had been done and the dowel drilled and located it was time for a dry fit. Really happy with the first unit built with a tinkercad and a dowel jog. taking the unit apart I cut out the sweep design on the top and bottom panels. The sweep is to take the eye from the fireplace and increase the depth for the wardrobe space. Then paint. 2 coats of Leyland MDF primer followed by 2 coats of Leyland Satin White to give it the same sheen as the Ikea finish. The top has an extra coat. In hindsight I should have pre drilled the holes for the screw supports when the unit was in the dry fit stage. I used a 2.5mm drill bit to drill the length of the screw then a 3.5mm drill bit for the facing wood so the screw wouldn't grip and would allow the two piece to be pulled together. Run a countersink bit to sink the head. All the screw heads are on sides that are hidden by walls on either side. Once the unit was painted and secured together it wa time to fit in its new home. Now since I allowed to extend the panels from 1200mm to 1220mm I was left with a wide unit. Not really allowing for this ment the skirting board had to be removed from the left wall to fit the unit in. Cutting enough skirting away to allow the unit to slide in means im left with a gap. The skirt board that was cut away will be cut to length and reinstalled using screws so it can be removed at a later date if required for removing the unit and allow for decorating. I'm really happy with the quality of the finished item. It matches a few touches of the Ikea's malm units and doesn't look out of place in the room while allowing for storage space to hang clothes. I have to source a curtain to hide the clothes area, this will run under the top panel and have a curve on the right. Although this is not a 3d printed item I hope this will aid ideas for projects you might want to undertake.
With this file you will be able to print 3D Tinkercad designed wardrobe cupboard with your 3D printer. Click on the button and save the file on your computer to work, edit or customize your design. You can also find more 3D designs for printers on 3D Tinkercad designed wardrobe cupboard.