3D Tuning Calibration Print
thingiverse
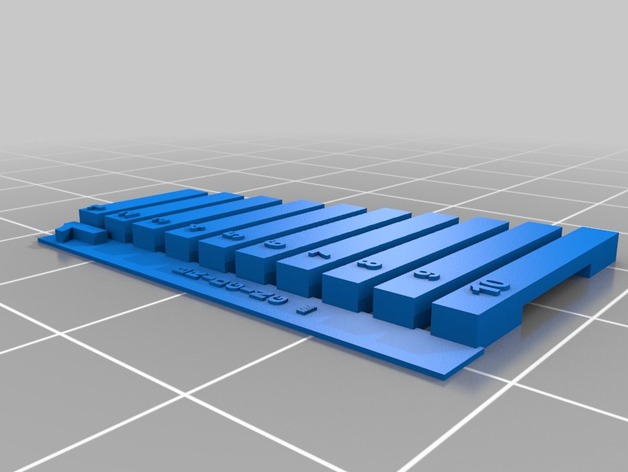
--== WHAT'S NEW? ==-- ADDED 7 NEW TESTS #8 / #9 ADDED FAN LEVITY test pattern REMOVED ZOOMING test FIXED #5 print distortion issue (Layer shift during print) Test Item 1 - FOCUS: 'BRIDGING' : This test is designed to evaluate bridging methods. Starting with a small 0.5mm bridge and increasing up to 12mm, most affordable 3D printers should have no problem printing bridges this big. However, All printers should be able to print a 1mm bridge with ease. So try and gauge where your printer starts failing with bridges and adjust your supports to cover bridges from this length +2 mm. If it starts drooping at 8mm, then you know that your printer's bridging capabilities need improvement. Test Item 2 - FOCUS: 'DELICATE' : This test is one of the hardest tests to perform and should not be attempted until #1 can be completed first. This will show you if your printer can print delicate details without being too hot, or disturbing the print layer below. Sometimes you will see your printer knocking your print when performing delicate prints at certain angles. So when printing this, you are looking for the hot end knocking the print along with warping of the sticks. The offset rings should also print perfectly too.. but where the rings end, you may notice the delicate sticks will start to warp or distort. If this is the case, it's an indicator that you need more external hot end cooling for your printer. Test Item 3 - FOCUS: 'INFILL' : While printing, check your infill and determine if the infill is strong enough and neat enough. There should be minimal stringing during infill. When printed, remove from bed and snap off each vertical riser starting from 4 and going to 1. They all should be equally hard to snap off, but of course the thinner '1' will be the easiest. But never-the-less you still should have to put some considerable effort into snapping them off. If they snap off easily, then this is a sign that the layers are not bonding. See test #1 to help with this. Test Item 4 - FOCUS: 'HEAT' : This test is designed to show you if the hot end is too much for small delicate areas which are worked on a lot. Everyone will have seen this before. A Print is going perfectly and then towards the top of a model where the hot end is just finishing off the top of a dome, point etc.. it all starts going wrong. This model will show you where you need to start switching on external fans to cool it down quicker by giving you a rough guide what to look for. If you can print this all the way to the top perfectly, your hot end heat settings are perfect. But please remember that the bigger parts might cool down too quickly so you will need to use a bit of judgement and external hot end fans. Test Item 5 - FOCUS: 'BRITTLENESS' : While printing, check your infill and determine if the infill is strong enough and neat enough. There should be minimal stringing during infill. When printed, remove from bed and snap off each vertical riser starting from 6 and going to 1. They all should be equally hard to snap off, but of course the thinner '1' will be the easiest. But never-the-less you still should have to put some considerable effort into snapping them off. If they snap off easily, then this is a sign that the layers are not bonding. See test #3 to help with this. Test Item 6 - FOCUS: 'RESOLUTION' : This test will show you if your printer can print at high resolution without any issues. The model should be printed with a layer height of 0.1mm and an infill density of 20%. When printed, check the surface finish and see if there are any stringing or bridging issues. If everything looks good, then your printer's resolution settings are correct. Test Item 7 - FOCUS: 'FAN LEVITY' : This test is designed to evaluate the performance of your hotend fans. The model should be printed with a layer height of 0.2mm and an infill density of 10%. When printed, check if there are any fan-related issues such as overheating or underheating. If everything looks good, then your printer's fan settings are correct. Print Settings Printer Brand: MakerBot Printer: MakerBot Replicator 2 Resolution: High (0.1mm) / Extra High (0.05mm) Infill: 15
With this file you will be able to print 3D Tuning Calibration Print with your 3D printer. Click on the button and save the file on your computer to work, edit or customize your design. You can also find more 3D designs for printers on 3D Tuning Calibration Print.