3Drag Central belt z-axis with trapezoidal leadscrew
thingiverse
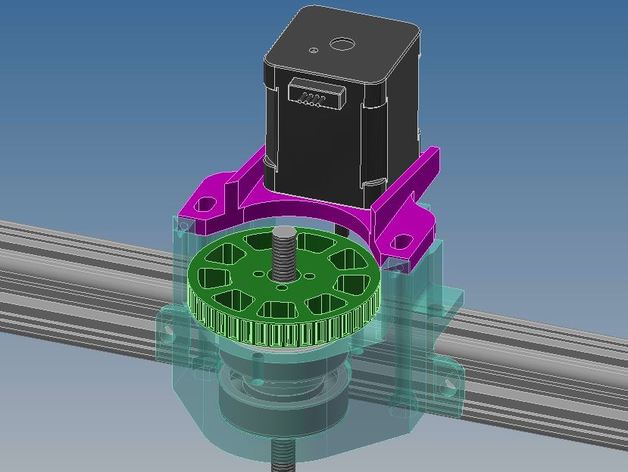
This is a mod of the original central z-axis design for 3Drag by Sgabolab, created as an alternative solution. https://www.thingiverse.com/thing:1496357 NB. Check immediately if your trapezoidal nut fits this design (check with the trapezoidal_nut file in stp or stl format). This design improves the Z-axis of 3Drag from a mechanical standpoint, without increasing electronic resolution. Needed: A trapezoidal lead screw (diameter 8 mm) with length of 40 or 50 cm (8mm/turn). A closed T5 belt of length 245 mm. A 10-toothed T5 pulley. Two skf 6004 ball bearings. Three M5 x 10 mm socket head screws. Ten M5 x 12 mm socket head screws. Two M5 x 70 mm socket head screws. Two M3 x 16 screws. Twelve M5 nuts. Four M3 x 40 mm screws (cut them to size later). Four M3 x 8 mm socket head screws. Four M3 nuts. Four M3 set screws of length 6 or 8 mm. Various M3 and M5 washers. Refer to the images for assembly details. The concept is that the nut rotates, supported by the bearing block, causing the lead screw to move upward in a rigid connection with the Z-axis components (essentially, it's not the lead screw rotating itself but rather the nut). The gear ratio between motor and nut is 4/1, resulting in four turns of the motor corresponding to one turn of the trapezoidal nut. With microstepping set to 1/16, you get: An 8mm/turn leadscrew -> The Z-axis moves 2 mm/turn -> 1600 steps/mm -> 0.625 um/step These configurations have been designed for use with layer heights of multiple 0.01 mm because one full step of the motor corresponds to a movement of 2mm/200=0.01 mm. It is recommended practice to use layer heights that are multiples of the full step of the stepper motor in mm (see http://manual.slic3r.org/troubleshooting/troubleshooting#z-wobble) P.S. Make sure to prevent backward motion of the nut during printing. Also, remember to update your printer's Z-axis steps/mm parameter!
With this file you will be able to print 3Drag Central belt z-axis with trapezoidal leadscrew with your 3D printer. Click on the button and save the file on your computer to work, edit or customize your design. You can also find more 3D designs for printers on 3Drag Central belt z-axis with trapezoidal leadscrew.