3in1 Universal Extruder Upgrade
thingiverse
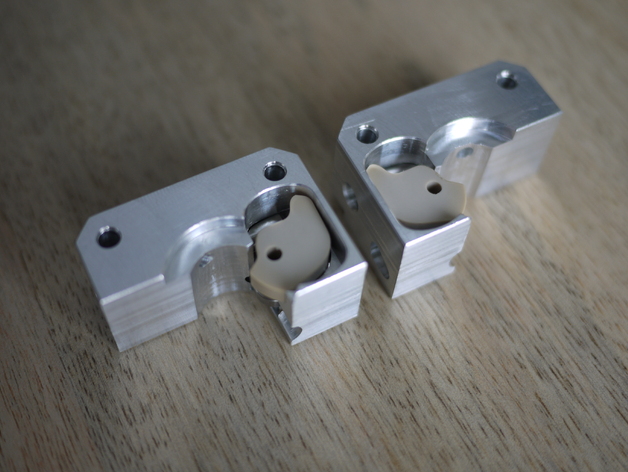
This extruder feeder upgrade replaces the stock mechanism on the following 3 Makerbot Printers (It also fits Wanhao/FlashForge/MagicFirm printers which are similar to the Rep1): Replicator 1 Replicator 2 Replicator 2X More information can be found at www.devilsinthedetails.ca You can download and print the housings and install hardware yourself or order a kit manufactured from billet aluminum and PEEK engineering polymer for long life and durability under extreme temperature (PEEK performs well up to 480*F so it will continue to work if you choose to print ABS/Nylon which requires higher temperatures). Here are some of the features: 1) It employs a bearing to provide even force to the filament as it varies in thickness. This force applied is easily adjustable without the need to replace parts or disassemble anything. 2) It re-positions the stepper motor rearward so that the gripper wheel can engage the flat on the motor shaft. No more need to file the shaft yourself possibly damaging the stepper motor with metal filings in the bearing. 3) It allows easy access for visual inspection as well as tool access in case of a jam which might require scissors to remove the filament. 4) It's also possible to release the bearing pressure easily and quickly to allow filament changes mid-print. 5) It has clearance allowing for adjustment in the vertical height of the thermal barrier tube. See where these extruders are now:http://www.devilsinthedetails.ca/locations.phtml This upgrade began development in April 2013. Since the closure of Makerbot Operators Group, status/feedback can be found here:https://groups.google.com/forum/?fromgroups=#!topic/makerbot-users/Ri2jhFPNPOQ You can see the full development history of this design in this discussion:https://groups.google.com/forum/#!topic/makerbot/SuzXohTGeZs Since then, the design has logged over 2200 hours of printing combined between 2 printers. This upgrade/hardware can be ordered here:http://www.devilsinthedetails.ca Here are some videos showing the upgrade in action (while still in the prototype stage). Prototype Extruder Install:http://www.youtube.com/watch?v=9miwEBzYHlI Filament Load & Unload Process:http://www.youtube.com/watch?v=g9DK7FC_TjU How easy it is to swap filament mid-print:http://www.youtube.com/watch?v=q_rd1E05l4Q Instructions The printable parts can be sliced with the latest Makerware using the following settings: 20% infill 5 shells 0.1mm layer height no rafts/supports Place them on the build surface oriented as shown in the Makerware screenshot. Check out the full instructions on how to install it here: manual-3in1-extruder.devilsinthedetails.ca
With this file you will be able to print 3in1 Universal Extruder Upgrade with your 3D printer. Click on the button and save the file on your computer to work, edit or customize your design. You can also find more 3D designs for printers on 3in1 Universal Extruder Upgrade.