4:1 Planetary Extruder
thingiverse
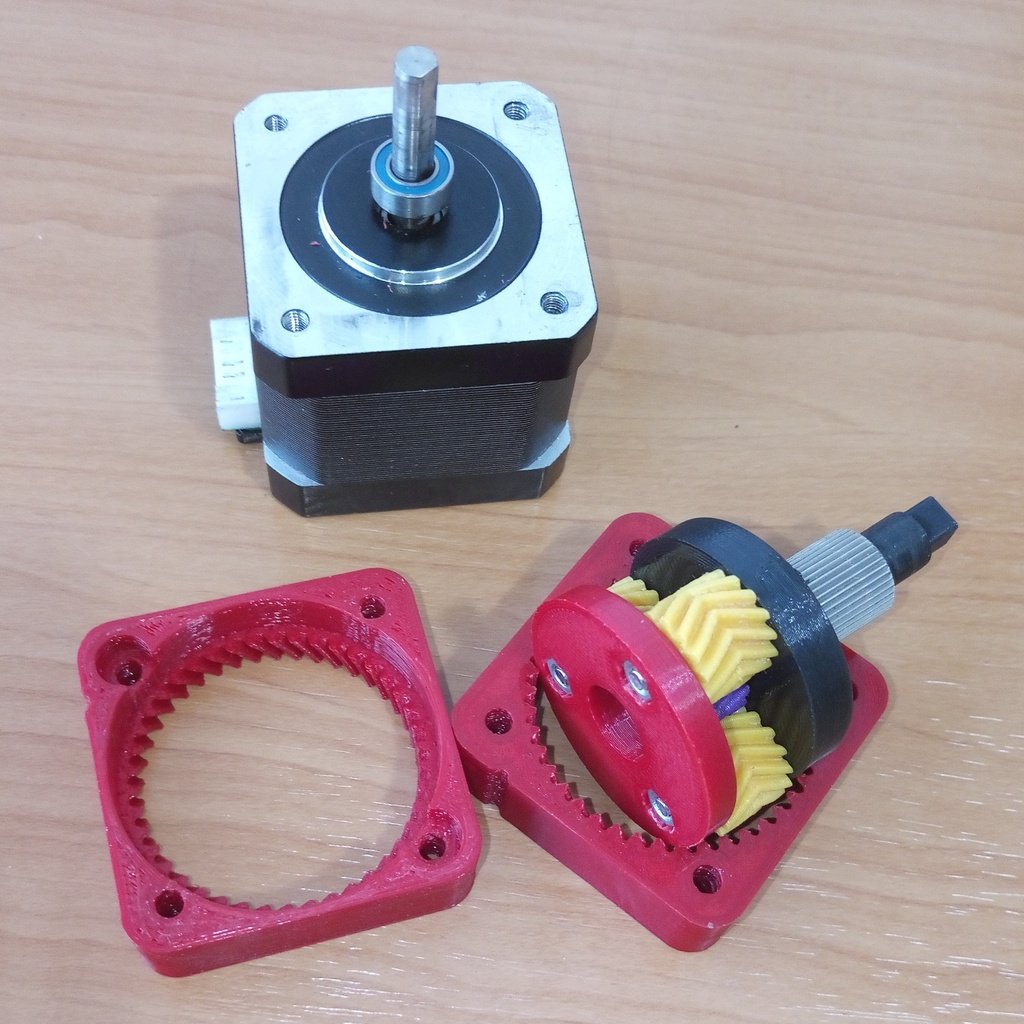
https://youtu.be/dIwERQjJ0wI *If you like to help out with R&D filament to support my procrastination from study and be my first ever patron :-)* https://www.patreon.com/dynagen/ <h3>4:1 Planetary Herringbone Gearbox</h3> Gearset can be used without included extruder <h3>Dual lever arm Extruder - only 11mm thick</h3> Suitable for flexible filaments & easy loading *Amplifies spring pressure* Standard/Mk8 aluminium lever style extruders (supplied with most things) are around 1.6x Rough calcs on this design is around 7x spring pressure. Doesn't deform filament as pressure is exerted on both gear and support bearing, with moving filament position preventing the filament being bent into the drive gear Herringbone gears in a planetary gearbox output 4:1 ratio Sun:14T Planet:14T Ring:42T Input = Sun Output = Planetary Carrier Parts Required: *Gearbox* 1 @ ID8mm Filament Drive Gear 2 @ MR105 bearings Choose either 1 @ 608 / 688 / MR128 Bearing (print suited bracket included. MR128 smallest) 3 @ M3 nuts 3 @ M3 x 20mm 2 @ M3 x 25mm *2 @ M3 x 31mm + thickness of (mount +extruder) see below for length with included extruder *Extruder* 1 @ 686 bearing *2 @ M3 x 42mm + thickness of mount 2 @ PC4-M6 hose fitting 1 @ 8mm x 20mm spring (found in most stock extruders) *Printing Notes* Select tolerance to suit your printer. "Tol00" < 0.1mm "Tol01" 0.1 - 0.2mm (to be added) "Tol02" > 0.2 (to be added) Print SunGear & PlanetPlateTop to gauge tolerance requirements Must use BearingBracket if only using gearset Tolerances can be interchanged to suit. 0.1mm differences All items have 0.4mm chamfers on lower edge so there is low concern of 'elephant foot' causing tolerance issues LAYER HEIGHT 0.1mm or lower INFILL Print All items at 100% infill, fill small gaps, etc RingGear & BearingBracket may be printed at 20% infill SUPPORT Only use support on; PlanetPlateTop, BearingBracket, ExtruderHead *Installation* -Check; planet gears rotate on PlanetPlateBase. Should be a tiny amount of resistance. SunGear is tight on motor shaft Filament drive gear is snug on PlanetPlateTop If too tight or too much slop, print different tolerance part. Tolerances interchangeable. -Place Planet and Sun gears upside down(from printed orientation) on a flat surface and arrange into planetary gear design. -Insert PlanetPlateBase into all 3 gears simultaneously. This can be lifted from the table with the sun gear captured in the centre -Use 20mm screws to pull nuts into place. Should be flush or very close -Place PlanetPlateTop onto gearset and install all 3@M3 x 20mm screws -Place RingGear with "DYN" onto stepper motor -Take note of SunGear hole orientaction and push gearset onto stepper motor shaft until fully engages RingGear -Place RingGear_MIR onto gearset. Align writing and notch in side. If not aligned, reset again -Insert 1 or 2 @ M3 x 25mm screws in diagonally opposed holes. These are not critical. Please consider if they will interfere with the extruder head and the desired final orientation of the motor connector *Notes* *Edit 13/10/19* BearingBracket_608 replaced. Incorrectly set bearing width to 6mm. Corrected to 7mm. Additional 1mm spacer provided. If the extruder is mated directly to the Planetary Gearset, use the spacer between to prevent extruder pins falling into gears. Some stepper motors do not have the flat shaft far enough down to accommodate the SunGear. Spacers can be used to resolve. *Edit 14/10/19* Updated ExtruderHead to suit 8mm x 20mm spring Added additional 06.Spacer_1mm to sit under extruder head. Old spacer still included to suit under planetary gearbox if needed
With this file you will be able to print 4:1 Planetary Extruder with your 3D printer. Click on the button and save the file on your computer to work, edit or customize your design. You can also find more 3D designs for printers on 4:1 Planetary Extruder.