4020 Fan for Ender 5+ (Plus) W ExoSlide and Micro Swiss
thingiverse
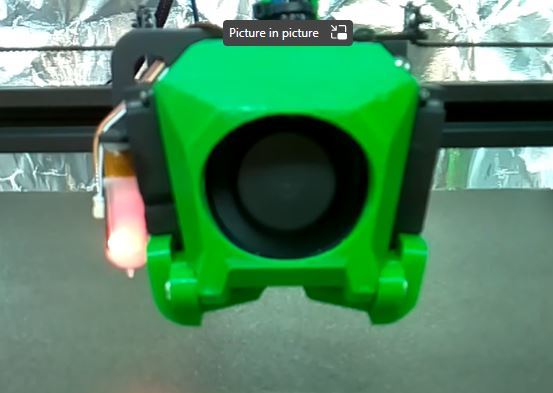
This is a remix of Schnabulation's remix, but based on the originator's second version design. It is specifically designed to fit an Ender 5+ with 4020 hotend fan, Micro Swiss hotend, and the ExoSlide gantry upgrade. Not sure if anyone else out there has that setup, same as me, but if not, you might be able to mod my mod for yourself... Changes made: Main Fan Cover was extended to accommodate 4020 fan. Removed screw channels originally designed to connect fan cover to Ender 3 stock backplate. Added pegs to hold 4020 fan in place. (Will be very solid once installed with the heatsink duct). Added integrated hotend wire/bowden support. Created screw hole as connection point for use with center hole on ExoSlide backplate. Completely redesigned the dual ducts to fit ExoSlide gantry with BL touch. Modified the heatsink duct to accommodate Micro Swiss hotend. Please be aware that this will only fit a 4020 fan, dual blowers, with ExoSlide and BL touch. It was designed specifically for my rig, with my mods, but since I put the work into it, I thought someone else might also find it useful. I have included the Fusion 360 file so that you can modify my remix, if you'd like. To assemble, remove all your hotend paraphernalia and begin with a clean ExoSlide backplate. Position/attach the BL Touch bracket first, then attach the blower ducts by pressing the holes over the mounting points for the hotend. Then, attach to the backplate/blower duct combo to the ExoSlide using the factory mounting points. The screws will countersink enough not to interfere with your blower fans. Attach hotend and the heatsink duct. Position the blower fans, but do not attach them to the main fan housing yet. Feed the hotend/extruder wires/bowden tube/fan wires carefully through the opening on the main fan cover, left for that purpose. Work an appropriate length M3 screw through the hole beneath the wire support and affix it to the backplate (top, center hole) with a nut. (Alternatively, you can use a tap set to thread the hole in the backplate for an M4 screw, which is what I did. Either way will work). Lastly, attach the blower fans with two small screws (each) to the holes provided and attach the main fan cover to the blower ducts with two screws. Work your zip ties through the channels in the support and secure your hotend wires/tubes. Should take about 20-30 mins to finish the mod, and it is probably worthwhile to do a PID cal afterward, especially if you are including this in a more comprehensive hotend rebuild. All of this stuff basically only fits one way, and I think it is pretty intuitive, but if you have questions, I'll be happy to help out. Be sure to block supports in the zip-tie channels. I recommend printing the blower ducts in PETG, if not ABS, due to the close proximity to heat.
With this file you will be able to print 4020 Fan for Ender 5+ (Plus) W ExoSlide and Micro Swiss with your 3D printer. Click on the button and save the file on your computer to work, edit or customize your design. You can also find more 3D designs for printers on 4020 Fan for Ender 5+ (Plus) W ExoSlide and Micro Swiss.