40mm Fan Dust Filter
thingiverse
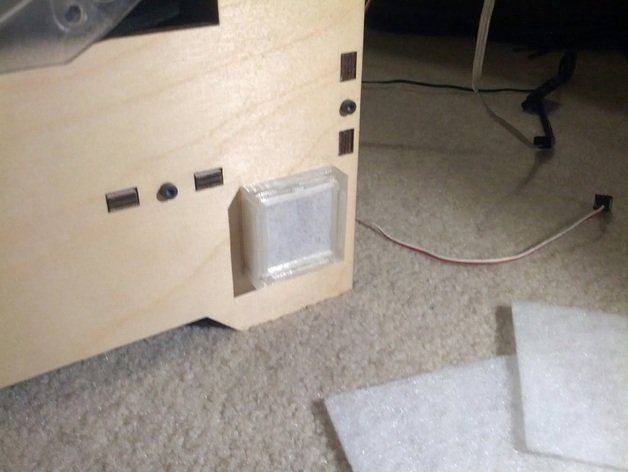
I created this dust filter for the fan under the replicator 1 for cooling the electronics but it can be mounted on any 40mm fan directly or otherwise for any application. I moved the fan so it was flush agents the inside and dremeled a 40mm hole on the side for the intake. I then built this filter which covered it on the outside. The 4 screw holes match that of a 40mm fan. Adding filters to intake fans are a good idea and will reduce or eliminate the need for you to clean your fans, heat sinks or electronics from dust, hair, and fur. Dimentions: 40mm x 40mm x 11.5mm Instructions Print 1 of each part. My print settings: Layer Height: 0.20 mm Infill: 13% number of shells: 2 Extruding speed: 70mm/s Cut and snap material between the 2 frame parts. I used some sort of vacuum air filter you can also used mosquito net folded onto itself 2 or 3 times. place the frame insert over the material and use it as a guide for cutting place material into the frame body, then press/snap the frame insert over the material. some extra force may be necessary on the corners Screw filter housing onto fan or service where you want to mount you can use your fans existing screws if long enough, or slightly longer M3 screws. Insert filter frame clean/replace filter as needed If you are doing what I did and wish to improve your replicators electronics cooling fan do the following: Disclaimer: The following steps requires that you cut/drill in to the replicators right side wood panel. Do so with care, and I'm not responsible for any damages. tilt printer backwards so it lays on the back side after removing the spool holders and unplugging it. unscrew and remove bottom electronics wood cover (one screw on the lower center of the right wood panel) clean out any dust/hair if any. unscrew and detach the fan from the electronics and line it up on the outside with the screw holes (using the screws helps) Use a pencil to trace the diameter of the fan, should be about 36mm in diameter and mark the 2 upper screws if you wish to use those. remove the fan use a dermal to carefully cut the 36mm diameter hole for the fan intake. mount the filter housing on the outside and the fan flush agents the wood on the inside. the existing screw threads should go back far enough to use, if not cut the spacers in half or use some washers. reassemble everything and place the filter frame with material, in the filter housing.
With this file you will be able to print 40mm Fan Dust Filter with your 3D printer. Click on the button and save the file on your computer to work, edit or customize your design. You can also find more 3D designs for printers on 40mm Fan Dust Filter.