440 MHz / 70 cm Ham Radio Eggbeater Antenna
thingiverse
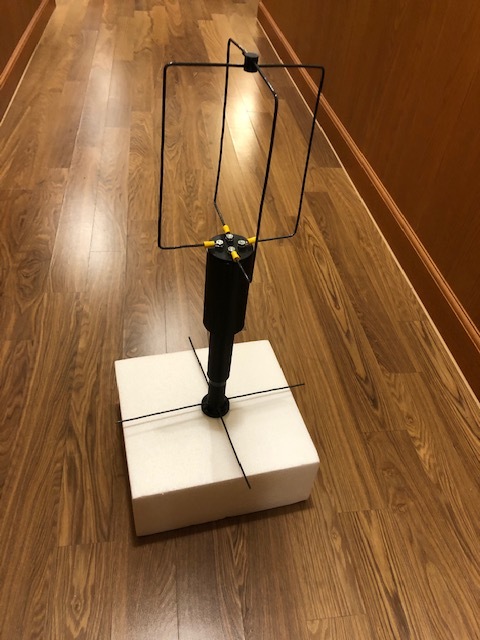
These are the components I designed to assemble a circularly polarized eggbeater antenna to work the low Earth orbit satellites. This is only the body. The design is a hybrid adapted from specs by both ON6WG and WB5RMG, links below. An additional link is provided where ON6WG describes a more simplified phasing line made with common RG-58 coax. WB5RMG describes the benefit of using rectangle shaped elements instead of loops. Even though I provide some dimensions in my graphics, you must do your own math to get your desired results. The articles walk through all that. The materials I used was just standard 12 gauge housing electrical wire for the antenna elements with lug connectors soldered on the ends, and 5mm screws with lock washers long enough to attach the antenna element lugs on top of the cap and the matching/phasing lines underneath the cap. I recommend just taping the tubes together until you get the dimensions you want and then glue it all together, except for maybe the top cap. You want to be able to maintain access the internal wiring. I made two small holes at the top of the main body where you can secure the cap with sheet metal screws or similar. Print off two of the "Eggbeater Lower Top Bottom Wide". One of them inserts through the inside of the "Eggbeater Body Wide", and protrudes out the bottom. The other piece of "Eggbeater Lower Top Bottom Wide" is flipped the other way so that the small holes are at the far end. Insert two reflector elements through these two small holes. My printer could not print a tube long enough for the proper distance of the reflector elements, so I had to print it in three parts, two pieces of the "Eggbeater Lower Top Bottom Wide" and one "Eggbeater Lower Tube Wide". The "Eggbeater Lower Tube Wide" is simply a hollow tube to connect the two pieces of "Eggbeater Lower Top Bottom Wide." Hopefully this isn't too confusing, but refer to the photo and it should make sense. As to all electrical lengths and configuration I defer to the two reference articles, below. The "Eggbeater Body Wide" is designed thicker in the lower half and I recommend fixing any mounting pole to that area. My suggested order of construction Insert one of the "Eggbeater Lower Top Bottom Wide" tubes into the cavity of the "Eggbeater Body Wide", so that the tube extends out the bottom and the collar is holding the tube in the body. Fix that one in place with glue or adhesive. Slide the "Eggbeater Lower Tube Wide" over the part of the "Eggbeater Lower Top Bottom Wide" tube that is extending out of the bottom of the main body. Tape it in place. DO NOT GLUE in place yet, because you will probably have to adjust. Slide the second "Eggbeater Lower Top Bottom Wide" tube into the bottom side of the "Eggbeater Lower Tube Wide" and tape in place. Insert the two reflector wires into the perpendicular holes on the "Eggbeater Lower Top Bottom Wide" tube at the bottom and fix in place so they are centered in the tube. At this point it's just a matter of creating your coax feedline and the phasing line. The coax feedline goes right through the center of all the tubing and the phasing line should fit nicely in the main body cavity. Attach the feedline and phasing line to the bolts on the bottom side of the "Eggbeater Cap". See the ON6WG article for correct connection to achieve the desired polarization. Basic antenna design: https://on6wg.pagesperso-orange.fr/Doc/Antenne%20Eggbeater-Engl-Part1-Full.pdf Modified rectangle elements: http://wb5rmg.somenet.net/k5oe/Eggbeater_2.html ON6WG's simplified phasing match: https://on6wg.pagesperso-orange.fr/Doc/Eggbeater-Ant-Revisited-English.pdf
With this file you will be able to print 440 MHz / 70 cm Ham Radio Eggbeater Antenna with your 3D printer. Click on the button and save the file on your computer to work, edit or customize your design. You can also find more 3D designs for printers on 440 MHz / 70 cm Ham Radio Eggbeater Antenna.