4th Gen Toyota 4Runner (2003-2009) | Wireless Charging
prusaprinters
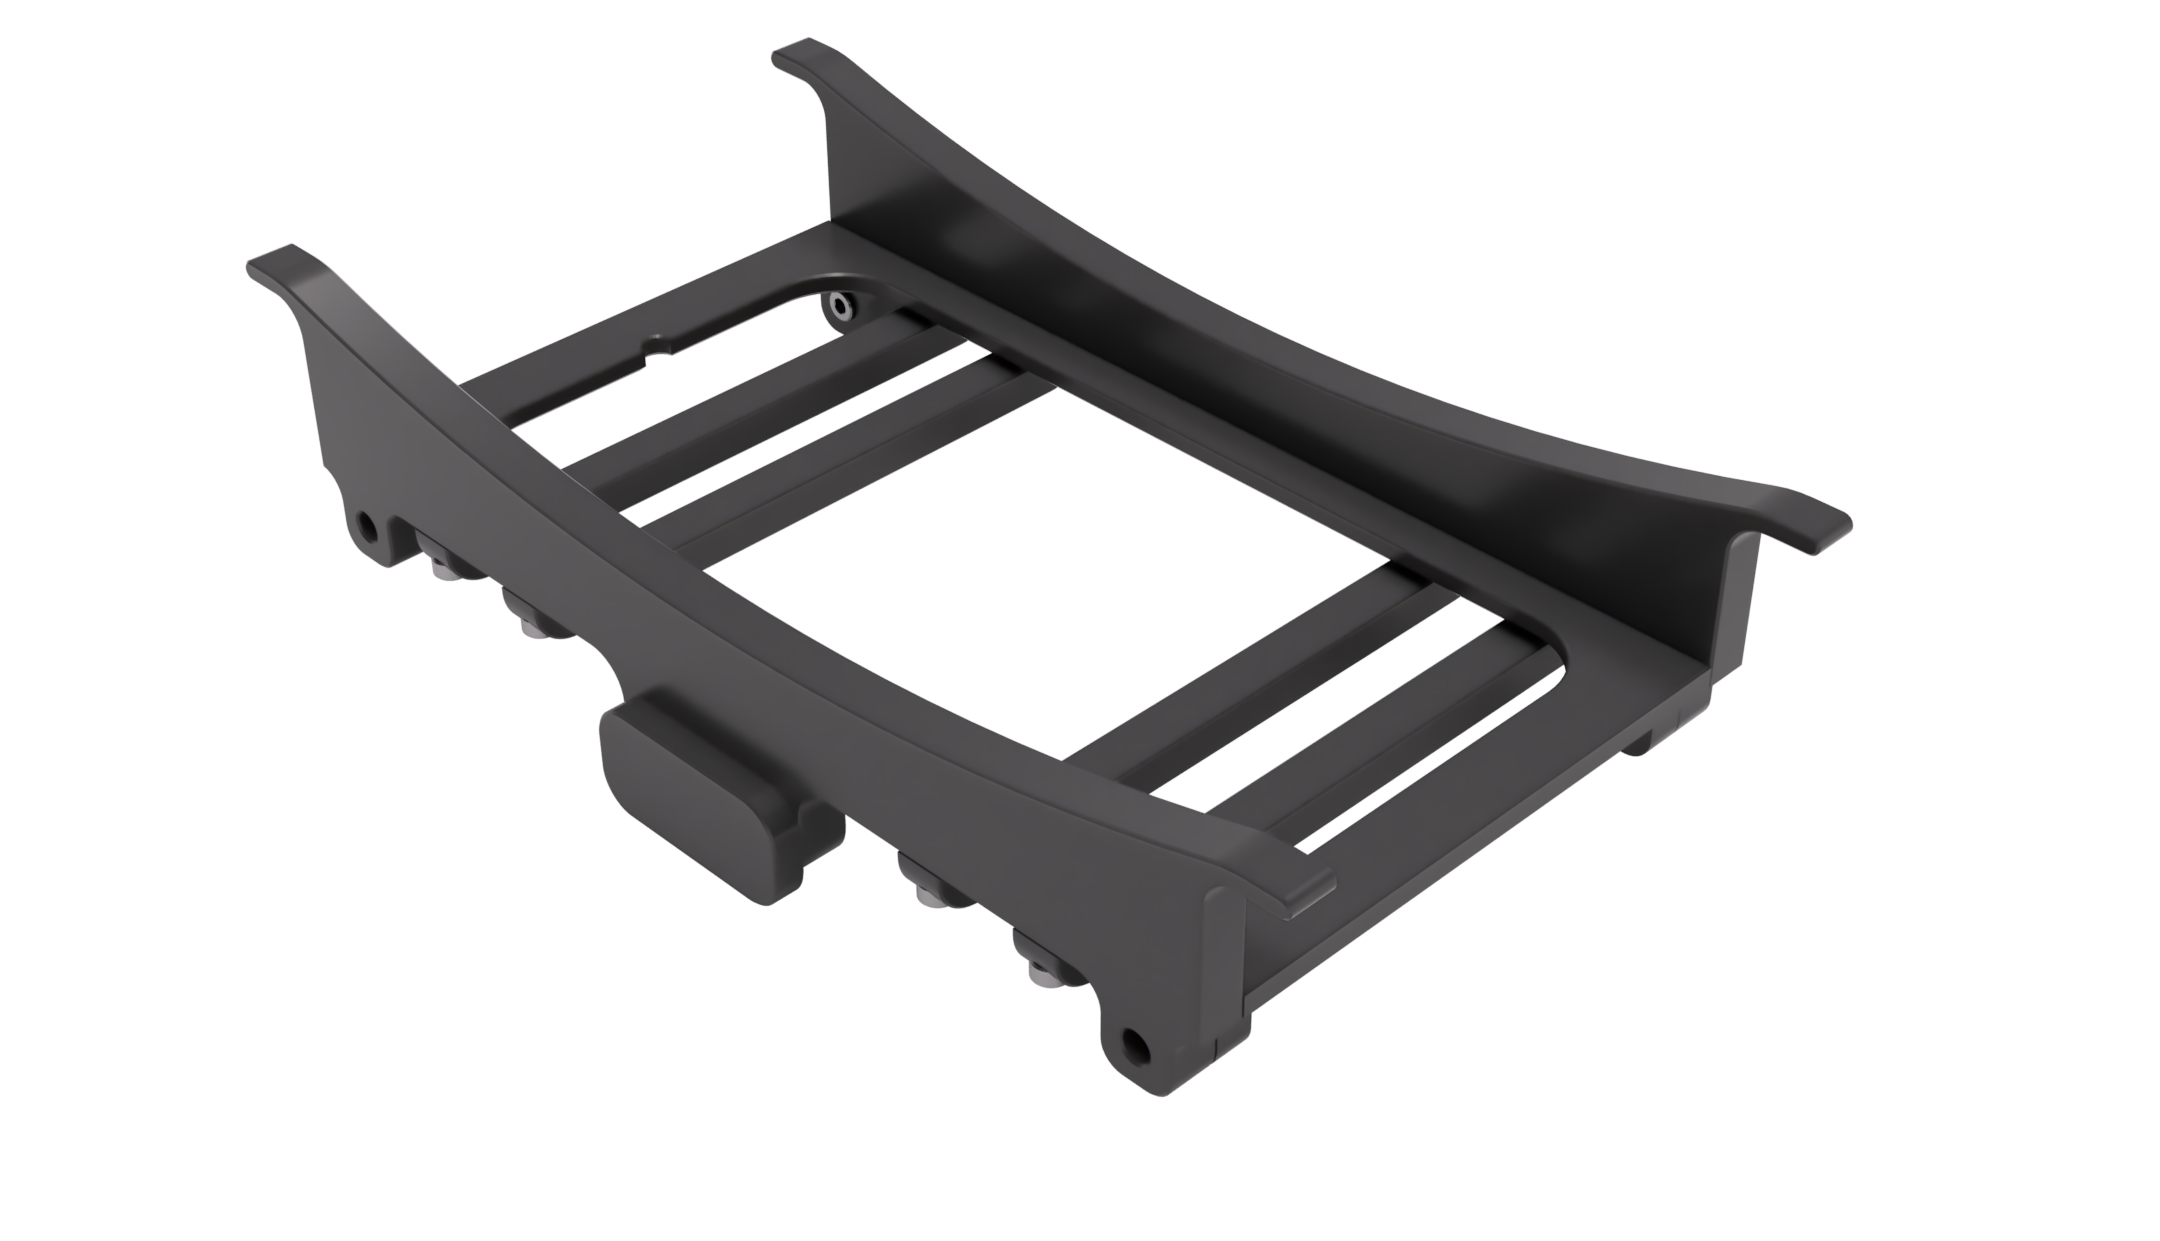
<p>Add wireless charging to your 4th Gen 4Runner (2003-2009)! </p><p>Fully assembled kits and/or printed parts can be <a href="https://www.etsy.com/listing/1294081626/4th-gen-toyota-4runner-2003-2009">purchased on Etsy</a>.</p><p>There are two options with this design. You can have 1 or 2 chargers in the center console. It is designed such that no reprinting is needed if you would like to add a second charger in the future. </p><p>The coin dispenser cannot be mounted in the center console at the same time as using the charging tray. Let's be real though… most people have already lost that thing long ago!</p><p>Depending on your vehicles trim level, is whether or not there is an option to plug in the charging pad/s inside the center console. My vehicle is the base SR5 so I had to add a <a href="https://www.amazon.com/dp/B07L9QST54?psc=1&ref=ppx_yo2ov_dt_b_product_details">USB charger</a> into the center console to remove the need to route the cables outside the console. </p><p>The tray is held in place by magnets. This is to ensure the tray does not slide around and to provide the proper 6mm offset from the front so the lid of the center console closes without force or the need to adjust the tray each time. </p><p>This design also takes the tissue box holder into account and has the proper clearances if that is being utilized in the center console lid. </p><p>The charging area is <strong>177.5mm x 91.7mm</strong>. This should be able to accommodate even the largest phones with cases. To maintain clearances with the lid the phone/device should not be thicker than <strong>12.8mm</strong>. Thicker devices, like AirPods, will work but may need to use the front charger in a dual charger setup. </p><h4>Design Goals:</h4><ul><li>No Supports!!!</li><li>Clean aesthetics</li><li>Modular design for faster prototyping and future updates</li><li>No requirement for permanent modifications to the vehicle itself</li><li>Utilize otherwise dead space</li><li>Keep a stock look to the vehicle</li><li>Easily removable/serviceable</li></ul><h4>Bill of Materials:</h4><ul><li><a href="https://www.aliexpress.com/item/2255800046543591.html?spm=a2g0s.9042311.0.0.21164c4dGhWHhY&gatewayAdapt=4itemAdapt">Heat Set Inserts (M3x5x4)</a> (<a href="https://kb-3d.com/store/inserts-fasteners-adhesives/278-brass-heat-set-threaded-insert-for-plastic-m3x5x4mm.html">USA Option</a>)<ul><li>Single charger <strong>qty: 12</strong></li><li>Dual charger <strong>qty: 24</strong></li><li><a href="https://www.amazon.com/Heat-Set-Corresponding-Inserts-Compatible-Connecting/dp/B09JSKY52V/ref=sr_1_4?keywords=heat+set+insert+tip&qid=1660860850&sprefix=heat+insert+too%2Caps%2C71&sr=8-4">Heat insert tool</a> (Optional)</li><li><a href="https://kb-3d.com/store/tools-equipment/400-ldo-m3-heatset-insert-tool-kit-1639077653902.html">Kit option</a> (Includes tool and heat inserts)</li></ul></li><li><a href="https://www.amazon.com/dp/B089VVG3ZP?psc=1&ref=ppx_yo2ov_dt_b_product_details">JADJ Wireless Charging Pad</a><ul><li>Single charger <strong>qty: 1</strong></li><li>Dual charger <strong>qty: 2</strong></li></ul></li><li><a href="https://www.amazon.com/gp/product/B00HA2ARZO/ref=ppx_yo_dt_b_search_asin_title?ie=UTF8&th=1">8mm x 3mm magnets</a><ul><li><strong>Qty: 4</strong></li></ul></li><li><a href="https://www.amazon.com/Socket-Screws-Machine-Thread-Quantity/dp/B07NTG92SL/ref=sr_1_1?keywords=m3x8+shcs&qid=1660863368&sprefix=m3+x8+shc%2Caps%2C80&sr=8-1">M3 x 8mm SHCS Screws</a><ul><li>Single charger <strong>qty: 12</strong></li><li>Dual charger <strong>qty: 24</strong></li></ul></li><li><a href="https://www.amazon.com/Double-Mounting-Waterproof-Outdoor-Black%EF%BC%8C1/dp/B08T1HB5LJ/ref=sr_1_3?crid=2EDIIB49OAGUO&keywords=VHB+tape&qid=1660863704&sprefix=vhb+tape%2Caps%2C78&sr=8-3">~37mm VHB Tape</a></li><li>CA/Super glue</li></ul><h4> Printed Parts List:</h4><ul><li><strong>4runner_side_support_with_magnet.stl</strong><ul><li>Only 1 for both options</li></ul></li><li><strong>4runner_side_support.stl</strong><ul><li>Dual charger <strong>qty: 2</strong></li></ul></li><li><strong>4runner_charging_pad_mount.stl</strong><ul><li>Dual charger <strong>qty: 2</strong></li></ul></li><li><strong>4runner_charging_pad_support_x4.stl</strong><ul><li>Dual charger <strong>qty: 8</strong></li></ul></li><li><strong>4runner_magnet_base_center_console.stl</strong></li></ul><h4>Print Settings:</h4><ul><li>ABS Recommended</li><li>PETG should work but is untested. </li><li>PLA may not be suitable in certain climates.</li><li>4 Perimeters/walls</li><li>40% infill</li><li>0.4mm line width</li><li>Parts are pre oriented in the correct position for printing</li><li>No supports</li></ul><h4><strong>Parts Breakdown/Assembly:</strong></h4><ul><li><strong>Heat inserts/Hardware</strong><ul><li>You can use a soldering iron and a standard tip to press the inserts into place. The heat insert tool makes that process a bit easier. </li><li><a href="https://www.youtube.com/watch?v=cyof7fYFcuQ">This is a short how to</a> on how to install a heat insert into a printed part. </li></ul></li></ul><figure class="image"><img src="https://media.printables.com/media/prints/261485/rich_content/644f18d9-f262-42f2-ac77-4aae570ef294/2022-08-18_15-08.png#%7B%22uuid%22%3A%2287160fb2-e9f4-4bc2-939a-c4df618452d9%22%2C%22w%22%3A1190%2C%22h%22%3A1872%7D"></figure><figure class="image"><img src="https://media.printables.com/media/prints/261485/rich_content/7dd63246-56ef-4d7d-b1c9-f07c3747b166/2022-08-18_15-09.png#%7B%22uuid%22%3A%226234b069-0de3-459f-808f-cddca43c30e9%22%2C%22w%22%3A2510%2C%22h%22%3A1708%7D"></figure><figure class="image"><img src="https://media.printables.com/media/prints/261485/rich_content/8ea4e276-5834-41bb-9a86-bd26ca7862c6/2022-08-18_15-01.png#%7B%22uuid%22%3A%22762748ff-e180-4fb8-8f71-815be93d307d%22%2C%22w%22%3A2314%2C%22h%22%3A1902%7D"></figure><figure class="image"><img src="https://media.printables.com/media/prints/261485/rich_content/66cc095e-8873-402d-8a98-233dfe2d06db/2022-08-18_15-02.png#%7B%22uuid%22%3A%224c221462-3cd7-4778-9f16-8d10b34aaf7c%22%2C%22w%22%3A2318%2C%22h%22%3A1698%7D"></figure><ul><li><strong>Charging pad installation</strong><ul><li>There is a notch at the top of the charging pad for the USB cable that exits the pad.</li><li>The printed parts list calls for 4 supports for each pad. You can use 2 per pad but the tray feels a bit more sturdy with all 4. </li><li>With the tray up side down you can place the charging pad into the opening and then add the bottom supports. They should be snug to the back of the charging pad and press into it slightly.</li></ul></li></ul><figure class="image"><img src="https://media.printables.com/media/prints/261485/rich_content/ad8d3724-49bf-47d4-8067-f40d0978600e/2022-08-18_19-53_1.png#%7B%22uuid%22%3A%22bddcaf16-31e5-415a-98e5-0cc9437db735%22%2C%22w%22%3A1830%2C%22h%22%3A1260%7D"></figure><figure class="image"><img src="https://media.printables.com/media/prints/261485/rich_content/1cd5bc9b-e72c-4524-bedd-264ab83ef5a9/2022-08-18_14-59_1.png#%7B%22uuid%22%3A%2265c9c571-8857-4f13-9570-c56bcfe4cd5f%22%2C%22w%22%3A2858%2C%22h%22%3A2010%7D"></figure><ul><li><strong>Base magnet (Center console side)</strong><ul><li>Install the magnets on the side support and the center console magnet base to ensure N/S is correct. Apply a small drop of CA/super glue so the magnets will not slip out. </li><li>Then apply the VHB tape to center console side. Trim the VHB tape to fit. </li><li>Wait to mount the center console magnet base until the tray is fully assembled. </li><li>To install the console magnet side. Leave it magnetically attached to the tray. Insert the tray. Remove the VHB peel and press it into the front of the console</li><li><strong>Note: The center console magnet base will be offset from the base of the side mount. Check the images bellow. </strong></li></ul></li></ul><figure class="image"><img src="https://media.printables.com/media/prints/261485/rich_content/a5f2c7f6-bfce-4c14-8ee1-06ece088422f/2022-08-18_22-25.png#%7B%22uuid%22%3A%22fc458f06-a0c9-43e1-9e9a-6087a1ac715e%22%2C%22w%22%3A3252%2C%22h%22%3A1704%7D"></figure><figure class="image"><img src="https://media.printables.com/media/prints/261485/rich_content/b24e4494-3824-4ca0-a9ae-503bfbff0f29/img_5507-copy.jpg#%7B%22uuid%22%3A%2209935148-04b3-42d0-84cc-6db3a1e2be25%22%2C%22w%22%3A2464%2C%22h%22%3A2632%7D"></figure><figure class="image"><img src="https://media.printables.com/media/prints/261485/rich_content/06bc9953-fe06-4333-9c21-2a25c04b8a4a/img_5649-copy.jpg#%7B%22uuid%22%3A%2218279899-0219-4a43-ae35-3590152c083a%22%2C%22w%22%3A4032%2C%22h%22%3A2744%7D"></figure><figure class="image"><img src="https://media.printables.com/media/prints/261485/rich_content/98cf9131-7006-4f33-8348-45f623b76fe4/2022-08-18_18-01.png#%7B%22uuid%22%3A%22d4fa5fde-53bc-4899-b7e6-4346ab6da3e9%22%2C%22w%22%3A3166%2C%22h%22%3A1242%7D"></figure><figure class="image"><img src="https://media.printables.com/media/prints/261485/rich_content/137793d4-ae9b-448b-a046-452cc3af1591/2022-08-18_18-00.png#%7B%22uuid%22%3A%22c58fe09c-3795-42be-bb6d-04ed570034fe%22%2C%22w%22%3A2266%2C%22h%22%3A938%7D"></figure><figure class="image"><img src="https://media.printables.com/media/prints/261485/rich_content/4ccd5a99-22de-4841-b397-7be6f5f5ae05/2022-08-18_15-00_2.png#%7B%22uuid%22%3A%22c6b8263a-03cd-4833-b9b4-7263fc9ee1d9%22%2C%22w%22%3A2850%2C%22h%22%3A1974%7D"></figure><h4><strong>Fully Assembled:</strong></h4><figure class="image"><img src="https://media.printables.com/media/prints/261485/rich_content/93c2c905-2d08-4cc0-b38f-fc7c5428413a/d510bbeb-0198-4919-934e-dd6bee5ced31.png#%7B%22uuid%22%3A%228f2e2856-5eee-431b-83c6-230a845faff1%22%2C%22w%22%3A2160%2C%22h%22%3A1241%7D"></figure><figure class="image"><img src="https://media.printables.com/media/prints/261485/rich_content/fbec85d1-d841-4c45-a18f-be2607c3aaaa/4runner_center_console_charge_pad_assembly_2022-aug-18_06-49-27pm-000_customizedview35021852936.png#%7B%22uuid%22%3A%22f787c594-5fdc-4c59-91ee-7c132fb9d4fb%22%2C%22w%22%3A2160%2C%22h%22%3A1241%7D"></figure><figure class="image"><img src="https://media.printables.com/media/prints/261485/rich_content/72368598-2e8b-4963-a40d-bef07c582f6a/4runner_center_console_charge_pad_assembly_2022-sep-20_04-33-35pm-000_customizedview19534916224.png#%7B%22uuid%22%3A%226b32a9aa-974f-48d9-9e21-538b8ab6f409%22%2C%22w%22%3A1656%2C%22h%22%3A970%7D"></figure><figure class="image"><img src="https://media.printables.com/media/prints/261485/rich_content/a8bec07e-b71d-42b5-ba04-ee00e2ad061e/4runner_center_console_charge_pad_assembly_2022-sep-20_10-21-35pm-000_customizedview11178105033.png#%7B%22uuid%22%3A%2232402b23-2eb4-439f-870b-3ec2825056be%22%2C%22w%22%3A2032%2C%22h%22%3A1191%7D"></figure><figure class="image"><img src="https://media.printables.com/media/prints/261485/rich_content/8e3641b0-e10b-4b27-970c-0a072b00a809/img_5501-copy.jpg#%7B%22uuid%22%3A%227301e639-a853-4c14-be76-21a49252f38b%22%2C%22w%22%3A4032%2C%22h%22%3A3024%7D"></figure><figure class="image"><img src="https://media.printables.com/media/prints/261485/rich_content/4f432832-ba0c-4995-8bc9-297f8f3c5601/under_supports.jpg#%7B%22uuid%22%3A%221364dd2a-efba-4389-83f7-5f796d5f7b82%22%2C%22w%22%3A3373%2C%22h%22%3A3024%7D"></figure>
With this file you will be able to print 4th Gen Toyota 4Runner (2003-2009) | Wireless Charging with your 3D printer. Click on the button and save the file on your computer to work, edit or customize your design. You can also find more 3D designs for printers on 4th Gen Toyota 4Runner (2003-2009) | Wireless Charging.