5 Gallon Bucket Dust Separator
thingiverse
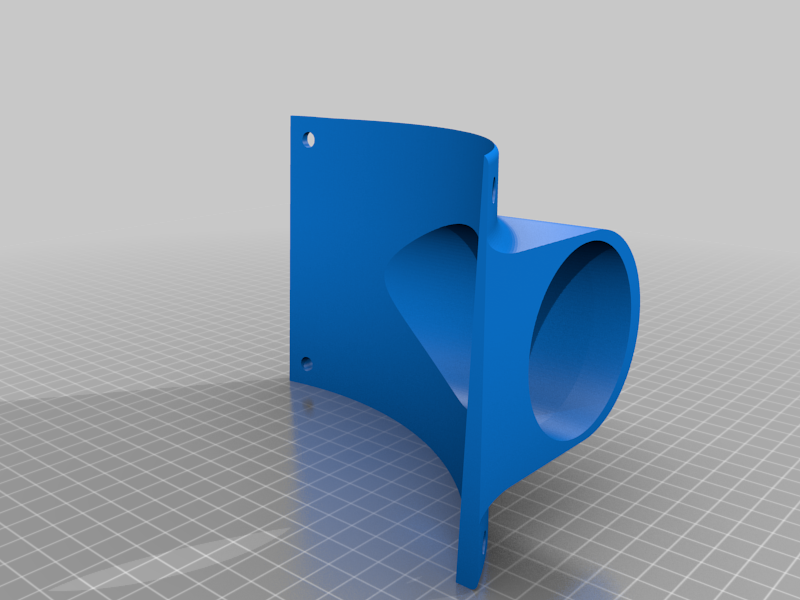
This is a Thein Baffle-type dust separator which can be built extremely cheaply, in one visit to a local hardware store. It uses a 5 gallon bucket as the main dust chamber, and a 3.5 gallon bucket as the thein baffle chamber. There's no precise measurements required for this, assuming your vacuum hose dimensions match mine - if not, my Fusion files are included for you to resize. This separator does an excellent job with both large chips and smaller sawdust particles, but will obviously still require a filtered vacuum for extremely small airborne dust particles. You can optionally use two unthreaded flanges (instead of a threaded flange, an unthreaded flange, and a threaded vacuum adapter) if your shop already has a 4" dust collection setup - but I suspect that if you have that set up, you probably won't need to build a separator out of buckets. ## Parts required: - 1x 5 gallon bucket - 1x 3.5 gallon bucket (you might be able to use another 5G bucket here, but the smaller one is generally cheaper and is less wasteful) - 2x 12" (standard size) bucket lids - 12x 1/4"-20 x 1/2" machine screws (or M6) - 12x 1/4"-20 nuts (or M6) - a bag or two of hot glue sticks ## Tools required: - a sharp utility knife - a permanent marker - 1/4" (or 6mm) drill bit and drill - a hot glue gun - a flexible tape or string (just for measuring a clean line around the outside of the bucket) - a piece of cardboard scrap about 4" long (more on this later) ### Optional quality-of-life tools: - Dremel rotary tool or comparable with cutting disk - a sharp chisel - a small piece of coarse sandpaper ## Critical measurements: - Bucket inlet hose adapter is 2.275" (fits Craftsman hoses) - Bucket outlet hose adapter is 1.75" (fits VacMaster hoses) - Bucket outlet flanges are 4" OD - Bucket outlet threaded flange is M100x2 - in case you want to make an adapter for other vacuums # Assembly ## Print instructions You should only need one of each included STL. I printed mine on an Ender 3 Pro with a 1.0mm nozzle in PLA+, but these designs should be tolerant to other materials and nozzle sizes. You will want to rotate the bucket inlet to print with the flat side (with the circular hole) against the plate. ## Outlet Lid 1. Center an outlet flange on one bucket lid. Mark the locations for all of the screw holes with your marker and drill them. 1. Loosely bolt one of the flanges to the bucket lid using your freshly-drilled holes and trace along the inner circumference of the flange with the marker. This ensures that the hole you cut out will line up with the flanges once assembled. 1. Cut out the large center hole with your utility knife or rotary tool. Assemble as follows: 1. Threadless flange mounts on the inside of the lid, with the flat face against the bucket lid 1. Threaded flange mounts on the outside of the lid, with the flat face against the bucket lid (sandwiching the lid between the flanges) 1. Bolts go through both flanges and the lid, tighten down nuts to secure 1. Threaded vacuum adapter screws on to the threaded flange After assembling, you can trim the inner hole with a utility knife or chisel if it does not align perfectly with the flanges. ## Inlet flange Note: the top of the inlet is the thinner side - the bottom is thicker. 1. Hold the inlet up to the 3.5 gallon bucket and align it with the underside of the first ring, approximately 1" from the top of of the bucket. You will notice that the second ring (which holds the handle of the bucket) prevents the inlet from sitting flush against the bucket. Mark the size of the inlet against that second ring and then use your utility knife or rotary tool to remove it from the body of the bucket. After this step is complete, you should be able to hold your inlet flush against the bucket aligned with the underside of the first ring. 1. While holding the inlet flush against the first ring mark locations for the screw holes on the bucket, then drill them. 1. Loosely bolt the inlet to the bucket to hold it in place. Use your marker to trace the outline of the teardrop shape it makes on the outside of the bucket, through the inlet hole. This step does not need to be perfect. 1. Remove the inlet from the bucket. Using your utility knife or dremel, cut out the teardrop shape you traced. 1. Loosely bolt the inlet on again and use your utility knife or chisel to trim the hole from inside the bucket so it aligns cleanly with the inlet flange. Remove the flange when finished. Assemble as follows: 1. Scuff the outside of the bucket around the hole with your utility knife or sandpaper. This will help hot glue adhere. 1. Heat your hot glue gun very thoroughly. 1. Lay a thick bead of hot glue around the hole on the bucket, on the scuffed area. While the hot glue is still molten, place the inlet against the bucket and bolt in place. Tighten the bolts quickly to apply clamping force before the glue cools. 1. Once the glue cools, trim any excess that may have squeezed out into the inlet hole. If there are any gaps, seal with more hotglue and trim flush. ## Separator bottom/baffle lid 1. Wrap your tape or string around the 3.5 gallon bucket, forming a line approximately 1.25 inches below the bottom of the inlet flange. Err on the side of creating a little too much space rather than too little space. 1. Use your utility knife or rotary tool to cut the bottom off of the 3.5 gallon bucket along the line you just created. 1. Using your knife or chisel, remove all of the support ribs around the perimeter of the top of the remaining bucket lid. You should now be able to nestle your separator body onto the lid where the ribs previously were. 1. Using the injection molding sprue in the middle of the lid as a centering guide, drill a hole directly through the middle of the bucket lid. 1. Center your separator body on the bucket lid. Use your marker to trace the inside of the separator body on the bucket lid. Do NOT cut anything yet. Remove the separator body when finished. 1. Drill a hole through a piece of scrap material and use a spare bolt and nut to attach it loosely through the hole you drilled in the center of the bucket lid. You should be able to spin the scrap freely. If you already used all your bolts and nuts, borrow some from the outlet flange. 1. Mark the scrap piece about 2" from the line marking the inside of the separator body. Using that mark, draw a circle on the bucket lid about 2" smaller in diameter than the separator body. Remove the scrap piece when finished, this piece is no longer needed. 1. Draw two lines between the two circles you have marked, dividing the inner area into a small section about 1/3 of the circumference of the circle centered on the end of the inlet hole, and a larger section comprising the remaining 2/3 of the circle. See photos for reference. 1. Cut out the larger section, leaving the smaller section and the center of the lid intact. 1. Scuff thoroughly around the top of the bucket lid with your utility knife or sandpaper where the separator body will sit. Scuff the bottom 1/2" of the separator body as well. 1. Heat your hot glue gun very thoroughly. 1. Rest the separator body inside the top of the bucket lid, aligned with the large circle you previously traced. Lay a thick bead of hot glue around the separator body, filling the space between it and the rim of the bucket lid. Work in sections to make sure your glue gun stays as hot as possible. HDPE (the type of plastic used for these buckets) is very difficult to glue, we need all the help we can get. 1. Once the glue is cool, trim any excess glue inside the bucket lid and use your utility knife to make sure the inside of the bucket lid is flush with the separator body. ## Final assembly 1. Snap the separator lid onto the separator body. 1. Snap the baffle lid (attached to the separator body) onto the main dust bucket 1. Friction fit your vacuum hose into the vacuum adapter on the outlet 1. Friction fit your inlet hose into the inlet flange
With this file you will be able to print 5 Gallon Bucket Dust Separator with your 3D printer. Click on the button and save the file on your computer to work, edit or customize your design. You can also find more 3D designs for printers on 5 Gallon Bucket Dust Separator.