5" Touchscreen for Raspberry Pi.

5" Touchscreen for Raspberry Pi.

thingiverse

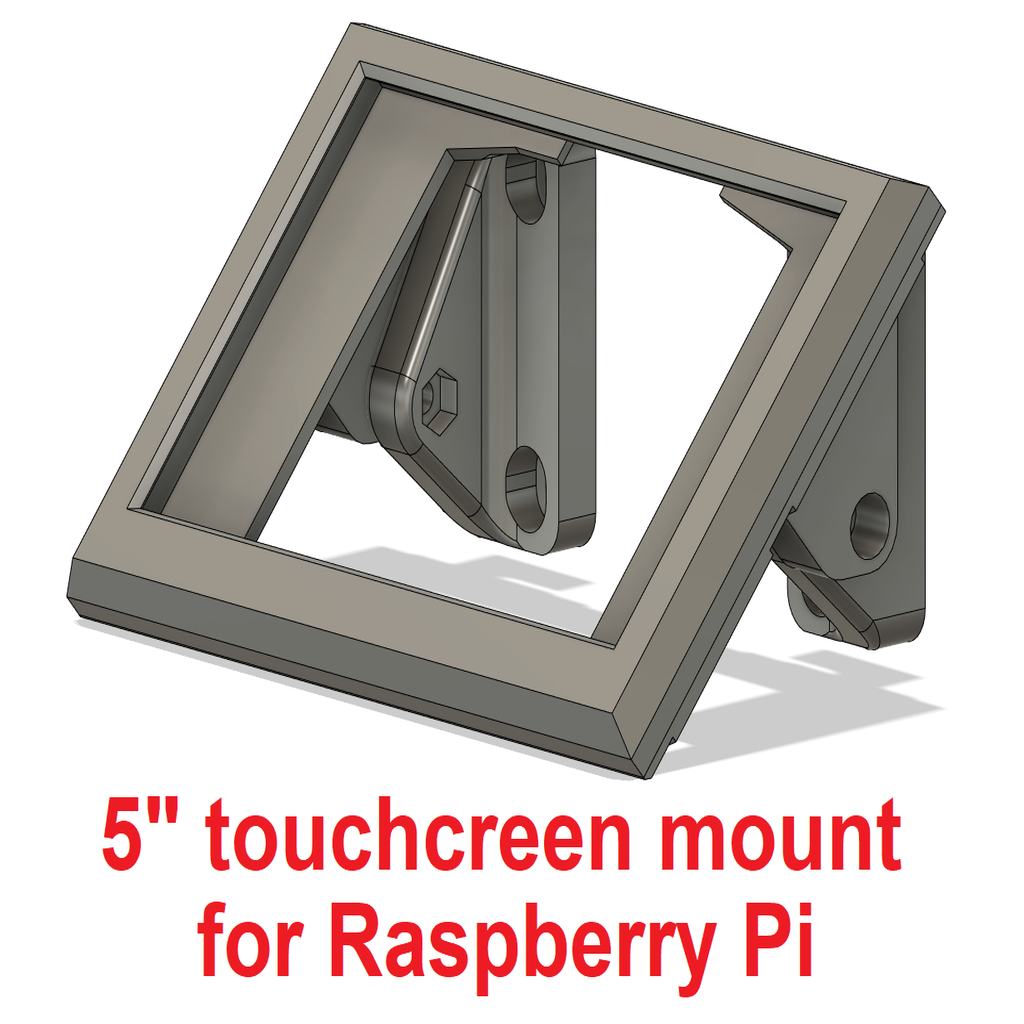
This is a remix from the 5" touchscreen mount that fits the Anycubic Kossel Plus printer. It mounts to the bottom frame of this printer but this remix is also suitable for other printers. Use the existing brackets, or build your own! Do you have a Anycubic Kossel Plus and do you want to keep the original display? Have a look at the original design: https://www.thingiverse.com/thing:3940357 **Also looking for some hardware to mount your raspberry? Check out these designs:** Raspberry pi mount: https://www.thingiverse.com/thing:3912074 Power supply mount: https://www.thingiverse.com/thing:3912130 Accessory switch mount: https://www.thingiverse.com/thing:3912189 **Assembly** - Remove spacers and mouting screws from the display. - Use M3 screws to attach the display frame to the frame. Just let them tap into the plastic. Max length 8mm - Use M4 bolts and T-nuts to attach the right and left bracket to the frame of the printer. Depending on the orrientation of you display, you can flip the left and right bracket. - Use a M4 nut and screw to connect the brackets to the frame **Parts** - The display can be found on Aliexpress, ebay, etc. It should cost you arround $20~25,- max. Just search for "5 touschreen raspberry" Details can be found here: https://www.elecrow.com/wiki/index.php?title=HDMI_Interface_5_Inch_800x480_TFT_Display - You can either print the square display frame, or the chamfered one. The one in the picture is the square one. - Get a HDMI cable that has the smallest possible connector size, or the print head might hit it. **cable and wires** Make your own cables using some wire and connectors. You can also just use the typical breadboard jumper wires you can buy anywhere. To attach to the display either use a pin header in the original connector, or solder to the pads on the board (see my picture). You only need 8 wires. 2 for 5V power, and 6 for touchscreen communication. Just make sure you connect the right pins. Its just a 1:1 connection and you need to mimic the original header. **Software instructions** 1. Get a Octoprint image file, write it to a SD-card, and config it. All information on how to do this can be found here: https://octoprint.org/download/ 2. Install the GUI (desktop). The easiest way to do this is using putty to remote login by terminal. Give the command "sudo /home/pi/scripts/install-desktop". Set it to start the GUI at boot. 3. Reboot into desktop. Your screen should be working now but on the wrong resolution and without touchscreen. You will need to connect a keyboard and mouse to your Rpi at this point. 4. Set the desktop to boot without login: Preferences -> Rpi configuration -> auto login as current user. 5. If you have not installed a tekst editor yet, you can install one by opening a terminal window and run: "sudo apt-get install leafpad". This will install a graphical text editor. 6. You need to edit a config file on your Rpi. (Read below how) You can find what what you need to edit here: https://www.elecrow.com/wiki/index.php?title=HDMI_Interface_5_Inch_800x480_TFT_Display  7. After rebooting to the right resolution, complete the other steps in the link above till you have your touchscreen working.  8. Install a browser if you do not already have one. For chromium open a terminal and run: "sudo apt install chromium-browser" 9. We need a delayed autostart on chromium and for this purpose we need to create a very simple bash file. Open a text editor and write the following 2 lines: ``` sleep 15 chromium-browser --start-fullscreen http://octopi.local/ ``` If you changed your hostname, change octopi into you actual hostname. Save this file as "del_chrome_start.sh" in the folder /home/pi/OctoPrint/ 10. Next we need to edit file  "/etc/xdg/lxsession/LXDE-pi/autostart" by adding the following line at the end: ``` @bash /home/pi/OctoPrint/del_chrome_start.sh ``` 11. Use a browser to go to http://octopi.local/ to setup Octoprint. I recommend doing this on a different computer because of the screen size but it can be done directly on the printer. 12. Install TouchUI plugin by going to settings -> plugin manager -> get more -> and paste the following link info ...from URL: https://github.com/BillyBlaze/OctoPrint-TouchUI/archive/master.zip Your done! ** possible errors**  - If your octoprint page is not always fully loading you may need to increase the "sleep" value in the bash file. This value is a delay in seconds. - Often chromium will tell you the page was not closed properly. The only fix for this i found is using kiosk mode for chromium, but that means its not easy to go back to desktop. **Editing a config files on your raspberry** There are many ways to do this. For this setup I like to do this in the Rpi desktop environment but here are some of your options: - The wifi settings and the screen resolution settings can actually be set on a windows PC directly on the SD card because these files are in the /boot folder of the card that windows can actually read. - A very populair way is using the simple program "nano" via a SSH login like putty. Always use the sudo (super user) command to be able to edit system files - Or, using a graphical text editor like leafpad you can edit straight from the desktop environment.  **PLEASE NOTE:** If you want to save a edited file that is not in your user folder (these system files are not) you have to start leafpad as a super user. Open a terminal window and run "gksudo leafpad &". This will start leafpad in super user mode. Open the config file from within leafpad and you will be able to save. Using file manager to browse to the file and opening it from there will open leafpad as a normal user and you will not be able to save the changes.

Download Model from thingiverse

With this file you will be able to print 5" Touchscreen for Raspberry Pi. with your 3D printer. Click on the button and save the file on your computer to work, edit or customize your design. You can also find more 3D designs for printers on 5" Touchscreen for Raspberry Pi..