5015 fan blower motor with the air intake and air duct reversed
thingiverse
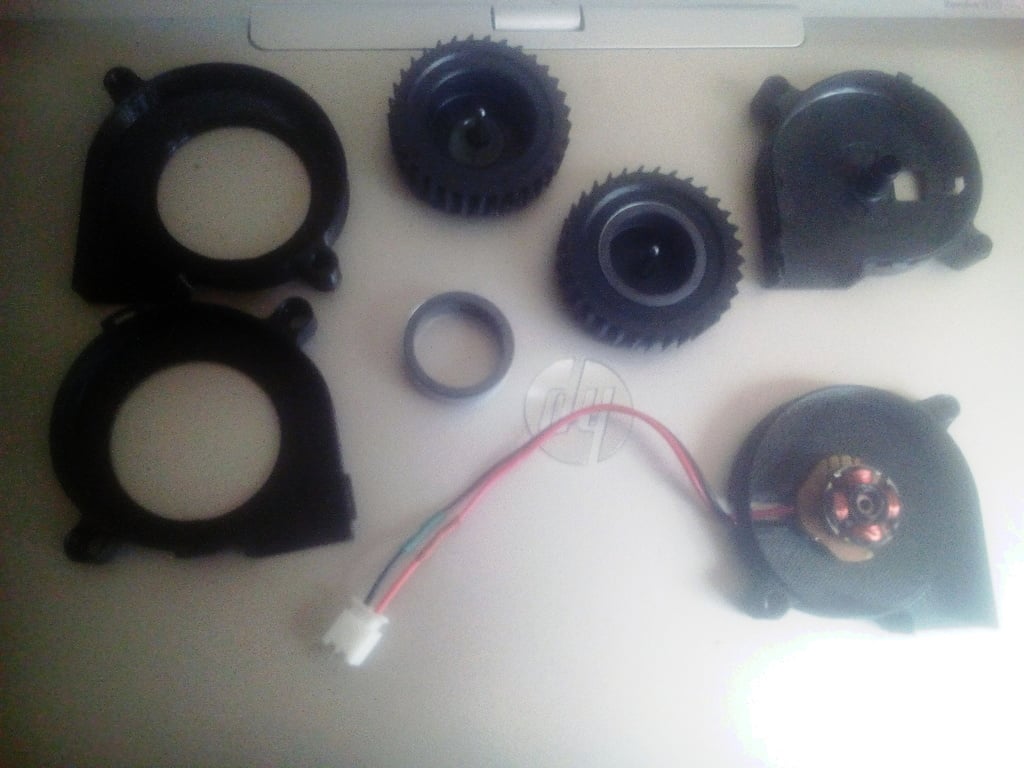
This is an incomplete project to see it I could make a 5051 fan that had the intake duct on the right rather than the left. The reason being that their are a number of people using this fan, because it's cheap and fairly compact, but quite often when you use 2 of them (e.g. when making a hotend filament blower duct) at least one quite often has a massively restricted air intake because it's next to something. A manufacturer should REALLY consider making one with the duct on the other side, so we don't have to modify any (unless one exists that I don't know about?). I've added this info to thingiverse in the hope that someone will take the project up, or at least find it interesting. I'll give as much information about what I have learnt so far (I'm a novice maker, so be warned). The reversed fan duct step files are modified from one I found on OnShape in the public area (all files created in OnShape via the free version are available for use by anyone, including mine). Removing Parts from a Standard 5015 fan ======================================= - Learn from my mistakes (I've killed 2 and have ran out!). - The Exact fans I used are these = https://www.banggood.com/3PcsPack-TEVO-DC-12V-505015mm-5015-Radial-Turbo-Blower-Cooling-Fan-For-3D-Printer-p-1345093.html These come with grease in the motor, which is a good sign they're pretty good for the money. An old one I had had no grease at all! - The original case opens easily. They're just clipped together. - The blade part of the fan (the bit with the metal shaft) is held in with some kind of miniature cir-clip washer. If you use a knife or very small bladed screwdriver, it will fracture and allow you to separate the 2 parts of the motor. (An old version from a different manufacturer had a larger, split plastic cir-clip that was much easier to remove than this version. - The motors stator (the part with the wound wires) is only pushed on to a plastic shaft (on this version). - IMPORTANT - When removing the stator, pull it up by holding the circuirt board and not the windings. The PCB and the winding are barely held together. If you pull via the windings, the wires will rip off. - There are 3 small plastic stand-offs that connect the stator to the PCB. Either hot-glue the stand-offs, on the PCB copper side, or melt them so the 2 halves stay together while you work on it, or they will separate in your hand and rip the wires off!! - Remove the brass bush from the original fan by pushing it though with a hot soldering iron. What I've Learnt ================ - The stators wires are micro thin and they brake easily. - The enamelling of the wires (the insulation) won't disappear if you add enough heat to them, but the extra heat will cause the wires to snap, making it useless. - Removing the enamelling of the stators wires with a knife, will often cause the wires to brake, making then too short to be used. - It would be better to cut the tracks on the PCB rather than mess with the wires! (IF I had any fans left I would give this method a go. - The stator has 4 connections from 2 wires. One wire from each winding is connected together, the other 2 are separate. - The PCB is VERY basic, but contains a small HALL-EFFECT (magnetic) sensor. Presumably, as the magnet in the blades rotates and reverses polarity, the HALL sensor detects this and then removes power to one wire and applies it to the other wire? - The circular magnet in the blades isn't glued in and can carefully be prised out, intact, with a flat bladed screw-driver. - Just changing the case is only part of the issue. The wiring need to be changed so the fan runs in reverse and then the blades will be pointing the wrong way. A step file is included which has the blades in the fan in the original direction, which will need to be changed. - Just reversing the power in isn't likely to help, as the Hall effect sensor is expecting 0V on the correct pin, so either the 2 separate ends of the wires need to be reversed, or there tracks cut and rewired in reverse. - If power in wires brake off, the PCB has + and - written on it. - The PCB says 24V. So are they using a standard PCB for different versions, or can you run these fans at 24V? I haven't tried, but it's something for you to consider. Creating The New Fan ==================== - IMPORTANT - When putting the stator on the new right hand side (RHS) case half, push on the windings, not the PCB, or it will separate and rip the wires off! - The old stator will happily hot-glue to the new case. - Insert the brass bush from the old fan in to the shaft of the new fan case(DON'T use a soldering iron!!). If your printer is setup correctly, it will be tight to push in (use a bit of grease fro the fan if it won't move) but it will fit. - The top of the shaft may be too tall. Cut to size once the bush has been inserted. - I don't think a new circlip needs to be created for the case. The magnet in the blades holds on to the metal in the stator quite well. - The shaft in the original blade hub will need to be put in the new hub (with the correct blades) - I haven't even started looking at this part yet. - Power the fan on and off in between the fan being stationary, to see if it runs. It has started with only one wire (2 connections) of the stator being connected, when the fan is in certain positions (although running slow) but won't start when in other positions (depends on polarity) in relation to stator. - The 2 halves of the printed case will connect together quite well, if you printer prints dimensions correctly and hadn't left any blobs / imperfections on the case parts. Once you are happy, glue the 2 halves together. Have fun!
With this file you will be able to print 5015 fan blower motor with the air intake and air duct reversed with your 3D printer. Click on the button and save the file on your computer to work, edit or customize your design. You can also find more 3D designs for printers on 5015 fan blower motor with the air intake and air duct reversed.