5th Gen 4runner Electrical Panel
thingiverse
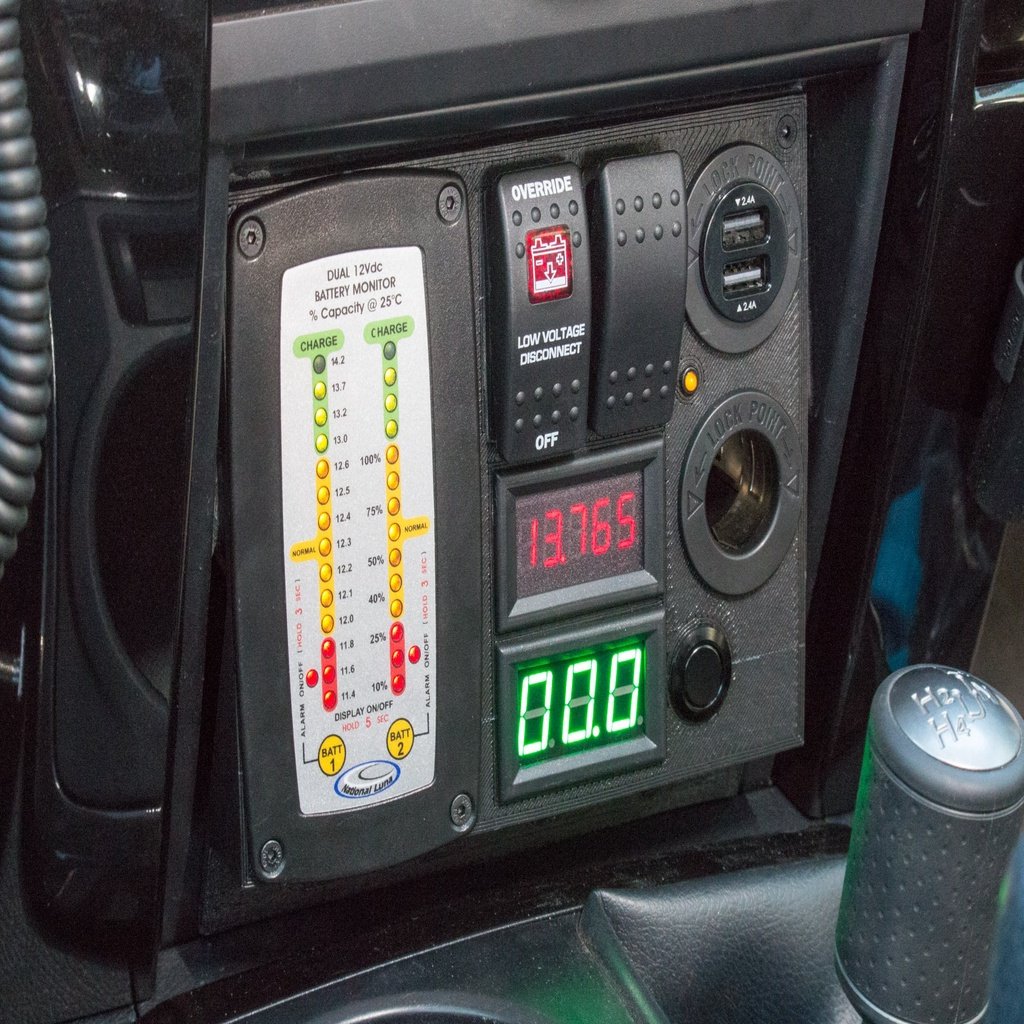
#### Overview There are not a lot of great places to mount switches or other gauges in the 5th gen 4runner so I designed this panel to attach panel mounted objects below the AC controls, replacing the fairly useless cubbies. You can use the same switches and gauges I used, or you can modify this to fit many things like rocker switches, an spod controller, switch-pros controller, or other gauges. This removes the USB and AUX in ports, but it would be easy to add it back with [something like this](https://www.amazon.com/BATIGE-USB3-0-Extension-Waterproof-Motorcycle/dp/B072KGMJ5N/ref=sr_1_7?keywords=usb+aux+in&qid=1569463041&s=gateway&sr=8-7). If you are concerned about cutting apart their original panel, you can buy a new one with part number 5540635070. **If you want this modified to fit whatever you want to mount on it, send me a PM or email brysonhicks56@gmail.com. I will upload a blank panel soon in multiple file formats that you can either modify or print and then drill to suit your needs.** The overhang is about 30 degrees. I printed it without support, and ran into some problems with print artifacts, but it was still structurally strong and that area is not visible unless you are looking up at it with your head where your feet should be. #### Assembly Remove plastic trays. This is fairly easy to do by pulling on the black trim on either side of the center dash. These pop off and you can then remove the AC controls by tugging on it as well. One they are removed there are two bolts to remove to free up the trays. To pull the trays out you need to pop up the center counsel trim, which can be done by hand by pulling on it. Once that is loose you can pull the trays out. Cut the plastic tray piece as shown in my photos. You can then put the panel in place to mark where you need to drill for the bolts to hold it in place. For the top left bolts I used a hot knife tool to cut and bend a piece of plastic that I super glued in place to support the nut. #### How my panel is wired If you want to copy my setup, I used this to control and view the voltages on a [Genesis Offroad Dual Battery Kit](https://www.genesisoffroad.com/4RunnerDualBatteryKit-p/181-t4rdbk.htm). They make a display button that shows the voltages and allows you to control the isolator, but I was not a fan of the price ($269!) and size of the display. I was able to find a source for the cable they use to connect to the kit and I probed it to find out what each pin did. I then used that cable to make most of the connections. - The National Luma dual battery display shows the voltage of each battery and includes alarms that go off if the voltage gets very low. It uses the cable going directly to the battery kit for each power and ground. - The low voltage disconnect switch controls a blue sea m-LVD that open the circuit for accessories connected to the AUX battery once the voltage gets low. This prevents the battery from being drained enough to damage it. You can override the shutoff with the switch as well as see the connection status. - The momentary switch to the right of the LVD switch manually connects the two batteries if they have been disconnected automatically due to the voltage getting low. This can be used to jumpstart the car with the push of a button if your main battery was depleted accidentally. - The amber status LED to the switch shows the current connection status. It turns on when the batteries are connected together. - The 12V socket at the top right uses the same power as the original socket, so it turns off when the car is off. - The 12V socket below the top socket is connected to the AUX battery so it is always on, unless the LVD disconnects it. - The red voltage display in the center shows the volts on the main battery when the car is on. This is useful so you can see what voltage the batteries are being charged at, which is ideally between 14.0V and 14.7V for AGM batteries. - The green amp display below the red voltage display shows the amps going through the cable from the AUX battery to the LVD. This shows the total amps being pulled out of the AUX battery so you can see how much of a load you are putting on the battery. The switch to its right turns the display on and off. #### Parts list Mounting: - [Bolts, I used M3](https://www.amazon.com/gp/product/B0761PKYR6/ref=ppx_yo_dt_b_search_asin_title?ie=UTF8&psc=1) - Super glue Wiring: - [Crimp connectors](https://www.amazon.com/gp/product/B01E5T81TI/ref=ppx_yo_dt_b_asin_title_o06_s00?ie=UTF8&psc=1) - [Zip Tie Anchors](https://www.amazon.com/gp/product/B06XNBS6TG/ref=ppx_yo_dt_b_search_asin_title?ie=UTF8&psc=1) - [10AWG wire (for socket connected to AUX battery)](https://www.amazon.com/gp/product/B07FKX5F6S/ref=ppx_yo_dt_b_asin_title_o09_s00?ie=UTF8&psc=1) - [Cable to connect to battery kit](https://www.newark.com/switchcraft-conxall/caen3c5m07990/circular-cable-cord-5pos-plug/dp/01AC7920) or google CAEN3C5M07990. Devices: - [Dual Battery Monitor](https://www.equipt1.com/products/dual-battery-monitor?_pos=3&_sid=43dafddc3&_ss=r&variant=7432662122559) - [Volt Meter](https://www.ebay.com/itm/1Pcs-Red-Led-5-Digit-Dc-0-4-3000-33-000V-Digital-Voltmeter-Voltage-Meter-l/132664371050?ssPageName=STRK%3AMEBIDX%3AIT&_trksid=p2057872.m2749.l2649) - [Connection Switch](https://www.ebay.com/itm/Blue-Sea-7930-Contura-II-Switch-SPST-Black-OFF-ON-7930/193020854654?ssPageName=STRK%3AMEBIDX%3AIT&_trksid=p2057872.m2749.l2649) - [Sockets](https://www.amazon.com/gp/product/B07M9Q3834/ref=ppx_yo_dt_b_asin_title_o06_s00?ie=UTF8&psc=1) - [Ammeter](https://www.amazon.com/gp/product/B01JIK8J3C/ref=ppx_yo_dt_b_asin_title_o09_s00?ie=UTF8&psc=1) - [Ammeter switch](https://www.amazon.com/gp/product/B07C21KTFQ/ref=ppx_yo_dt_b_search_asin_title?ie=UTF8&psc=1) - [Indicator LED](https://www.amazon.com/gp/product/B000THMK66/ref=ppx_yo_dt_b_asin_title_o03_s00?ie=UTF8&psc=1) - [Low Voltage Disconnect](https://www.amazon.com/gp/product/B00GZOP53M/ref=ppx_yo_dt_b_asin_title_o04_s00?ie=UTF8&psc=1)
With this file you will be able to print 5th Gen 4runner Electrical Panel with your 3D printer. Click on the button and save the file on your computer to work, edit or customize your design. You can also find more 3D designs for printers on 5th Gen 4runner Electrical Panel.