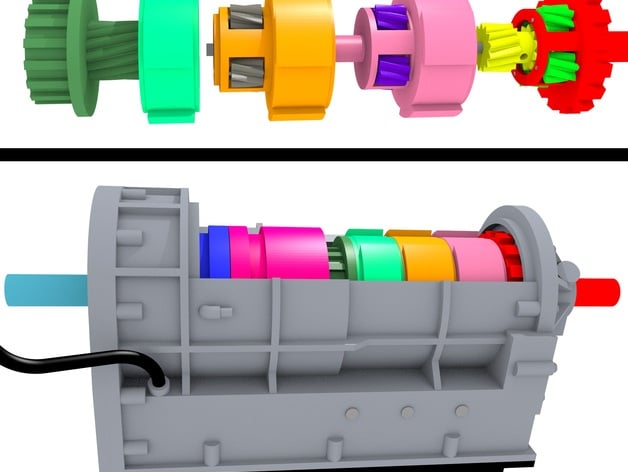
6 Speed Allison Automatic Transmission / Gearbox
thingiverse
The document provided appears to be a changelog or revision history of a 3D printed mechanical gear train or clock model, referred to as a "retraction test for [Geartrain Design: Screw]. This is an extensive model with many intricate components, likely representing the movement of time, as it involves various gears and clutches interacting together in different sequences." The revisions listed range from cosmetic adjustments, like adding details and adjusting spaces between parts, to functional improvements such as: - Enhancing stability and reducing friction by altering contact areas. - Adding supports for better structural integrity, particularly noticeable with changes in the oil pan's supports and in the fork rods' positioning. - Improving components' durability and fit through modifications such as hole sizes and C-clip adjustments. - Updating parts to be single-shell printed models after encountering issues with printing multiple-polygons connected designs. - Integrating a solenoid-driven mechanism, necessitating changes in the design for compatibility. These include adjusting gear positions, redesigning clutches, and incorporating parking pawls and realistic cases. These modifications seem to have aimed at refining the model's mechanical operation, its appearance by adding more details and ensuring structural stability. The project appears to involve considerable planning, 3D printing, and testing to refine the design for either a specific use (like educational purposes) or as part of an art piece emphasizing mechanistic engineering. **Technical Highlights:** - Multiple revisions for refining structure and functionality. - Significant cosmetic improvements with attention to detail and design symmetry. - Mechanism changes for both button-driven and solenoid-engaged interactions. - Use of spacers, C-clips, and adjusting the sizes of components' holes for better fitment. **Mechanical Innovations:** - The addition of magnets to secure covers in place highlights an interest in stabilizing mechanical systems. - Revisions related to improving clutch engagements show a focus on smooth gear transitions. - Solenoid-driven interactions introduce complexity that requires design adjustments for seamless operation. - Attention to ensuring all components print together, without breaking at connections.
With this file you will be able to print 6 Speed Allison Automatic Transmission / Gearbox with your 3D printer. Click on the button and save the file on your computer to work, edit or customize your design. You can also find more 3D designs for printers on 6 Speed Allison Automatic Transmission / Gearbox.