60mm Fan Mount For 31mm Direct Drive Extruder
thingiverse
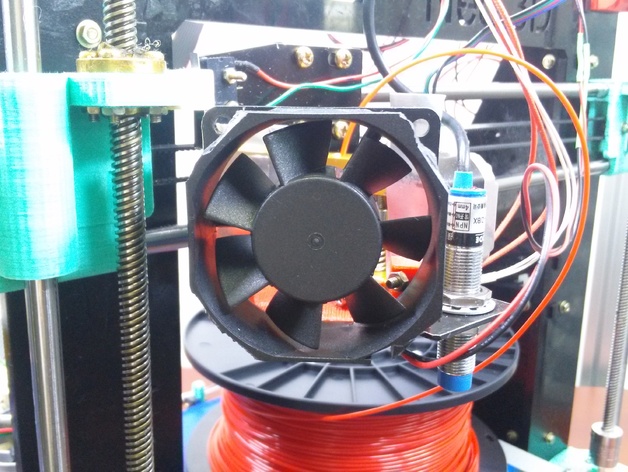
This is my total solution for heat creep. Not only does it effectively solve any and all jamming issues I have had with ABS, it is also extremely cheap and simple to implement. 3D printer designs are plagued with the ubiquitous 40mm fan which does not effectively cool the extruder, nozzle throat, or filament which leads to inevitable jamming. All over the internet and 3D printer boards you can find elaborate fixes such as fancy heat sinks, geared extruders, ad nauseum. My solution is to just stick on a bigger fan. This solution is directed towards users who print in ABS using cheap knock-off i3 clones using some kind of cover or hood to keep parts from warping (like me). This solution requires 1 60mm fan, 7 M3 screws & nuts, thermal paste, and a 28mm nozzle throat. This solution should work for pretty much any knock-off direct-drive extruder which uses 31mm stepper motor mounts. Optionally, you can add a second fan and switches for not too much more moolah. For more details, read below. Actual results: If you print your i3 in an open configuration (no hood or cover), then you will need to raise your heater to 260 deg C and slow your printer down to 10-15 mm/s. Your throat will be too cool to run any faster than that. I made a cardboard cover for my printer so I can hotbox it for ABS prints. If you cover your printer after the first layer, you can set your heater to 240 deg C from the start. (As of 2016/12/01) I run my printer at 50 mm/s all day long. I always run the heatbed at 90 deg C. I turn the fans on after covering my printer. Even though the air is recirculated inside the enclosure, it is cool enough to prevent heat creep or jams which I used to constantly suffer through before I made this change. This may or may not be the right solution for you. If you found another solution that works well for you I am truly happy for you. However, if you are in my boat and you need an effective solution for minimum expenditure then I recommend giving this a try. Thanks for reading! Print Settings Printer: knock-off i3 clone, Made-in-China Rafts: No Supports: No Resolution: 0.3 Infill: 25% Notes: I recommend using ABS for this print since it will be situated in close proximity to the hot-end of your 3D printer. Also included (and pictured above) is a button frame for holding toggle buttons to power each fan. You shouldn't wire your 60mm fan to your control board. Post-Printing Step 1: Remove Anything That Blocks Airflow. You want your fan to blow all over the throat, extruder, filament, and motor. As in my case, the tensioner arm and frame seem to be made out of anodized aluminum so that also helps with heat transfer. If there are heat sinks covering this, then take them all off. Direct airflow is the best flow out there. An added benefit is that while the fan is on you can see through the blades. I like taking the mystery out of what is going wrong! Direct airflow, no heat sinks required. Step 2: Thermal Paste Everything I recommend pasting anything that touches the threads of your throat. At minimum, add paste to where the throat touches the tensioner body. Always insert teflon-side-down into the heater block, and paste the threads there too. Make sure the nozzle body and throat are tightly-coupled so no plastic leaks out and clogs internally. While you have the paste out, you should go ahead and: a) paste your nozzle, then reinsert it into the block; b) paste your heater element, then reinsert it into the block; and, c) paste your thermistor, then reinsert it into the block. I did these things and have zero regrets. By the way, why the short throat? Less friction. The short throat is fine when you have this fan pointed at it. =) Paste and 28mm M6 throats with teflon inserts. Step 3: Add Windscreens to Direct Exhaust Upwards I previously tried to print plastic screens but they cracked very easily (predictably). In order to keep the total weight of this assembly as low as possible, I recommend snipping thin aluminum. If you don't have scrap Al sitting around, just cut up a beer can. If you're Mormon, you can use a soda can. =) Plug any gaps with tape. I know, it's ugly but it's not like you have to show everybody on the internet what you did! =) It's Tape! Step 4: Screw It Together I used 12mm M3 screws (3 ea) to secure the windscreens. I used 30mm M3 screws (2 ea) to hold the fan bracket (printed red part) to the tensioner body. I used 18mm M3 screws (2 ea) to hold the fan to the fan bracket. I only need 5 nuts. Step 5 (Optional): Second Fan You can stick a second fan and use it to cool the driver circuits to your stepper motors. Remember, heat kills electronics! Cool your circus board. Step 6 (Optional): Add a Switch Housing The housing is press-fit so you don't need screws or any other junk to hold it on. I added switches so the heatbed will warm up faster. A+ Penmanship! Step 7: Power Through SMPS You can't adequately power these fans through your original control board connector. Unfortunately, every SMPS is different and I can't give you specific wiring instructions. If you don't know how to do this step, ask your husband so he can help you. ;-) But seriously, don't guess or trust to luck on this step. Only 1 of 4 things can happen: 1) Everything works fine, OR 2) Fan will catch on fire, OR 3) SMPS will catch on fire, OR 4) You will catch on fire! Bzzzzt. Step 8: Test If you get everything working, then I hope you will have the same great results that I did. If, for some reason, this solution does not work out for you, then I hope you didn't throw your original components away. You can always return your machine to its original configuration with minimal money lost. Good luck!
With this file you will be able to print 60mm Fan Mount For 31mm Direct Drive Extruder with your 3D printer. Click on the button and save the file on your computer to work, edit or customize your design. You can also find more 3D designs for printers on 60mm Fan Mount For 31mm Direct Drive Extruder.