64mm Magnetic Carriages
thingiverse
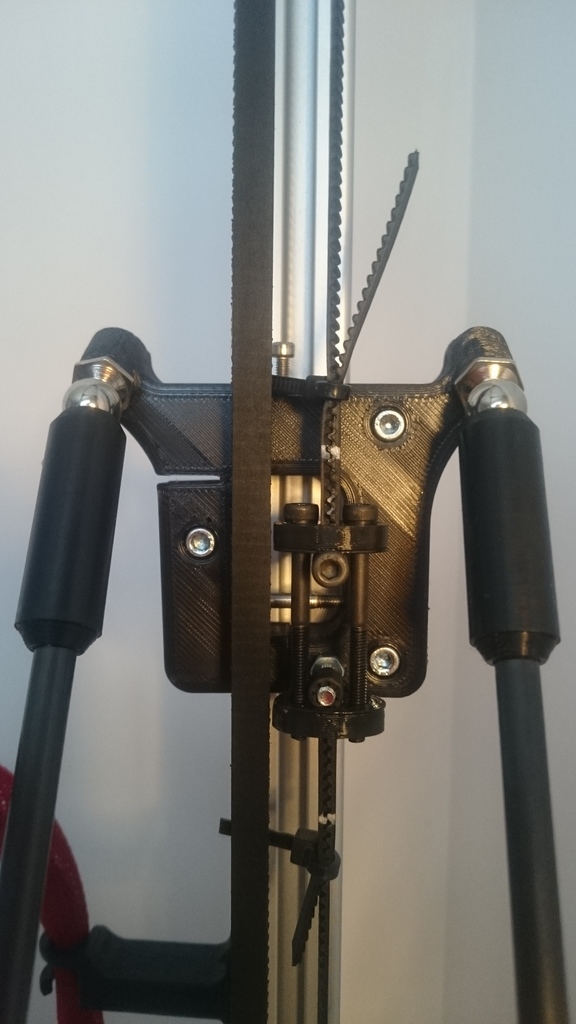
This is a remix of Hayden's 2020 carriage, which I really like because it makes the carriage incredibly light and offers fine belt tensioning capabilities. The key differences are: A 64mm rod spacing is used to work seamlessly with the 64mm 3xPiezo Magnetic Effector found here: https://www.thingiverse.com/thing:2361081 Additionally, I've incorporated 3mm holes for M3 bolts to work in conjunction with Delrin V-Wheels from Think3DPrint3D (http://www.think3dprint3d.com) and 20mm wide extrusions from Motedis Profile 20 I-Type slot 5 (http://www.motedis.co.uk/shop/Slot-profiles/Profile-20-I-Type-slot-5:::999991_99999133.html) or Misumi (http://uk.misumi-ec.com/vona2/detail/110302684350/?HissuCode=HFS5-2040-%5B50-4000%2F0.5%5D&PNSearch=HFS5-2040-%5B50-4000%2F0.5%5D&KWSearch=HFS5-2040&Keyword=HFS5-2040&searchFlow=results2products&Keyword=HFS5-2040). These wheels have the same spacing, so they can also work with extrusions and 15mm diameter V-wheels from OpenBuilds or RobotDigg.com if you modify the hole size. I've included CAD files for this remix; if you need other formats, please let me know. Per carriage, you will require: Three Delrin V-wheels from Think3DPrint3D (www.think3dprint3d.com) Two 10mm ball studs from Haydn at MagBallArms.com Three M3x30 bolts Ten M5 nylock nuts Six M3 washers Two M3x35 hex bolts for the belt tightener Two M3 nuts for the belt tightener One M3x40 hex bolt for preloading the carriage wheels One M3x20 hex bolt for the vertical post for the lower G2 belt attachment One M3x15 bolt for upper belt attachment One M2.5x12 hex for fine end stop tuning Nine M3x4mm spacers (http://www.ebay.co.uk/itm/142378241665) The spacers are to be placed between the bearings in each wheel, which helps a lot with wheel alignment. Between every wheel and the carriage, there is one nylock nut and two washers. It's best to fit them first and measure all three with a caliper before you fit the wheels. This way, you know all three wheels will be the same distance from the carriage when fitted. Nylock nuts can differ by as much as .4mm. My Kossel is built with Robogigg metal corners, and I've twisted the belt to run over the idler pulleys. They run very smooth this way. Cable ties should not be necessary if parts "b" and "c" are precisely printed. Some of Robodigg f623zz bearings started being noisy after 6h of use, so I've replaced them with some EZO made in Japan.
With this file you will be able to print 64mm Magnetic Carriages with your 3D printer. Click on the button and save the file on your computer to work, edit or customize your design. You can also find more 3D designs for printers on 64mm Magnetic Carriages .