6mm Belt Tensioners for Monoprice Select Mini 3D Printer
thingiverse
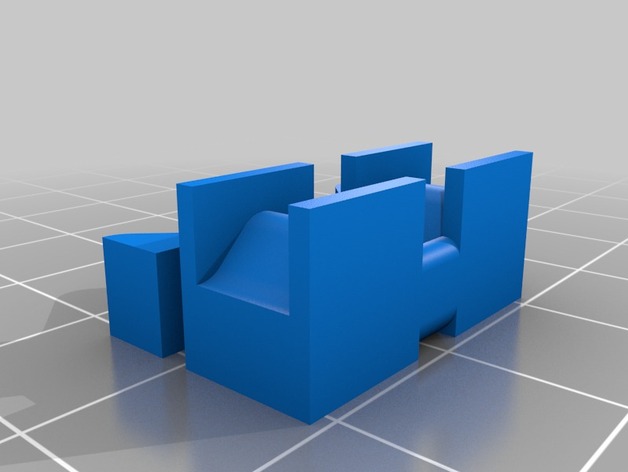
The Monoprice Select Mini has a pair of 6mm belts which are used for the X and Y movement. These belts each have a cheap spring tensioner which can flex under rapid changes in acceleration, leading to artifacts in the print. These belt tensioners can be used to replace the spring tensioners to apply constant tension to the belts and eliminate the flexible springs. To use these tensioners, you will need a small cable tie fastener for each tensioner, which provides the clamping force to the tensioners and holds them in place. Once you print these parts, clean them up and test fit them before attempting to install them. They should fit together snugly and securely. When that is done, take the spring clips off your belts with a pair of pliers and install the tensioners in their place as follows: Start with the X tensioner, take a cable tie and the smaller half of the tensioner (important to use the smaller one) from the rear of the machine you should see the belt through the large slot. Place the smaller half of the X tensioner on the exposed belt on the side of the belt with the teeth in it. Place the second half of the tensioner on the other side of the belt and engage the cable tie to its lock. Draw the cable tie together to provide enough force to hold it in place but DO NOT tighten it fully. Now you slide the extruder hot end all the way as far toward the tower as it will go, and hold it there while you slide the belt tensioner along the belt as far to the opposite end of the gantry as it will go. Now fully tighten the cable tie lock. Use two pairs of pliers to get it as tight as you can. Trim of the excess cable tie. Slide the extruder hot end back and forth and make sure the tensioner does not hit on anything when it moves. If the tensioner hits the extruder, then you probably have the large and small parts swapped. The small one should be on the inside. If the extruder hot end is blocked from travelling to ether extent, then you probably did not have the hot end and tensioner at opposite ends of the gantry when you tightened the cable tie. In either case, just cut the cable tie and make corrections. For the Y tensioner, lay the machine on it's back and pull the build plate as far forward as you can get it. Then take one of the halves of the Y belt tensioner and feed the cable tie through the slot. Pass the cable tie around the belt and put it through the slot in the other half of the Y belt tensioner. Engage the cable tie into its lock, but DO NOT tighten it yet. It's very important that you push the belt tensioner as far forward along the belt as you can get it. Try and get it right up against the metal lip of the build plate. Then tighten the tie wrap as tight as possible and trim off the excess. Sit the machine upright and slide the build plate backwards and listen for the limit switch to engage when it is almost completely to the rear. If the belt tensioner interferes with the travel of the build plate before the limit switch engages then you didn't get it fully forward before tightening. Cut off the cable tie and try again. If you have trouble holding the clamps in place and tightening the cable ties (an extra set of hands would be useful) you can try using a clamp or locking pliers to compress the tensioner together until you get the cable tie tightened. This worked great on my printer, and the Y belt tensioner provides enough tension now that eliminates the slop on the linear rod bearings which I was seeing before. I tried to provide enough tolerance in these parts to insure that variations in each printer would not be an issue, but since I only tested this on my printer, feedback on any tolerance issues would be welcome. Print Settings Printer: Monoprice Select Mini Rafts: No Supports: No Resolution: 0.4mm Nozzle / 0.1mm Layer Infill: 100% Notes: I printed these with 100% infill, as the print time was so short for such small parts that less infill did not make a significant difference. Post-Printing Post Printing Make sure to clean up the tensioner pairs and get rid of any excess plastic, and test fit the parts before installing. They should fit together snugly. Sand any irregularities until they fit.
With this file you will be able to print 6mm Belt Tensioners for Monoprice Select Mini 3D Printer with your 3D printer. Click on the button and save the file on your computer to work, edit or customize your design. You can also find more 3D designs for printers on 6mm Belt Tensioners for Monoprice Select Mini 3D Printer.