6x9 Acrylic stereo
thingiverse
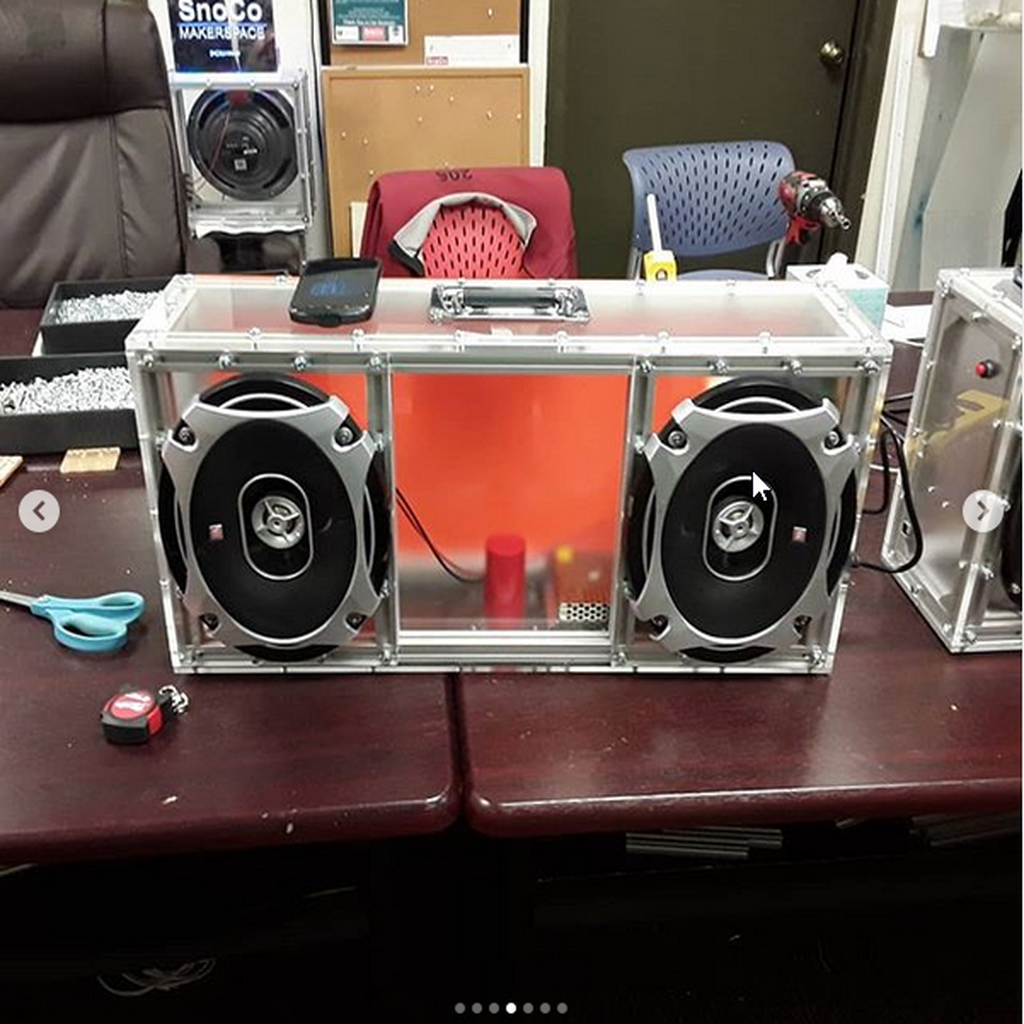
These are instructions for a sweet boombox with bluetooth. It has great bass and gets very loud. https://cad.onshape.com/documents/abecc1e4a25d752cab92a374/w/032777bac13a4669d6abff43/e/1aeae0d6091d6b140c4c4e20 You will need a 3D printer and a laser cuter to build this. You might be able to use a CNC mill and lathe if you're ninja. BOM: 2020 Extrusion: - 4 @ 578mm - 4 @ 110mm - 6 @ 251mm a bunch of 1/4" wood or acrylic a small piece of 1/8" acrylic or wood. Some thin EVA foam for the gaskets. 126 M5 x 12mm bolts 118 M5 slot nuts 4 M5 x 12mm countersunk bolts 4 M5 Washers 4 M5 Nuts 12 M3 x 14mm bolts 8 M3 x 30mm bolts 50 M3 washers 28 M3 Nuts Amazon: https://www.amazon.com/gp/product/B01E6S0JS4/ https://www.amazon.com/gp/product/B07XG88R94/ https://www.amazon.com/gp/product/B07D8QXXRX/ https://www.amazon.com/gp/product/B00O8MZD94/ https://www.amazon.com/gp/product/B00ME5YAPK/ https://www.amazon.com/gp/product/B000E0PPG0/ Instructions: Cut out all Acrylic pieces Cut out all gasket pieces from thin sheet of EVA foam or use gasket tape if you have any. 3D print the pole mount Optional - you can put a design on the center piece and cut it out of clear acrylic. Then you can use 12v LED strip to side light it. Take the mounting nuts off the amplifier board. Use some wire cutters to cut off the tabs sticking out of the mounting pots on the amplifier board. These will prevent the board from mounting flush to the amp plate. Mount the amplifier board to the amp plate. Use 6 M3 x 14mm screws to mount the plate to the right side piece. Wire up the power input plug There's a pic of it. I would suggest using white for (N). Black for (L). and green for (Earth symbol) The wires should be about 6" Mount the power plug to the right side piece. Use the countersunk screws to mount the pole mount to the bottom piece with the gasket between them. Use super glue or epoxy to reinforce the pole mount at it's base. Also mount the power supply with screw mounts facing away from the pole mount Mount the handle to the top with the gasket inbetween. Assemble the frame - I would suggest starting with the bottom acrylic piece. Start attaching Extrusion to it. Remember to preload the slot nuts for the side pieces. Attach the speakers pieces and center pieces. Then attach the extrusion to those pieces. Attach the top piece and the extrusion for that. Attach the left piece and it's extrusion. Don't attach the right side or the rear yet. Mount the speakers. Use the long M3 screws. Put the bolt head on the back side of the speaker mount. put the gasket on then the speaker. Use a nut and washer to fasten it all down. Then slide the grill on and use another nut to fasten that on. Attach the right side (don't forget to preload slot nuts for the back plate.) Once both speakers are attached,, start wiring - Power plug to power supply. Match symbols. 12v +/- to amp board +/- Speaker L/R +/- to amp board. If you used a 12v LED strip to edge light the center,, wire that in. Inspect!! Make sure +'s are going to +'s. Plug it in and power it on. Watch for smoke. Be careful - there are live wires on the inside. If everthing powers up,, look for a new bluetooth audio on your phone or tablet. Play something. Don't worry if the sound is dry. We will fix that in a sec. If you are connected and don't hear anything,, try twisting the knobs. If everything works,, then unplug it,, mount the rear and enjoy!!
With this file you will be able to print 6x9 Acrylic stereo with your 3D printer. Click on the button and save the file on your computer to work, edit or customize your design. You can also find more 3D designs for printers on 6x9 Acrylic stereo.