7 Wonders Duel - Solo tiles
thingiverse
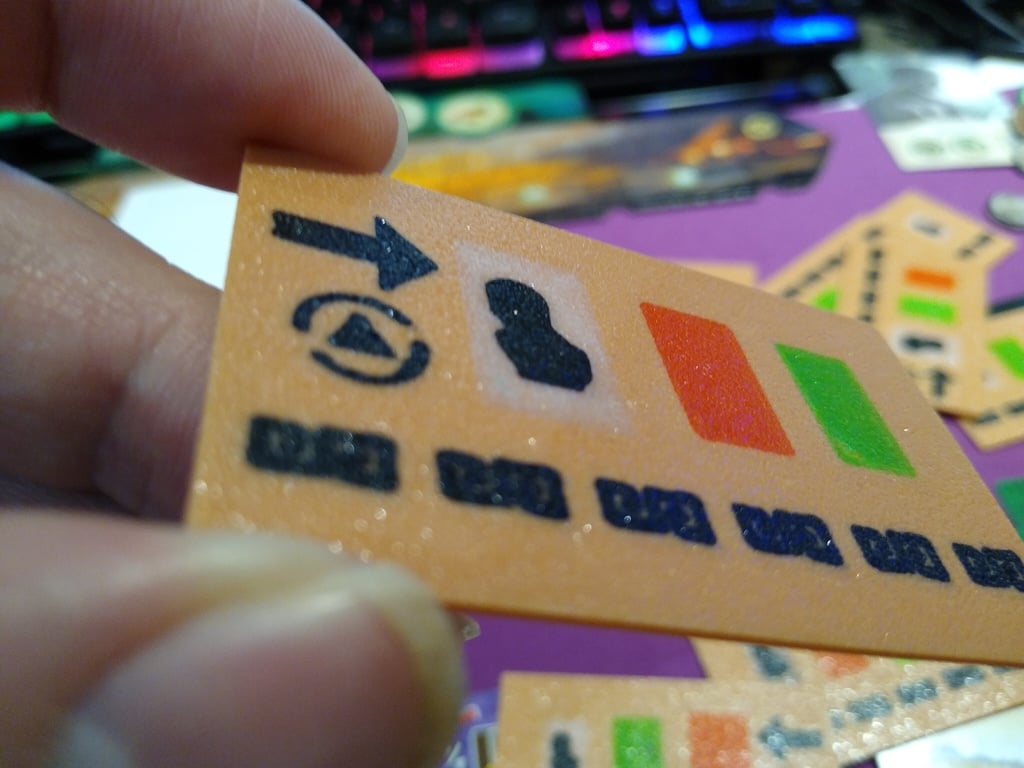
After the free print'n'play release of the solo mode for 7 Wonders Duel, the decision cards were pretty simple looking and since they needed to be shuffled a few times I didn't want to use just paper and I don't have sleeves for those sized cards. So, I decided to make them into tiles instead. Download 7 Wonders Duel Solo here: https://print-and-play.asmodee.fun/7-wonders-duel/ The tiles are made by "inlaying" the various coloured parts into the first layer and then printing around them for the tile itself. I got the idea from the Make Anything YouTube channel at this video: https://www.youtube.com/watch?v=KV2AjyowXX4 I only used a single extruder (Prusa i3 MK3s, no MMU). Basically this requires quite a lot of swapping There are 12 cards, with 10 of them being unique. My TriangleWhite.stl file was corrupted so I didn't upload it, but you can use the CircleWhite to replace it. <p>Here is how I did it.</p> <p>Layer height must be 0.2. Highly recommended you sort out your printer so you do not have elephant's feet since you will have multiple parts printing right next to each other in place.</p> <p>In PrusaSlicer, I imported all the STL files at the same time for each same labeled part (Triangle, Circle, Left, Right). This would make 4 cards/tiles. Move all the tiles around so they do not overlap. Do this manually, don't use the "Arrange" button. Using the arrange button will mess up your alignments Please Note that the cards must be printed upside down</p> <p>For all the "Triangle" cards, the STL files with Triangle in the name and has the triangle with the circle arrows around it, line up all the bits so that they line up with the appropriate spots on the tiles.</p> <p>Next, do the same for the "Circle" cards.</p> <p>Again for the "Left" and "Right" cards. Note that the "Left" and "Right" correspond to the left or right column the card is on in the PDF file.</p> <p>In PrusaSlicer you will need to make a new printer profile. This profile would be the same as the default, except in the "End G-code" section, you should comment out the lines that start with M104 and M140. This will keep your extruder and bed hot for the entire process. Save the new profile.</p> <p>Now, click the eye icons for all the parts to hide them. </p> <p>After ensuring that your bits are lined up in the tile, click the eye for TriangleBits, slice it and export it. Click the eye for the Triangle Bits again to hide it, click the eye for TriangleGreen, slice it and export it. Click the eye beside TriangleGreen to hide it, click the eye for TriangleRed, slice it and export it. Click the eye beside TriangleRed to hide it, click the eye for TriangleWhite, slice it and export it. Finally, click the eye for TriangleWhite, click the eye for TriangleTile, change the printer profile back to default (so the printer will turn off the bed and extruder after printing)(I take no responsibility if you don't switch your profile back to default back and your house burns down because the heaters never turned off), slice it and export it. </p> <p>Do the same for each of the other cards</p> <p>Once done, start printing and swapping filaments. Don't forget to clear the prime wipe at the start of each print.</p> <p>This process is a bit confusing, so take your time to think about what you are doing for each step.</p> <p>Alternatively, you can try just printing out the part separately and glue them together. If you do this, you might need to scale down the bits, but I did not try this, nor will I.</p>
With this file you will be able to print 7 Wonders Duel - Solo tiles with your 3D printer. Click on the button and save the file on your computer to work, edit or customize your design. You can also find more 3D designs for printers on 7 Wonders Duel - Solo tiles.