90mm Storm Water Drain Outlet Flap Hinge
thingiverse
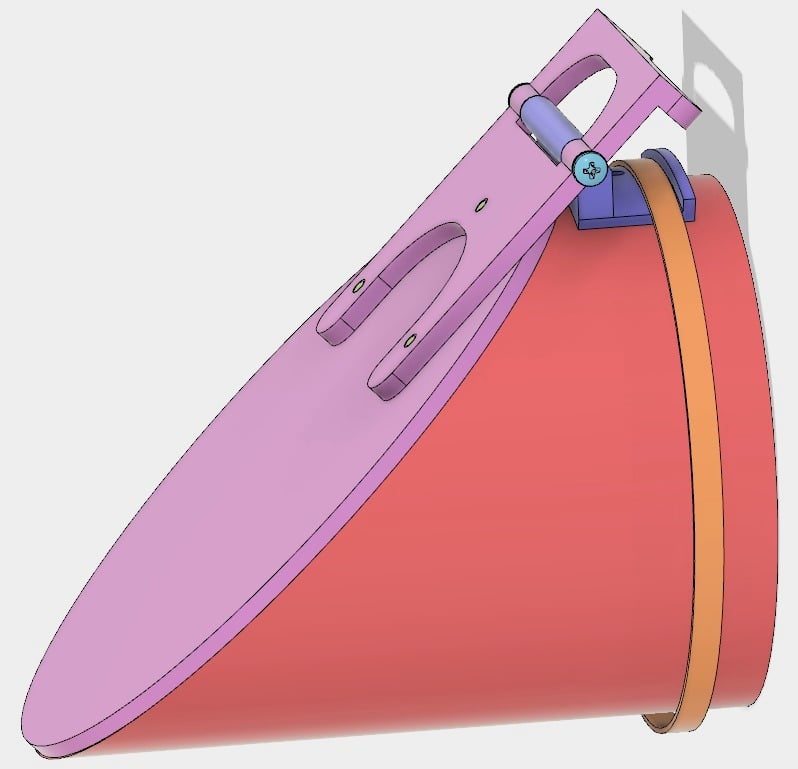
18 June -2017: Added 3 photos of an actual completed assembly, ready to be added to a drain pipe. The actual flap is just a piece of offcut acrylic I had lying around but it could be anything. Where I live we have large pythons and, both to protect the snakes and to keep my pipes flowing, I have flaps on my stormwater drain pipe outlets to prevent snakes, rats and other small critters from entering the pipes. Using a grid on the end of the pipe does not work as grids catch leaves and gets blocked leading to a pipe that fills up, overflows and does not drain as intended. This hinge is designed to be clamped on to a 90mm PVC storm water pipe with a large hose clamp or sturdy cable tie. There is a hole provided to put a little self tapper through to help the cable tie.(I don't think PVC glue will work) The 90mm pipe needs to be ended with a 45 degree angle ( more or less. See the images). It uses gravity to close the flap, hence the angle. The flap, even though shown as a oval, any rectangular piece of perspex will do as long as it is wider and longer than the opening of your pipe. The flap is bolted from the inside with three 3mm self tappers. (I tried to give an idea of a cable tie placement in the assembled picture - the thinnish orange ring around it all on the right hand side. Did not want to spend a big amount of time 3d modeling a cable tie). What I like to do is to build the whole assembly on a short piece of 90mm pipe (as shown) so I can comfortably work on my workbench. Then, by using a 90mm joiner section, I can simply glue the whole thing on to the end of the actual drainpipe. I know it will cost you a dollar or 2 more but it is much more convenient. The hinge consists of two 3mm diameter x14mm bolts. The inner hinge hole is 3.2 whilst the outer is 2.9 so the bolts should rotate freely in the inner hole. The reason for using the outer hole to cut thread through is so the device is less sensitive to how tightly you screw the bolts in and also so that if you take the hinge apart, the bolts will be captured by the outer part of the hinge and not simply fall and get lost. The back of the hinge has been extended with a limit stop to prevent the flap from being opened so far that it will not close on it's own (e.g., wind or very strong water flow). As long as the hinge is not seized and correctly mounted, it will always close. You will need: The hinge part-a (the outer hinge section) and part-b (the inner hinge section) 2 off 3mm diameter x14mm pan head stainless steel bolts (for the hinge) 3 off 3mm diameter x5mm stainless steel self tappers (or you could use 10-12mm long bolts and nuts) to secure the flap to the hinge 1 large hose clamp or cable tie to secure the hinge to the pipe (4.8mm wide x 380mm UV stabilised cable tie works fine) 1 off 3mm diameter x5mm stainless steel self tapper (or 10-12mm long bolt and nut) to secure the hinge to the top of the pipe and prevent slipping. Hints: First, cut the angle on the pipe. Use a mitre or something to ensure it is flat and around 45 deg. Assemble the hinge part-a and part-b. With the hinge gin the fully closed position (i.e. as it will be with the pipe closed off) and hold the flap material on the inside of part-a so you can judge how close to the hinge axis you can mount it (affected by flap thickness). Drill the centre hole on the flap accordingly (use about a 3.2mm drill or slightly bigger than the self tappers you will be using). Loosely mount the flap so you can make sure it is straight and will sit flush on the pipe without hindering the hinge. Now you can mark the other 2 holes. Dis-assemble and drill the other two holes. Now you can mount the flap making sure to screw from the flap side into part-a (to minimise protrusions in the pipe that can catch on debris). Now, hold the whole assembly on the pipe so you can move it back and forth till the flap seal on the pipe is perfect. Mark the location of the hole. Remove the hinge and drill the pipe. Use a 3.2 mm if you will be using a bolt and nut as I have or 2-2.5mm or so if you will be using a self tapper from the top. If you are using a bolt, insert it from the inside and tighten the nut from the top with a long-nose plier.
With this file you will be able to print 90mm Storm Water Drain Outlet Flap Hinge with your 3D printer. Click on the button and save the file on your computer to work, edit or customize your design. You can also find more 3D designs for printers on 90mm Storm Water Drain Outlet Flap Hinge.
