A Better Rudder (for Inflatable Kayak)
prusaprinters
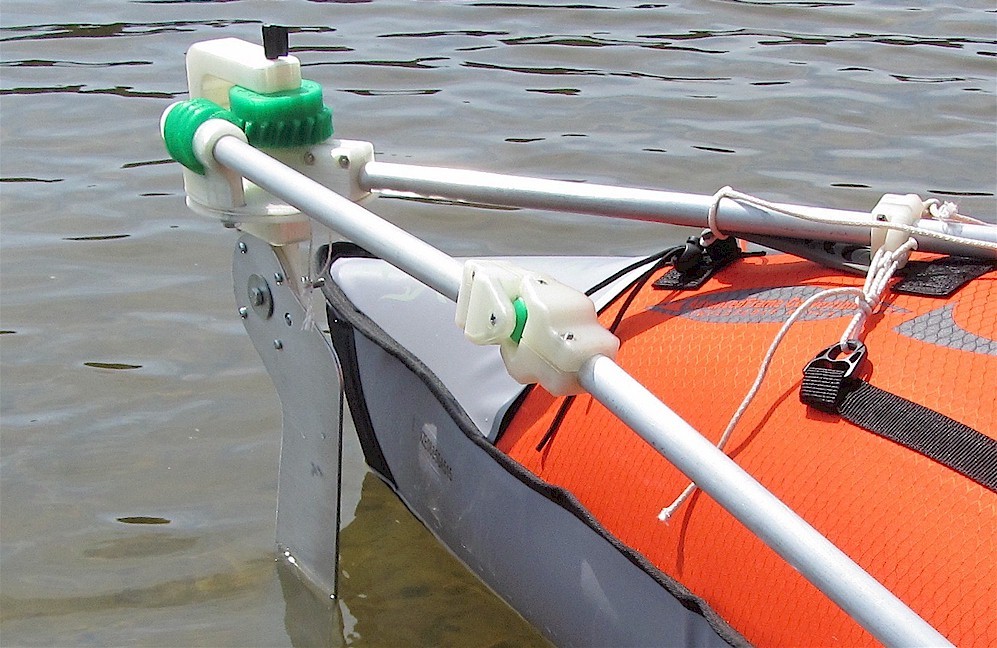
<p>Well, better than my previous rudder (<a href="https://www.thingiverse.com/thing:806945">http://www.thingiverse.com/thing:806945</a>). Rotating the worm gear both adjusts the rudder angle and also tilts the rudder fore and aft. For normal steering angles (+/-20 degrees) the tilting does not affect the steering. If you crank rudder all the way over to 120 degrees, though, you can lift the rudder clean out of the water. The whole assembly straps to the back deck of the kayak (in this case, my Advanced Elements Convertible) and breaks down easily for transport. See how it works here: <a href="https://youtu.be/B3C8raQL2_4">https://youtu.be/B3C8raQL2_4</a></p> <h3>Instructions</h3> <p>Instructions:</p> <p>You will need to print the following parts (all 0.2mm layer, 4 perimeter, 25% infill):</p> <p>1 gear.stl</p> <p>1 worm.stl</p> <p>1 wormbracket.stl</p> <p>1 bigpulley.stl</p> <p>1 yoke.stl</p> <p>1 bladepulley.stl</p> <p>3 idler.stl</p> <p>2 t-clamp.stl</p> <p>3 tiedown.stl</p> <p>2 u-joint.stl</p> <p>1 spider.stl</p> <p>1 handle.stl</p> <p>The yoke is the largest part and needs a 5" x 8" bed. All others can be printed on a 6" x 6" bed.</p> <p>You will also need:</p> <p>16 8-32 x 1" screws</p> <p>4 8-32 x 3/4" screws</p> <p>7 8-32 x 3/8" screws</p> <p>13 8-32 nuts</p> <p>3 1/4-20 x 1" hex bolt</p> <p>2 1/4-20 nuts</p> <p>2 1/4" standard washers</p> <p>2 1/4" fender washers</p> <p>4 6-32 set screws</p> <p>2 3/16" dia x 0.55" stainless steel rod</p> <p>1 3/16" dia x 0.75" stainless steel rod</p> <p>1 5/16" dia x 4.75" stainless steel rod</p> <p>1 36" long x 0.75 dia aluminum tube</p> <p>1 24" long x 0.75 dia aluminum tube</p> <p>2 12" long x 0.75 dia aluminum tube</p> <p>1 rudder blade (as per blade.pdf)</p> <p>heavy duty nylon string for pulley system</p> <p>nylon cord for lashing</p> <p>All fasteners should be stainless steel.</p> <ol> <li>Insert screws and nuts into all parts with tube clamps and tighten only lightly.</li> <li>Tap the holes in the gear, spider, bigpulley and bladepulley with an 8-32 tap. Tap the setscrew holes in the worm and yoke with a 6-32 tap.</li> <li>Insert the 12" tube (worm-tube) thru the wormbracket, inserting the worm as you push the tube thru. Secure the worm with one set screw. Use the other set screw hole as a guide to drill a 0.109" hole (7/64th) in the aluminum tube. Insert the second set screw so that it penetrates the tube. Repeat with the first set screw hole.</li> <li>Press the 2 shorter 3/16" dia pins into the holes on the inside of the yoke. Press the longer 3/16" pin into the bottom flange of the yoke. If the pins don't press in securely, glue them in with superglue. Put the 2 idler pulleys over the 2 short pins.</li> <li>Assemble the bigpulley and gear into the yoke and then insert the 5/16" rod as an axle. Secure the rod with the 2 setscrews in the yoke.</li> <li>Mount the yoke bracket on the bigpulley with the 1/4-20 bolts and standard washers. Adjust the position so that the gears engage fully, but without too much friction. Now tighten the clamp on the worm bracket so that there is a small amount of friction when turning the worm. This will prevent the rudder from back-driving the worm.</li> <li>Take a 36" long piece of nylon string and secure the center of it in the notch in the blade pulley using a shorter 8-32 screw. (Make sure the screw does not stick out the other side of the pulley.) Then screw the blade to the side of the pulley. Secure the blade/bladepulley to the yoke with a 1/4-20 bolt and 2 fender washers. Use two nuts locked together to secure the bolt.</li> <li>Insert the 24" tube into the big pulley and tighten in place. Assemble tie-down pieces onto the 24" tube and onto one end of the other 12" tube (the cross-tube). Assemble the cross-tube to the 24" tube with the t-clamp. Lash the rudder assembly to the rear deck of your kayak. Make sure to lash the end of the cross tube down to the kayak deck as this is what keeps the entire assembly from rotating. You'll have to play around with the exact positioning for your kayak. You may also need to adjust the tube lengths.</li> <li>Now finish the string & pulley assembly: put the 3rd idler pulley over the pin in the flange on the yoke. Take one end of the string and run it over the blade pulley, under this idler pulley, up through the hole, around the left upper idler, around the big bully and then secure loosely with a screw in the bladepulley, up through the hole, over the right upper idler and around the other side of the bigpulley. Adjust the worm so that the rudder is pointing straight ahead and is also vertical. Pull both sides of the string taught and tighten with the clamping screw. This will take a bit of fussing and you'll want to study the video.</li> <li>Assemble the u-joint between the worm tube and the 36" tube and mount the handle on the other end of the 36" tube. Make sure the handle end of the tube is loosely supported by a strap on the side of the kayak or else you will end up breaking the wormbracket.</li> <li>The easiest way to disassemble for transport is to just remove the bigpulley from the 24" tube, and remove the u-joint from the worm tube.</li> </ol> Category: Sport & Outdoors
With this file you will be able to print A Better Rudder (for Inflatable Kayak) with your 3D printer. Click on the button and save the file on your computer to work, edit or customize your design. You can also find more 3D designs for printers on A Better Rudder (for Inflatable Kayak).