A collection of slicer test files (no printing required)
thingiverse
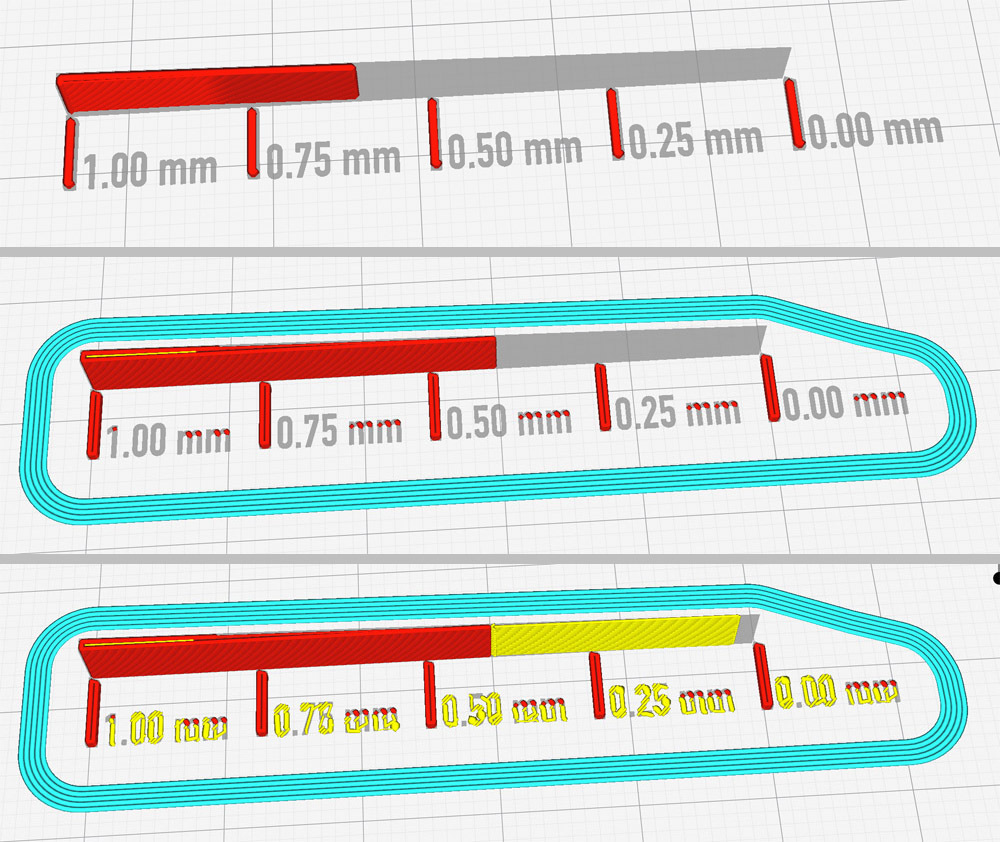
This is a collection of files I have made to evaluate solutions for different slicing problems. They are <b>not</b> intended to be printed at all; all the information they provide can be seen in the slicer preview display. I've marked this a a"work-in-progress" since I'm quite sure that I will add more files in the future (depending on which further problems I will run into), so, if you're into this matter, be sure to check back occasionally. Most of today's slicing applications are very elaborated pieces of software with tons of useful options, but the "perfect slicer" has not been invented yet - often you stumble into problems that can be solved by changing some settings, but then there's those nasty cases that a specific slicer can't handle at all while another one can. Hopefully. As of this writing, I am using Cura 3.6, Slic3r 1.2.9, Slic3r PE 1.41.2+, and Simplify3D 4.1.1. I would not want to do without any of them as each has unique features which are not found in the other ones (yet I think that S3D offers poor performance regarding the price you have to pay for this one). Forthcoming versions of these apps may behave different than the current ones (at least I hope so, regarding a few cases!), so whereever I refer to the behavior of a specific slicer in the following explanations, keep in mind that this may not apply to versions newer than stated above. One more thing before we get to the files: I know that there are a lot more slicing applications out there, but as yet I didn't find any other than the four mentioned above that seemed to be worth having/using. However, I can neither know nor test every alternative, so I would be glad if you would comment in case you found capabilities in some other software which aren't covered by my "standard collection". <b>A few words on how to use these files</b> To test specific aspects (more on that below), just load the appropriate file into your slicer, make the settings whose effects you want to evaluate, and slice the file. Next, take a look at the preview your slicer generates. The preview modes differ a little in the different applications: - In Cura you have to switch from "Solid view" to "Layer view". - In Simplify3D the preview is displayed automatically. - In Slic3r click the "Preview" tab at the lower window edge. - In Slic3r PE click the graphical "Layers" icon in the lower left corner of the window. - Note that both Slic3r and Slic3r PE give you a fully featured preview <b>only</b> after saving the G-code. This is a little uncomfy especially for quick comparisons. When in preview mode, every slicer gives you at least two sliders to choose which layers to see and which not. You can choose whether or not to display non-print movements and/or retraction coordinates. In Cura and Simplify3D you have the additional opportunity to start an animation that shows the order in which the printhead movements are performed, which is very useful for determining some quality/stability aspects. In most cases, the very first layer is what contains all information needed, so just pull the slider down and don't bother yourself with fancy but confusing 3D displays. Well, but now let's take a look at the files (in the order they appear in the above pictures): <b>Single Extrusion Wedge</b> This is a very useful tool to determine the minimum wall thickness that can be printed at all with a specific set of settings. Basically, it's just a wedge whose thickness ranges from 1 mm to absolute zero. Just set your perimeter size(s) and single extrusion behavior, slice the file, and the slicer's preview willl give you a graphic readout of (1) what thickness will be too fine to be printed at all, and (2) where the boundary between perimeter printing and single line extrusion (if applied) lies. Here are a few examples of different settings (all Cura): <img src="https://cdn.thingiverse.com/renders/28/19/8a/88/d1/d77af79594860bef81150309c82566c9_preview_featured.jpg"> The upmost sniplet shows the effect of choosing an extrusion width of 0.6 mm (set independently from the nozzle size). The one in the middle shows a behavior that might be unexpected: Here the nozzle size was set to 0.4, but extrusion width to 0.3. Cura ignores the extrusion setting and limits wall thickness to the nozzle diameter. The downmost sniplet shows the same setting but with the additional option "Print thin walls" checked (which is the Cura synonym for "allow single extrusion walls"). You can see that the perimeter wall ends just like in the example above, but a single (= non-looped) extrusion with decreasing diameter is printed down to the 0.1 mm area. <b>Intersecting Blocks</b> This is a simple test that shows if a slicer can handle self-intersecting objects at all: It looks like one solid object, but in fact it's three independent cubes looming into each other. Currently, every slicer except for Simplify3D can handle such files. <b>Floating Z Gap Blocks</b> These are for blocks hovering above four standing blocks at different heights. The height gaps are 0.01 mm, 0.1 mm, 0.25 mm, and 0.4 mm. Slicers tend to treat very small gaps, especially in Z direction, as file errors that need to be "healed". While this may be useful in many cases, it leads to an unpleasantly simplified output in many others. This file shows the threshold a slicer uses to identify "unwanted" gaps, depending on the layer height and healing settings selected. You can also rotate the file by 90° to compare the X/Y gap behavior. Tip 1: Use multiple wall/cover layers for testing - this way it's easier to recognize block separations in the preview display. Tip 2: Keep an eye on where your slicer classifies planes as "bridges" - in real life, for these planes your current bridging settings would be applied (which may be undesirable if you constructed a gap just to achieve an intermediate wall, not a "functional" gap). <b>Twisted Dropshape</b> This one reveals slicers' (or users') misbehavior in setting the right parameters to achieve an optimal Z seam position, especially in singe wall applications. The basic shape in the file has only one sharp corner, so this is where the layer start (that causes the Z seam) should be placed. Unfortunately the position of this corner is rotated by 45° on the Z axis, so a fixed couple of coordinates for the layer start point will not lead to satisfying results. Try it with different slicers - maybe you will be astounded how complex it can be to solve such a simple task. Tip 1: Set your slicer to retract on layer change, and set the preview to show the retract blobs, so it will be easier to see the layer start positions. Tip 2: As the "start point closest to specific location" feature in Simplify3D is often misunderstood, I'd like to preventively advise you that this "specific location" does not have to be on the build plate at all - usually a value like X 100, Y 2000 gives you the best results. Tip 3: Rotating the object on the Z axis changes a lot. <b>Reversed Dropshape</b> Different object, same problem - in this case, the sharpest corner is in the back of the object for one half of the height, but in front of it for the other half. Objective is the same as for "Twisted Dropshape": Position the layer start at the sharpest corner in every layer. To be fair, I have to mention that, with most slicers, it would require manual editing of the G-code (which I wouldn't encourage you to) to solve this problem. <b>0.4 mm Constriction</b> This really is a hard one: a set of two blocks connected by a constriction of just 0.4 mm in diameter. While every slicer is able to connect the blocks with a single extrusion wall, there seems to be none that does it in the (for stability reasons as well as for looks) only acceptable way of making this single extrusion a part of the upper wall movement: <img src="https://cdn.thingiverse.com/renders/4e/df/47/0c/bb/9006ce8cbbfae67330fff0f0632bce28_preview_featured.jpg"> (I've added a manually edited G-code file that shows the order in which the walls <b>should</b> be printed and fro which the above picture is taken - please don't try to print this file, it's for demonstration purposes only!!). That said, there is currently no reason to give this file a test (unless you have an idea how to make it work - if so, please, please comment!). But it will be worth to look at with every forthcoming update of any slicer software. Maybe some day a programmer surprises us with the right solution. <b>Spiral Test Dome</b> While every slicer offers a "spiral vase" or "spiralize" mode, most of them are completely unable to calculate it right. This is another file that is intended to be used for the examination of slicer updates. It's a spheroid dome that actually could never be printed in spiral vase mode due to its too steep overhang angle. However, this very property makes this shape ideal to show if a slicer can draw real spirals at all, or if it's using some way to simplify this complex task. As you will see, currently Cura is the only app that can handle this task. Both Slic3rs, as well as Simplify3D (see screenshot below), fail to calculate XY coordinates in relation to the changing Z values, resulting in indents in the printed shape: <img src="https://cdn.thingiverse.com/renders/19/ba/4e/30/01/dbaec6099eb8e8f749acb7aa4efc5a3e_preview_featured.jpg"> Nevertheless, there is hope - in S3D, for example, the spiral behavior was changed with version 4.1, and then again with 4.1.1 - though as yet they were not able to do it right, this shows at least that they are aware of (some of) the aspects that make their expensive software inferior to free alternatives... maybe with 5.0 they will have mastered this issue? Well, that's my slicer stress test collection so far. Still reading? Fine - I think you're in the right place then. ;)
With this file you will be able to print A collection of slicer test files (no printing required) with your 3D printer. Click on the button and save the file on your computer to work, edit or customize your design. You can also find more 3D designs for printers on A collection of slicer test files (no printing required).