A6 MKS upgrade electronics box
prusaprinters
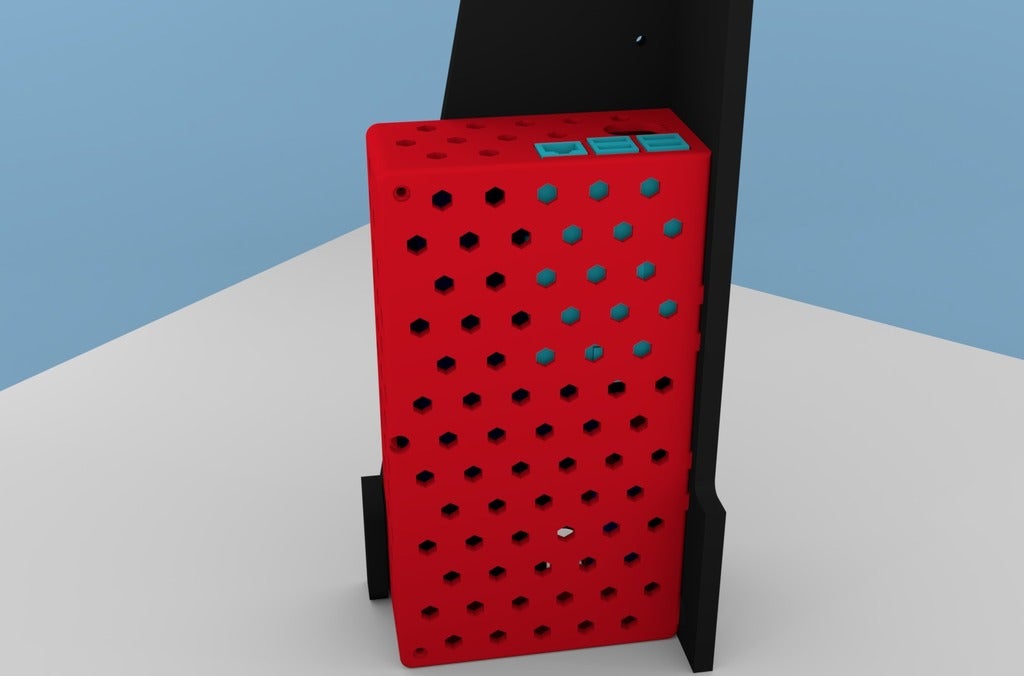
<p>This is an enclosure for an Anet A6 that (tightly) fits:</p> <ul> <li><a href="https://amzn.to/2Qqir47?tag=revensanchez-20">MKS Gen v1.4</a>*</li> <li><a href="https://amzn.to/2EblQfB?tag=revensanchez-20">Mosfet</a>*</li> <li><a href="https://amzn.to/2E89QM5?tag=trevensanchez-20">Raspberry Pi 3</a>*</li> <li><a href="https://amzn.to/2QLiGGi?tag=revensanchez-20">3A Buck converter</a>*</li> </ul> <p>I upgraded my A6 to a MKS Gen v1.4 as it was the simplest (and cheapest) route to upgrade the stepper drivers and get some <a href="https://amzn.to/2EbdaWC?tag=revensanchez-20">TMC2130</a>* action.</p> <p>This was the layout I came up with that lets me have everything in one box and still have the connections be more or less tidy. It fit's the A6's frame and it prints really well. It's also not <em>too</em> big that you can't actually print it on the A6.</p> <p>Apart from the components, you will also need a <a href="https://amzn.to/2rtbn7K?tag=trevensanchez-20"><strong>left</strong>-angled USB cable</a>*; ideally I would like to connect the RPi through the I/O header, but I haven't had time to get around to that and besides: it's nice to have the USB cable in place for reflashing firmware without having to open the enclosure.</p> <p>Airflow is good, but not great. It works for me without any issues, but you may need active cooling for your setup. I've added versions of the lid to accommodate a 90mm or a 40mm fan (Update 4-FEB-19).</p> <p>The holes next to the cable port are to thread in strands of filament or single core wire in order to give the cables more rigidity.</p> <ul> <li>affiliate links</li> </ul> <h3>Print instructions</h3><p><strong>Rafts:</strong> No<br/> <strong>Supports:</strong> No<br/> <strong>Resolution:</strong> 0.2mm<br/> <strong>Infill:</strong> 30%<br/> <strong>Filament:</strong> PETG</p> <p><strong>Notes:</strong></p> <p>No supports are needed to print the files as they are. All bottom facing screw holes or anchor blocks are stepped precisely for 0.2 printing.</p> <h3> Post-Printing</h3> <p>The square nut holes will probably need to be deburred. Put the nuts in before you start assembling. They are a bit oversized to account for that.</p> <p>Fasten the box to the frame first and build in place. Because of the layout and to use the holes on the frame, once the components are in place it's not trivial to take the box off unless you take the MKS out too.</p> <p>You will also need some short screws to hold all your components down. I used random screws from my box of <em>PC screws</em>. I think they're M3x5 flanged head; your typical motherboard screws. The mounting holes can accommodate M3 screws (8mm or less), though these are really tight with the RPi (2.8mm holes), so I don't recommend them (I used them, but if you damage your RPi, that's on you).</p>
With this file you will be able to print A6 MKS upgrade electronics box with your 3D printer. Click on the button and save the file on your computer to work, edit or customize your design. You can also find more 3D designs for printers on A6 MKS upgrade electronics box.