About modeling method of counterbore hole on the bottom side.
prusaprinters
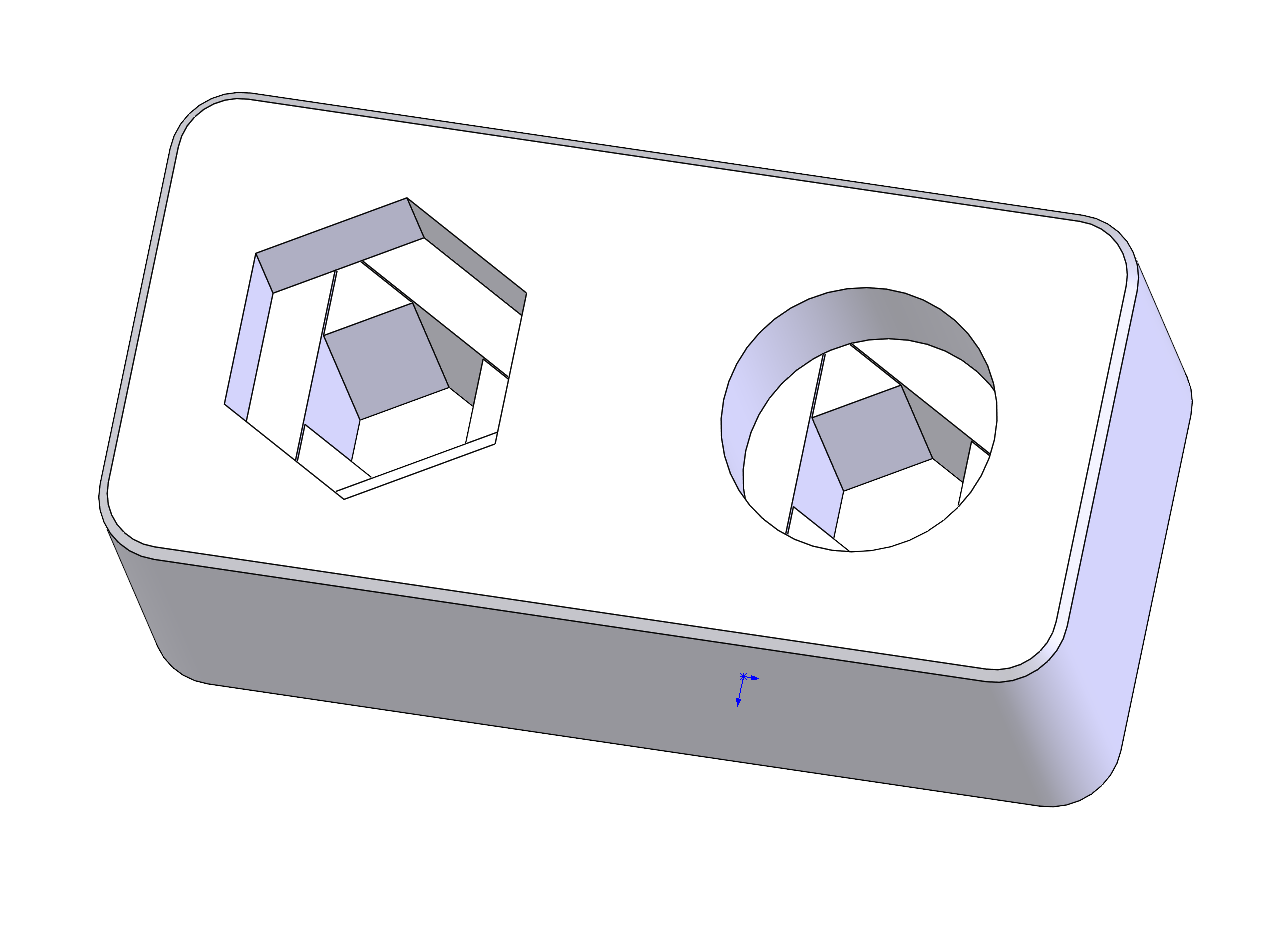
<p>If counterbore holes for nuts and bolts are provided on the bottom side, printing tends to be disturbed. Also, it is not practical to use support pillars because they are too narrow.</p><p>The modeling methods described here solve that.</p><p> </p><p>As an example, we will model counterbore holes and through holes for M3 nuts and screws.</p><p> </p><p>1. Make a counterbore hole to fill the nut.<br>For the time being, let's set the diameter of the inscribed circle to 5.6 mm and the depth to 2.5 mm.</p><figure class="image image_resized" style="width:70.83%;"><img src="https://media.prusaprinters.org/media/prints/61803/rich_content/f0d0d1f0-0521-461e-bc2b-edf744aa69a2/0sukurinshiyotsuto-2021-03-28-2307.png#%7B%22uuid%22%3A%22ba1eff98-371b-4f30-8fc8-b2ddd7fd5e1f%22%2C%22w%22%3A690%2C%22h%22%3A663%7D"></figure><p> </p><p>2. Make a hexagonal through hole for the screw to pass through.<br>For the time being, let's set the diameter of the inscribed circle to 3.3 mm.<br>The key to this method is not to make this hole circular.</p><figure class="image image_resized image-style-align-center" style="width:76.13%;"><img src="https://media.prusaprinters.org/media/prints/61803/rich_content/194f34df-10ae-4548-8405-f2e652e71ae1/2sukurinshiyotsuto-2021-03-28-2307.png#%7B%22uuid%22%3A%22d86a261c-9acd-415c-98d0-4b22a170f0dc%22%2C%22w%22%3A690%2C%22h%22%3A663%7D"></figure><p>3. Based on the bottom surface of the counterbore hole for the nut, draw the same straight line as one of the hexagonal sides of the screw hole to make an equilateral triangle.<br>Then, rotate and copy the equilateral triangle as shown in the figure.</p><figure class="image image_resized" style="width:73.34%;"><img src="https://media.prusaprinters.org/media/prints/61803/rich_content/abb37372-b7ae-4bee-857e-aed309b8cf17/3sukurinshiyotsuto-2021-03-28-2307.png#%7B%22uuid%22%3A%22266a1828-59d0-414f-9bd4-8a4c15cfb8bf%22%2C%22w%22%3A690%2C%22h%22%3A663%7D"></figure><p>4. Cut the body with three equilateral triangles. The cutting depth should be the same as the thickness of one layer of 3D printing.</p><figure class="image image_resized" style="width:54.27%;"><img src="https://media.prusaprinters.org/media/prints/61803/rich_content/aae4157f-e2a8-4e23-82fa-dd9650fc5bc4/ming-cheng-wei-she-ding-1.png#%7B%22uuid%22%3A%22466b2aaf-62a0-4d6e-b020-9bbd3b88dcc4%22%2C%22w%22%3A1005%2C%22h%22%3A909%7D"></figure><p> </p><p>5. In the case of counterbore holes for nuts, the corners will be rounded and it will be difficult for the nuts to enter, so provide a small groove to prevent this.</p><p>The recommended groove width is 0.1 mm.</p><figure class="image image_resized" style="width:84.03%;"><img src="https://media.prusaprinters.org/media/prints/61803/rich_content/cf36e34d-6c6f-4b20-9f15-abd845b50a58/ming-cheng-wei-she-ding-2.png#%7B%22uuid%22%3A%22bd22ebfa-d2b9-43a7-ab51-6fbe2416d2a8%22%2C%22w%22%3A878%2C%22h%22%3A862%7D"></figure><p> </p><p> </p><figure class="image image_resized" style="width:81.38%;"><img src="https://media.prusaprinters.org/media/prints/61803/rich_content/44d69120-af35-431a-be0c-31ca44507213/ming-cheng-wei-she-ding-3.png#%7B%22uuid%22%3A%22cffc1433-979d-4f9e-9055-836239195997%22%2C%22w%22%3A1158%2C%22h%22%3A1072%7D"></figure><p> </p><p><br>That's all there is to it.</p><figure class="image image_resized" style="width:68.24%;"><img src="https://media.prusaprinters.org/media/prints/61803/rich_content/12e1f52f-4cf1-47a5-8a9a-d5e4413327da/ming-cheng-wei-she-ding-4.png#%7B%22uuid%22%3A%22eb147ef2-dccf-4506-b873-89d59d287d01%22%2C%22w%22%3A1057%2C%22h%22%3A1141%7D"></figure><p> </p><p> </p><p>Finally, take a look at the slices.<br>You can see that there is always a foundation at the start and end of the bridge, and that the bridge is always in a straight line.</p><p> </p><figure class="image"><img src="https://media.prusaprinters.org/media/prints/61803/rich_content/ca247c95-feb7-4e8d-8176-6f1bf2f5cd2e/sukurinshiyotsuto-2021-03-28-234125.png#%7B%22uuid%22%3A%225f3075d1-45e4-4452-be31-10b06a3a4097%22%2C%22w%22%3A1371%2C%22h%22%3A2858%7D"></figure><p> </p><p>The counterbore holes for bolts are simpler.<br>Please refer to the attached model.</p><p> </p><p>This is the end of the explanation of this method.</p><p> </p><p> </p><p> </p>
With this file you will be able to print About modeling method of counterbore hole on the bottom side. with your 3D printer. Click on the button and save the file on your computer to work, edit or customize your design. You can also find more 3D designs for printers on About modeling method of counterbore hole on the bottom side..