AC Nylon Rit Dye Color Chips
thingiverse
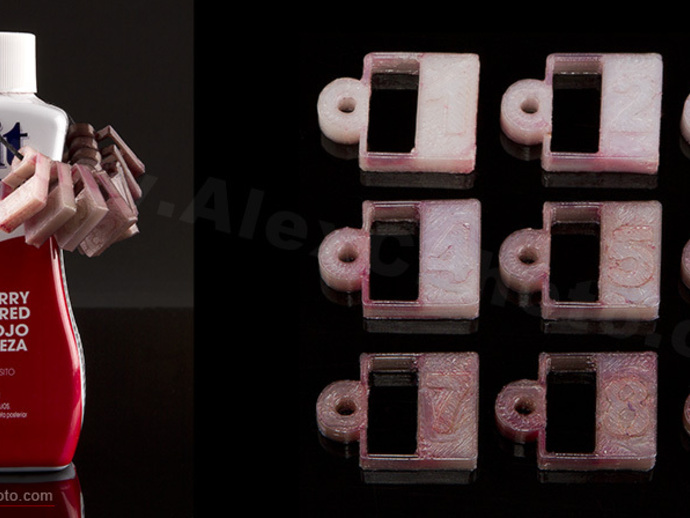
So the first time I dyed Nylon I was rather impressed with how well the colors saturated into the plastic,. But what really got my engine revving was that dependent on time and temperature different tones of each color could be generated with close control of those variables. Furthermore, each dye color had its own progression characteristics. So I set out to create a method to generate progressive tone color chips. I chose to make the temperature a constant 130 F as that is the temp the water gets to in a double boiler on low in my crock-pot. And then decided to progress the dye time by one hour per chip. It makes for an interesting day but I put a full set of color chips into a ziplock with the dye then floated the dye in the 130 F water, and then every hour I removed a color chip starting with 1 to see a light tint, and ending at either 9 or 12 for dark as can be saturation. I did not use vinegar as I did not want to alter the Dye, mostly for re-use reasons, but also I did not want to add any unknown variables to the filament drying/printing since I also plan on Pre-dyeing filament for the tie-dye effect some have tried, so I wanted my colors to represent non-altered dye. I printed these 2 walls in all directions, with that I can be fairly assured that the dye will not find its way into the infill and get trapped in there, where a single wall will mean just that, and some uneven dyeing results. I also made the chip with solid areas, infill areas (25%),. and a thin walled area, which shows how the dye saturates in to each. I added adhesion pads, I do not like to "Squish" the first layer to get Nylon to stick to the garolite, I'd rather get a accurate bottom layer and have to do some light trimming after the print. An exact-o or small sharp scissors make quick work of the pads. The pads also give a good place to start digging with a thin spatula to easily separate the parts from the garolite. After dyeing I then hung the chips on a string and attached the string to the bottles the Rit dye came in. (I use the liquid Rit dye because it comes in its own re-useable container, if you go with powder you will have to provide a container for storage, or dump the dye after every use, which is just wasteful IMHO since it can be re-used many , many times for this application. I am getting some really interesting results with this process and since not everyone's variables are exactly the same (different crock pots, etc,.) I though some folks might like to try this for themselves =) Also since printing Nylon can be a hair tricky for some, I've broken them out into individual numbers in case you only want to test one or two durations, or you can not quite do a near full platter just yet. I have also sometimes had a single number get messed up on a full platter and in that case you can print an individual to fill out the set you want. Please Let me know if you'd like to see anything added or changed on these. And please do post your picks & process if you try it! Oh, I am using 618 Nylon for my test chips, I am un-sure at this time weather or not the other Nylon absorbs the dye at the same pace or with variance. I will add more sRGB Accurate color photos as I run the test on more of the dye color options. the first batch of three colors where on 9 chips, going forward I am going to try to do 12 hour tests. Oh one word of warning, do be careful with the Ziploc filled with dye, spilling that much dye in your kitchen is an absolute nightmare to clean up! A bit more on this color project here. http://www.printrbottalk.com/forum/viewtopic.php?f=74&t=4623
With this file you will be able to print AC Nylon Rit Dye Color Chips with your 3D printer. Click on the button and save the file on your computer to work, edit or customize your design. You can also find more 3D designs for printers on AC Nylon Rit Dye Color Chips.