Acetone Vapor Bath Fan (for 5 gallon bucket)
thingiverse
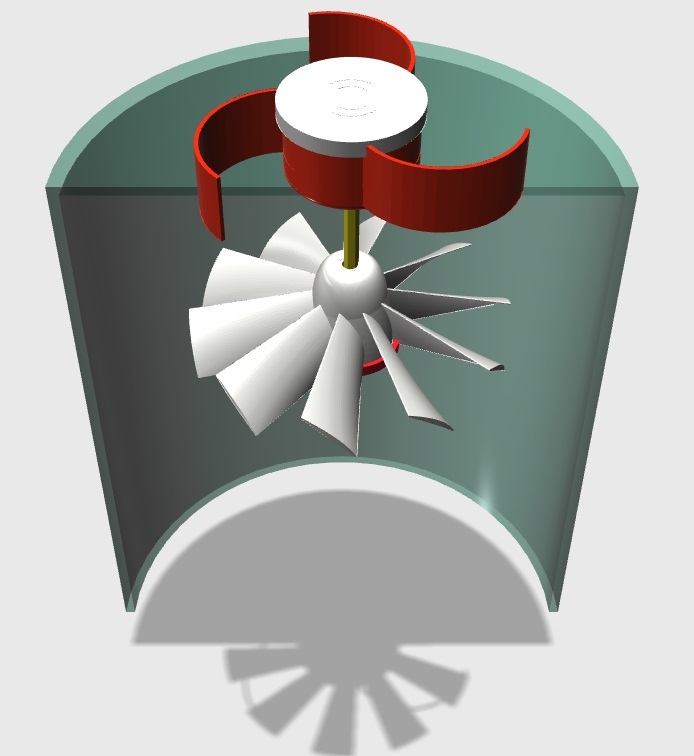
Disclaimer: Do not perform an acetone vapor bath to smooth ABS parts. Performing acetone vapor baths is dangerous and should not be performed in doors, near open flames, near motors or motorized equipment or any environment deemed to be hazardous. Only perform outdoors in well ventilated area. Perform at your own risk. OK, disclaimer over. I use a 5 gallon bucket with magnets and paper towels dampened with acetone to perform the acetone vapor baths. The bucket is placed upside down and the lid is the shelf. To allow the vapors to move get to all of the part, I created a shelf. The shelf improved the results but not enough. I added a fan without an engine. You do NOT want to use a motor inside the bucket or in the vapor environment. The fan is propelled by an external house fan placed outside and away from the bucket. It is aimed at the top. Keep the electric fan outside and away from the acetone bucket. Aim it so that it blows across the bucket. The outside, top bucket fan catches the wind, spins and rotates a connected shaft. The shaft goes through the bucket via a small hole and connects to an internal fan inside the bucket. The spinning shaft rotates the internal fan and gently disperses the vapors around the entire area instead of the vapors hanging stagnate. The parts to print are two fans and two keyed caps. Parts not included are the shaft and a small bearing. I used a pencil for the shaft. It is light weight, sturdy and in expensive and easily replaced. Only glue the keyed caps to the pencil. If there is an issue, you can break the pencil and only reprint the caps (if needed) instead of having to reprint everything if you glued it all together. I used a roller skate / skateboard wheel bearing. You can find them on Amazon (https://www.amazon.com/s/?ie=UTF8&keywords=roller+skate+bearing&tag=googhydr-20&index=aps&hvadid=229079127579&hvpos=1t1&hvnetw=g&hvrand=2419097003072874643&hvpone=&hvptwo=&hvqmt=b&hvdev=c&hvdvcmdl=&hvlocint=&hvlocphy=9012086&hvtargid=kwd-297500426091&ref=pd_sl_v2449as4a_b_p37). REMEMBER: Never try indoors, only perform outside in well ventilated areas. Protect your skin. The vapors are hazardous to your health and explosive. To be safe, just don't do it. By printing this object, you release myself and Thingiverse from any liability or claims. Other than that, it works quite well. Print with PLA only, so it doesn't melt. I printed at .25 resolution and 50% infill. It is pretty sturdy. Assemble with crazy glue. Remember, only glue the keyed caps to the shaft. Let gravity hold the fans in place on the keyed caps and hold the bearing in place. If you glue the bearing, it may not turn. The fan should rest on the bearing and be allowed to freely spin the inner or outer casing of the bearing depending on how it sits on it. It decreased the vapor bath time on a large print from 3 hours to 45 minutes. REMEMBER: JUST DON'T DO IT... BUT IF YOU INSIST, DO IT OUTSIDE AND KEEP THE HOUSE FAN FAR ENOUGH AWAY THAT VAPORS CAN DISSIPATE BEFORE TRAVELING THE DISTANCE TO IT. DO NOT SMOKE AROUND ACETONE. DO NOT PERFORM NEAR AN OPEN FLAME, MOTORIZED EQUIPMENT, OR ANY POSSIBLE IGNITION SOURCE OR SPARKS. You don't want an explosion that could harm someone or start a fire. The upper fan is a remix of https://www.thingiverse.com/thing:7487 The internal fan is a remix of https://www.thingiverse.com/thing:2187837 Note, need a tray to hold your parts? This goes great with the bucket fan: https://www.thingiverse.com/thing:3024218
With this file you will be able to print Acetone Vapor Bath Fan (for 5 gallon bucket) with your 3D printer. Click on the button and save the file on your computer to work, edit or customize your design. You can also find more 3D designs for printers on Acetone Vapor Bath Fan (for 5 gallon bucket).