Action Stickman +
thingiverse
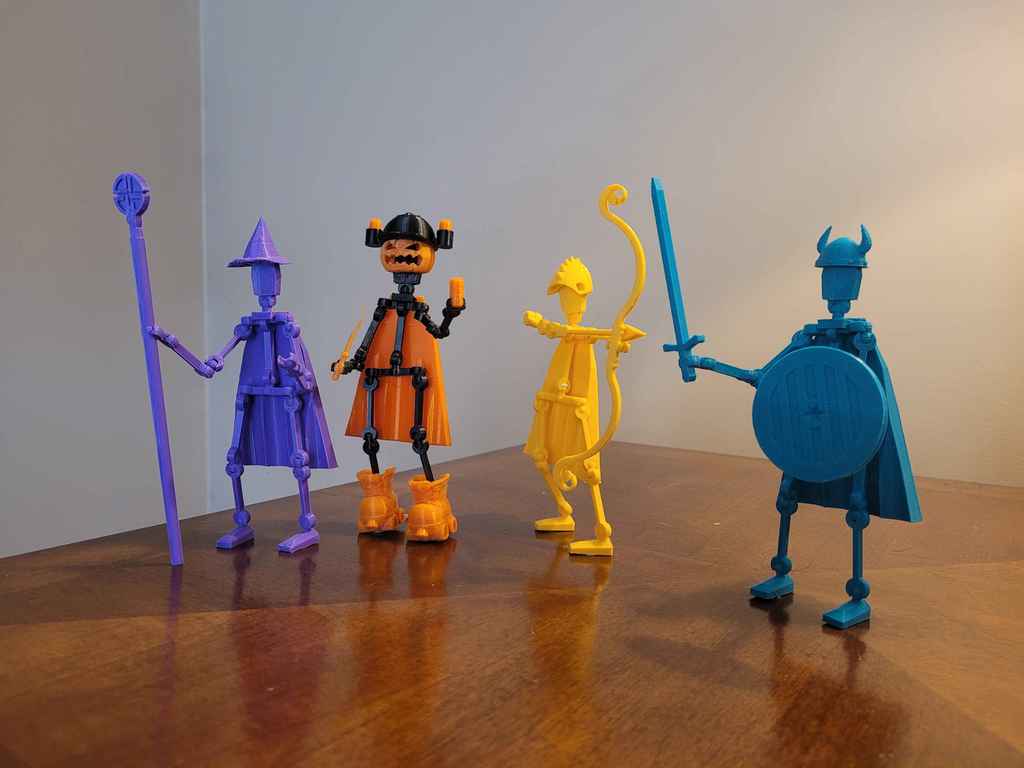
9/29/22 - Printed Beer_Helmets for PumpkinKing and Beers fit in holders and hat fits snugly. Edited all the Hands in all Sets to make them a bit tighter. Edited Beer Helmets for regular models not just the PumpkinKing. 9/28/22 - Edited ALL models and accessories to print anything without supports. Designed Beer Helmet for PumpkinKing with and with/out beers. Still need to test print those. 9/26/22 - Got all models printed to test functionality and think everything is pretty good. 9/25/22 - Making a Halloween Model: Edited Roller_Skates to print w/o supports. Printed Pumpkin_Helmet and Roller_Skates. Both pieces were tight as designed and snapped into place. I loved Radical_One's StickMan Fighters so much but those poor guys seemed to be a bit naked so I dressed them with capes and gave them some weapons and armor choices. Print: You want to start with choosing which set you'd like to make. If you want to mix and match pieces choose the "bare set" which wont have any accessories so you can then add what you want. I didn't include the cape in the sets for it's settings should be different. It's the only piece you can drop the infill to around 40% and kick up the speed. Everything else (perhaps excluding the shield) you'll want 100% infill and print layers around .12-.16, pretty slow. (The pieces are small so the time difference between printing fast and slow isn't that much anyway). I have two different cape choices one standing and the other laying down. The go-to is the standing model but if you have bad adhesion issues try the laying model. (They are not the same- I edited the laying model to print without supports (Everything should print fine without supports)). If you are printing the bare set you also need to include the cape bracket. The other sets have the cape bracket included, just not the actual cape. The bracket That holds the cape to the model is tiny!! If you have issues print it by itself at 8-10mm/s on a raft (0.3 air gap) should do the trick. (The bracket can be a little chewed up and still work). The pumpkin_helmet and Roller_Skates I've printed in PETG and were able to "snap" the head and feet into perspective positions. They are tight (perfect) and shouldn't need to change any sizing unless you are using something that is super shrink-y.. I did print them very slow at 40mm/s (I use Klipper so my go-to is 100mm/s) If you are having issues with pieces breaking, poor layer adhesion, or can see gaps between the lines where it should be solid: try printing a "long_bone" 20 degrees hotter on a 60/45 degree bed. Kick up flow to 115%. Then test it to see if that did the trick.. Almost every filament brand I've bought instruct too cool of setting. Assembly: There are two "bone" length sizes. The 4 shorter "bones" in the set are the arms (2 on each arm) and 4of5 of the longer pieces make the legs. The 5th long "bone" piece makes the torso. There are two pieces with stems in the middle. The one with a shorter length and a taller stem is the "neck" while the wider piece, short stem is the "hips". Cape assembly is pretty self explanatory- CAREFULLY press the cape_bracket, while slightly twisting over the "head socket". It then rests over the models "shoulders" with the two pins pointing out the back which snap into the cape. (I recommend assembling the arms and legs before snapping the bracket to the cape so not to put the bracket through un-needed stresses while pressing on the arms and legs). Remix: I decided to make the cape in two pieces so if the print happens to turn out poor quality, instead of re-printing the entire 4 hour cape you can simply reprint the 8 minute bracket. Plus it keeps a 90 degree angle if you decide you want to print the cape laying down due to adhesion issues. The downside is the bracket is VERY small. The model without any accessories is the "Bare_Stickfighter_Set" file. This is Radical_One's design except for whatever reason every time I printed his the Torso/Hip joint was very loose so the model wouldn't stay upright. I made all the balls a bit bigger to tighten the joints. I also dropped the sword and put it in the included warrior set. All those pieces are of his design. Most the accessories I've created from scratch but a few small pieces remixed from other tinkers.
With this file you will be able to print Action Stickman + with your 3D printer. Click on the button and save the file on your computer to work, edit or customize your design. You can also find more 3D designs for printers on Action Stickman +.