Active Cooling Fan Duct for Replicator 1 / Duplicator 4 / FlashForge
thingiverse
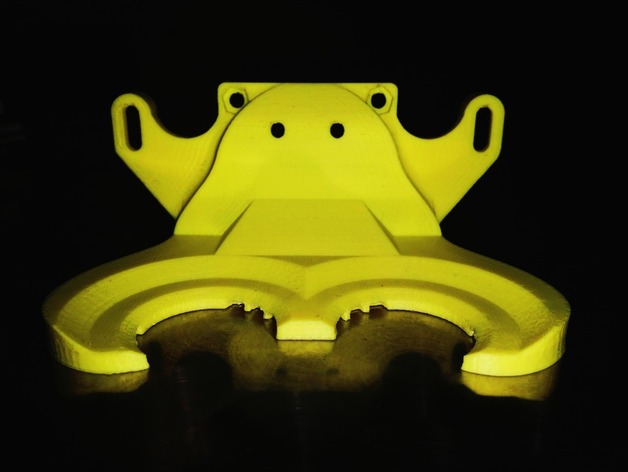
New version of this cooling duct is available at ThingID 537918. If you intend to print it, please read the following information thoroughly: This active cooling duct is designed for MakerBot Replicator 1, FF3DP FlashForge, CTC Creator Dual, and WanHao Duplicator 4 & Duplicator 4X printers. A version for Replicator 2X is in progress at ThingID 298733. The model is based on the rolling airflow concept by SSW (ThingID 259688). Key differences include redirected air outlets to nozzle tips and printed models, a 2mm shallower design for closed print chamber doors, improved airflow utilization through MK7/8 trapezoid rods, and targeted outer ducts covering nearly 360 degrees of cooling. You will need a 24V 40x40x10mm fan, two M3x60 hex socket screws (or clips), two M3 nuts, and two M3x15 countersunk head screws. Modify the front door for optimal cooling. Low-detail version is also available. A separate version without airway holes is provided for specific printers that require a clip attachment instead of bolts. Note: Duplicator 4/FlashForge/CTC users need to modify their control boards to enable fan control. Slicing the duct with MakerWare 2.4.1 on Duplicator 4 with Sailfish 7.6 firmware worked well for me. Simplify3D 2.1.1 also slices flawlessly. ABS is recommended for future prints, using a custom profile with 0.1mm layer height, 1 shell, 100% infill, 230°C extrusion temp, and 90°C heat bed temp. Disable bridging, rafts, and support structures.
With this file you will be able to print Active Cooling Fan Duct for Replicator 1 / Duplicator 4 / FlashForge with your 3D printer. Click on the button and save the file on your computer to work, edit or customize your design. You can also find more 3D designs for printers on Active Cooling Fan Duct for Replicator 1 / Duplicator 4 / FlashForge.