Adaptive Optics - Demonstration Model
thingiverse
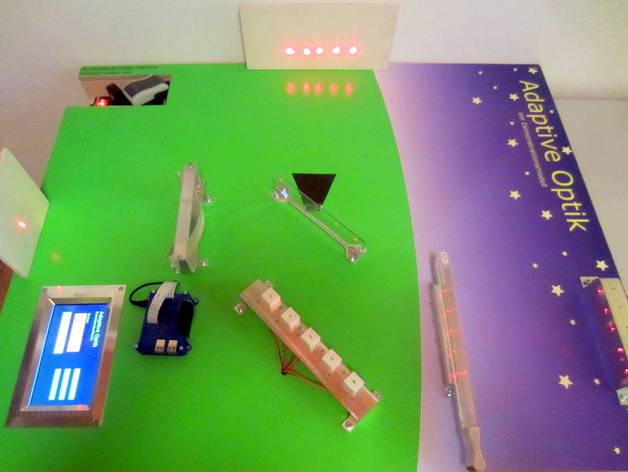
Adaptive Optics - Demonstration Model The "Adaptive Optics - Demonstration Model" illustrates the basic functionality of adaptive optics. It is a diy project based on Raspberry Pi and programming in Python image recognition with OpenCV 3d printed parts and a wooden baseplate Adaptive optics is a technique used by astronomers to overcome the disturbing influences of the atmosphere. The wavefront of the light passing through the atmosphere gets disturbed by turbulences caused by the exchange of warm and cold air. This effect leads to blurred images. With the invention of adaptive optics astronomers are able to measure the distortion, to adjust a corresponding correction and take pictures as sharp as taken from space. For more information about the adaptive optics see:http://www.ctio.noao.edu/~atokovin/tutorial/intro.htmlhttps://en.wikipedia.org/wiki/Adaptive_opticshttps://www.eso.org/public/teles-instr/technology/adaptive_optics/ In order to have some interactive demonstration model, I built this project, which I now want to share with you. If you’re interested in the code I wrote, check my github repository Print Settings Printer Brand: Ultimaker Printer: Ultimaker 2 Notes: In order to have robust and accurate parts, I decided to use aluminium as material for most of the parts. I did not try to print all of the parts, but I’m sure it is possible. Keep in mind that the “lense.stl” and the “atmosphere_glas.stl” files are made of plexiglass. You might try printing with transparent filament and plosih it, but I highly recommend getting it manufactured by some professionals. All parts are accessible as individual parts in my adaptive optics model collection:http://www.thingiverse.com/fgebhart/collections/adaptive-optics-model How I Designed This All parts are designed for fitting on a 80 x 100cm baseplate. The software I’m using is Autodesk Inventor. First I started using wood as material, but because of the lack of accuracy I started 3d printing and milling aluminium. Feel free to adapt the parts to your needs. Project: Adaptive Optics - Demonstration Model Overview & Background: Since adaptive optics is a sophisticated and fascinating technique I decided to build a model to help people understanding this modern technique and (of course) to share my fasctination. By completing this project you will learn the following skills: programming in Python wood manufacturing principles of linear optics electro-technics soldering image recognition with OpenCV graphical user interface with tkinter … Objectives: Once the model is built you are able to present it. Therefore students will learn: the basic functionality of adaptive optics like measuring optical distortion correcting the distortion principles of linear optics physics of lenses … …and don’t forget the “wow-effect”. People might get infected by the fascination of diy-projects and start building their own project. Audiences: Since the model illustrates just the basic functionality of adaptive optics, there is no certain grade or age. Younger students might just be interested in how the model works, high school students will see the analogy to the real adaptive optics and even adults will have a lot of questions. Subjects: The “Adaptive Optics – Demonstration Model” is applicable to science, physics, astronomy and robotics. Skills Learned: Depending on the skills of the students there are two options of “skills learning”: Building the project on your own or Someone builds the model so you can have a hands-on experience about adaptive optics The hands-on experience will teach you the following skills: the basic functionality of adaptive optics like measuring optical distortion correcting the distortion principles of linear optics physics of lenses … If you're building it on your own, you will for sure add: programming in Python wood manufacturing principles of linear optics electro-technics soldering image recognition with OpenCV graphical user interface with tkinter … Lesson/Activity: First of all check the following video to understand what the "Adaptive Optics - Demonstration Model" does and how it works: https://youtu.be/DhV-dv6C7ik Now consider the following structure of this section: Building Process 1.1 Wooden Baseplate 1.2 Top Board 1.3 Electronics 1.4 Adjusting Positions 1.5 Programming Presentation of the Adaptive Optics – Demonstration Model (Please keep in mind that this is no detailed step-by-step instruction. It will just give you the idea of what to do. If you have any questions about building the model, don’t hesitate to write a comment or email.) 1. Building Process In order to build the "Adaptive Optics - Demonstration Model" you will need: Raspberry Pi 2 B (or newer) Raspberry Pi camera module 5x smal laserelemets 5x 5V 28BYJ-48 Steppermotor + ULN2003 Driver Board 7inch touchscreen for Raspberry Pi 3d printed parts + lenses loads of cable, wood, screws and of course tools 1.1 Wooden Baseplate The first thing you have to do is caring about the baseplate. Therefore you'll need a 80 x 100cm wooden board. By adding slats around the edges you’ll create an interspace for the electronics. Leave some space for the power supply. 1.2 Top Board Make sure to buy a flat top board, so the laserbeams will stay in one surface. I recommend a thickness of about 10-12mm. Place the 3d printed (/aluminium) parts on the top board to check their positions. Turn on the lasers to check if they are aligned correctly. Drill holes for the cables. Cut some window for the touchscreen and attach the parts to the top board. 1.3 Electronics In order to get the system running plug the stepper motors to their driver boards and connect them to the Raspberry Pi. I recommend using a breadboard to connect all the motors and the touchscreen together. Attach the touchscreen to the top board. Connect the camera module to the Raspberry Pi and attach it to the top board using the “cam_hold.stl”. 1.4 Adjusting Positions Finding the perfect position of the 3d parts will take some time. Be sure to have some “mobile support screens” to check the propagation of the lasers. Once you found the right positions drill some holes and screw the parts tightly. 1.5 Programming For programming you’ll need to install OpenCV on your Raspberry Pi. Check my github repository. Here I uploaded my code. The main programs are called: AO_just_stabi.py AO_reset.py tk_ao.py just_cam.py Put them together with the gui images in your Raspberry Pi home folder. Take your time to read the comments in the code, since it will help you a lot. 2. The final demonstration model: Once you set up the entire system, you should be able to run it. Start the adaptive optics correction mode by hitting the button “start adaptive optics” in order to activate the “live-correction-mode”. Now you can add any disturbances and watch how the system applies a corresponding correction. The focused laser spot at the small screen will therefore always gets back together to one small point. So finally the combination of image recognition software, raspberry pi with python script and moving mirrors establishes a system which performs live corrections to any manually added disturbance. Have Fun! Duration: Depending on your skills this project will take about 1-3 months to build. Once it is done it should be able to have a presentation + discussion in about 2-4h. Preparation: Students should know about: the aspects of night sky observations telescopes References: https://www.youtube.com/watch?v=gDGvNyVApgg http://www.ctio.noao.edu/~atokovin/tutorial/intro.html https://en.wikipedia.org/wiki/Adaptive_optics https://www.eso.org/public/teles-instr/technology/adaptive_optics/ Rubric & Assessment: At the end of the project, students should have learned about: the influences of the earths atmosphere the problems of night sky observations the functioning and impact of adaptive optics for earthbound telescopes
With this file you will be able to print Adaptive Optics - Demonstration Model with your 3D printer. Click on the button and save the file on your computer to work, edit or customize your design. You can also find more 3D designs for printers on Adaptive Optics - Demonstration Model.