Adding the Ender 3 S1 printer profile in Cura 5/4.13
prusaprinters
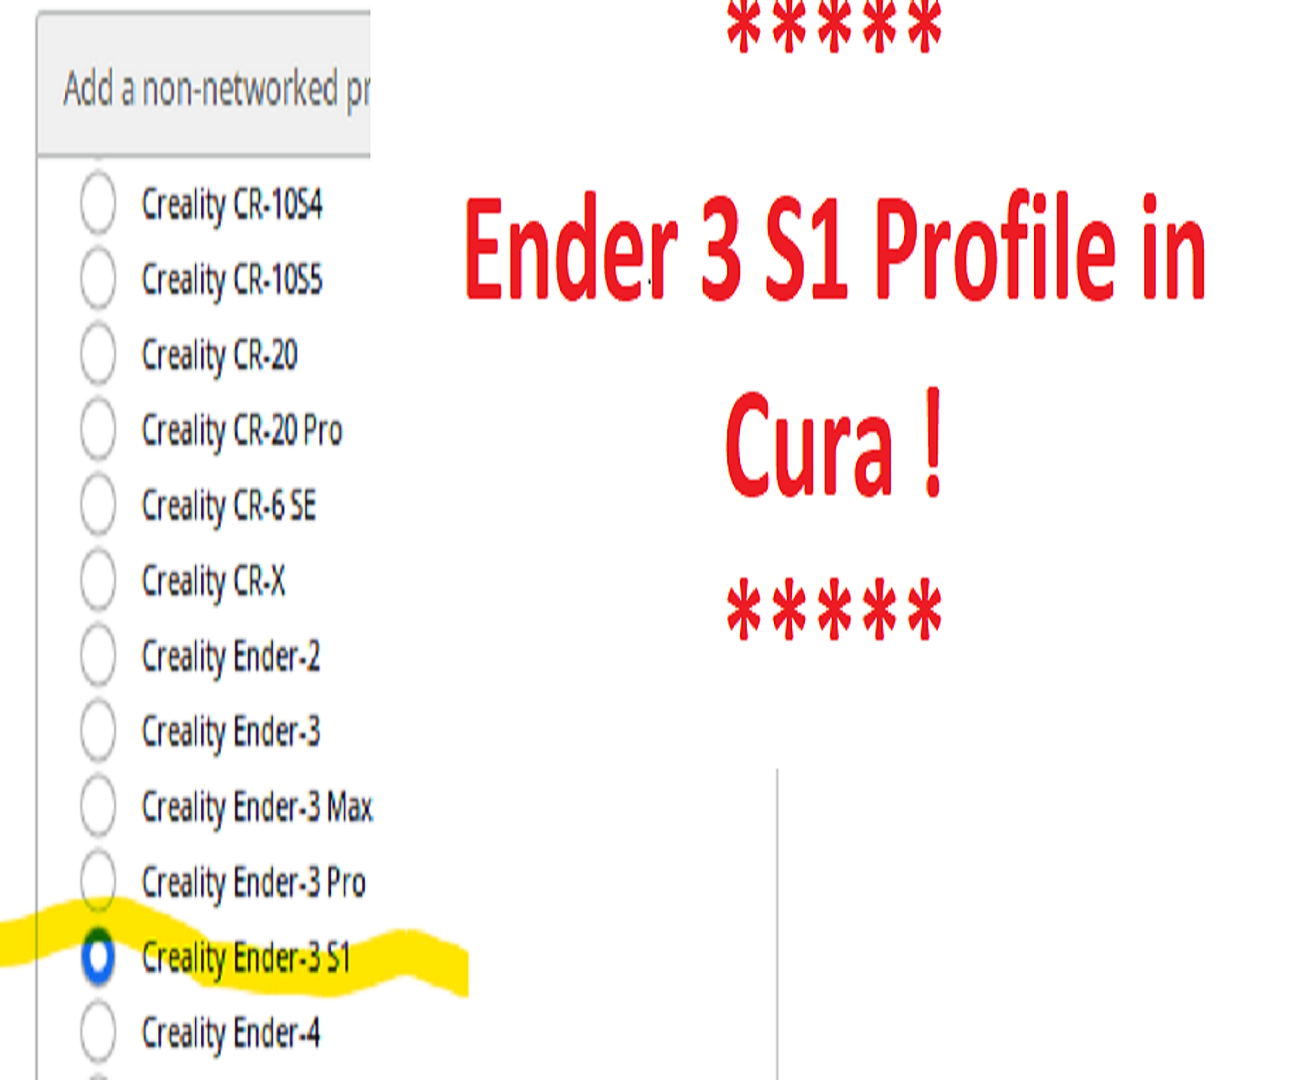
<p>Don't forget to hit the like button if this helps you :)</p><p> </p><p>The included prints are simple validations to run after applying these instructions and the result should look something like the posted photos. If it does not and it has significant stringing or you can see the build plate through the letters then you will need to tweak your slicer settings for retraction & flow. (my prints are made with Cura 5, using another version may result is small details missed i.e seeing the build plate through the text)</p><p> </p><p>Cura does not have an Ender 3 S1 profile or for the Ender 3 S1 Pro. So people stick with the Creality slicer (older version of Cura rebranded) or they use Cura's Ender 3 Pro profile and then adjust the machine settings and import profiles or they try out Prusa slicer which has a E3S1 profile.</p><p>This works but wouldn't it be nice to select from the list of printers in Cura and be able to pick the Ender 3 S1 in the list?</p><p> </p><p>Well you can and its easy - detailed instructions below. Whole process takes 2 minutes or less.</p><p> </p><p>Follow these instructions on what you can do in Cura 5 (also works also for other Cura versions)</p><ol><li>Close Cura if open</li><li>Locate your root Cura folder usually something like C:\Users\<usename>\AppData\Roaming\cura\5.0 (default location for Cura5 data, version 4.13 is in the folder called 4.13) </li><li>Download the pdf file called “Folders” from the file list<ul><li>Right click on it and select “save link as” as to choose the downloads folder on your computer (if you just left click it likely it tries to open as a pdf and will fail)</li><li>Change the extension to .zip </li><li>Unzip it</li><li>Note: You need to change the file extension from .pdf to .zip. Printables wont allow me to upload a zip so hence the pdf extension.</li></ul></li><li>Inside that zip file you will find 3 folders “definitions”, “extruders” and “variants”</li><li>Copy the files inside each of those folders and paste them into the corresponding folder with the same name that is located as sub-folders of the root folder identified at step 1. Overwrite if you need to. (Overwrite files don’t copy the entire folders just the contents of the folders)</li><li>Open Cura<ul><li>Settings→Printers→Add New</li><li>Select “Non Networked Printer”</li><li>Scroll down to Creality and now you will find Ender 3 S1</li><li>Select it and click “Add”</li></ul></li></ol><p> </p><p>All the defaults should match what is needed for the Ender 3 S1 but you can confirm manually by comparing to the Creality slicer machine profile and print profiles.</p><p> </p><p>For those that have the Ender 3 S1 Pro the settings should be pretty much the same but I haven't got one to confirm. Certainly much better than using the defaults for the Ender 3 Pro.</p><p> </p><p><strong>Print settings:</strong></p><ul><li>Material: PLA</li><li>Quality: 0.2mm layers</li><li>Profile: Standard Quality (this will be available after setting up the printer as a default)</li><li>Infill: Does not matter</li><li>Enable: Print thin walls</li><li>Initial layer flow 110%</li><li>Arc Welder: Enabled in Cura (not needed but I find it prints the small curves in letters better)</li></ul><p> </p><p>Credits: Somewhere in my journeys I found the initial files and explanation for doing this but I don't recall where so this work is based on someone elses. Anyways now it is memorialized here with some extras for all to easily find.</p>
With this file you will be able to print Adding the Ender 3 S1 printer profile in Cura 5/4.13 with your 3D printer. Click on the button and save the file on your computer to work, edit or customize your design. You can also find more 3D designs for printers on Adding the Ender 3 S1 printer profile in Cura 5/4.13.