Adjustable glass bed corner bracket
thingiverse
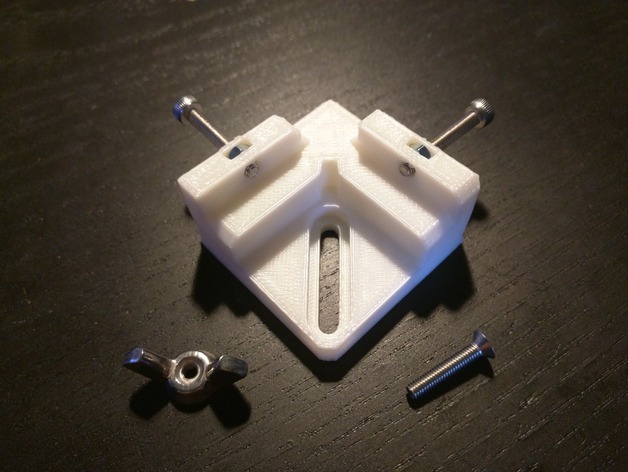
Corner bracket for a glass bed on a Makerbot Replicator 2 and its clones. This bracket is designed for a 1/4" glass plate but could be used for something thinner. Any tips/tricks on how to use or improve the design, feel free to post a comment! Feed back is greatly appreciated. [Update 8/28/2016] I added a version without the adjustment slot. Print Settings Printer: Qidi Tech Rafts: Doesn't Matter Supports: No Resolution: 0.2mm Infill: 50% Notes: Due to the temperatures, this really should be printed with ABS and not PLA. Post-Printing Additional non-printed hardware In addition to at least two of the printed corner clips, you will also need the following: 4x M3 x 20mm screws, 2 per corner. I used socket head screws because I couldn't find any thumb screws. 4x M3 nuts, 2 per corner. 2x M3 x 15mm screws to replace the ones protruding underneath the heated bed. My bed used flat head screws. 2x M3 wingnuts, 1 per corner. Installation Instructions Print two of the new corner brackets. Slide M3 nuts into the two slots on the top. Screw in the M3 x 20mm screws in from the side. Remove your heated bed assembly after it has cooled. Everything will be easier if you don't have to do all of your work reaching into your printer. Remove your PCB heating element from the aluminum build plate. Remove anything that is on top of your aluminum build plate and clean it. Mine had a large plastic sheet on it and I used Goo Gone in a cookie sheet to remove the glue. Reassemble the heated bed assembly, make sure to replace 2 of the corner screws with the longer, 15mm flat head screws using the same nuts. Which two corners is up to you, but they need to be on opposite corners. Slide the newly printed corner brackets over the longer screws and use wingnuts to secure them. Put the heated bed assembly back into the printer. Place the glass bed on top and tighten it down with the screws on the corner brackets. Take a picture and post it on Thingiverse. Level your bed. Print some awesome stuff. How I Designed This I bought a glass bed for my Qidi Tech assuming that the bed was the same size as on the Flash Forge Creative Pro. It's not by the way, the Y-axis is about 1/16th of an inch shorter. Determined to use my piece of glass and the inability to find corner clips that would work for my situation on this printer. I found some designs that might work if they were bigger (by austingeorge and albertkoey). I designed this version for the Qidi Tech, but it should be compatible with any of the Makerbot Replicator 2 clones like the Flash Forge Creative Pro. Tips and Tricks Loctite I put a drop or two of blue Loctite on each of the screws and then threaded them back in and secured the bed. This came after a few prints came out ruined because the build plate started moving due to the screws loosening. Just make sure that the Loctite you buy can handle the temperature. A couple of them that I saw at the store couldn't handle the 110C heat. It's also important to take a look at what exactly is in the Loctite of your choice, some might melt ABS and weaken the part. All four corners instead of just the two. After installing the glass on mine, I noticed that the glass was secure and wouldn't move, even after running a print, but it was not square with the bed. I decided to not put brackets on all four of the corners, but it could easily by done while the headed bed assembly is apart. If you choose to take this route, you will need to double the quantities of all the parts above and complete step 7 of the installation instructions twice on all four corners.
With this file you will be able to print Adjustable glass bed corner bracket with your 3D printer. Click on the button and save the file on your computer to work, edit or customize your design. You can also find more 3D designs for printers on Adjustable glass bed corner bracket.