Advent Calendar
prusaprinters
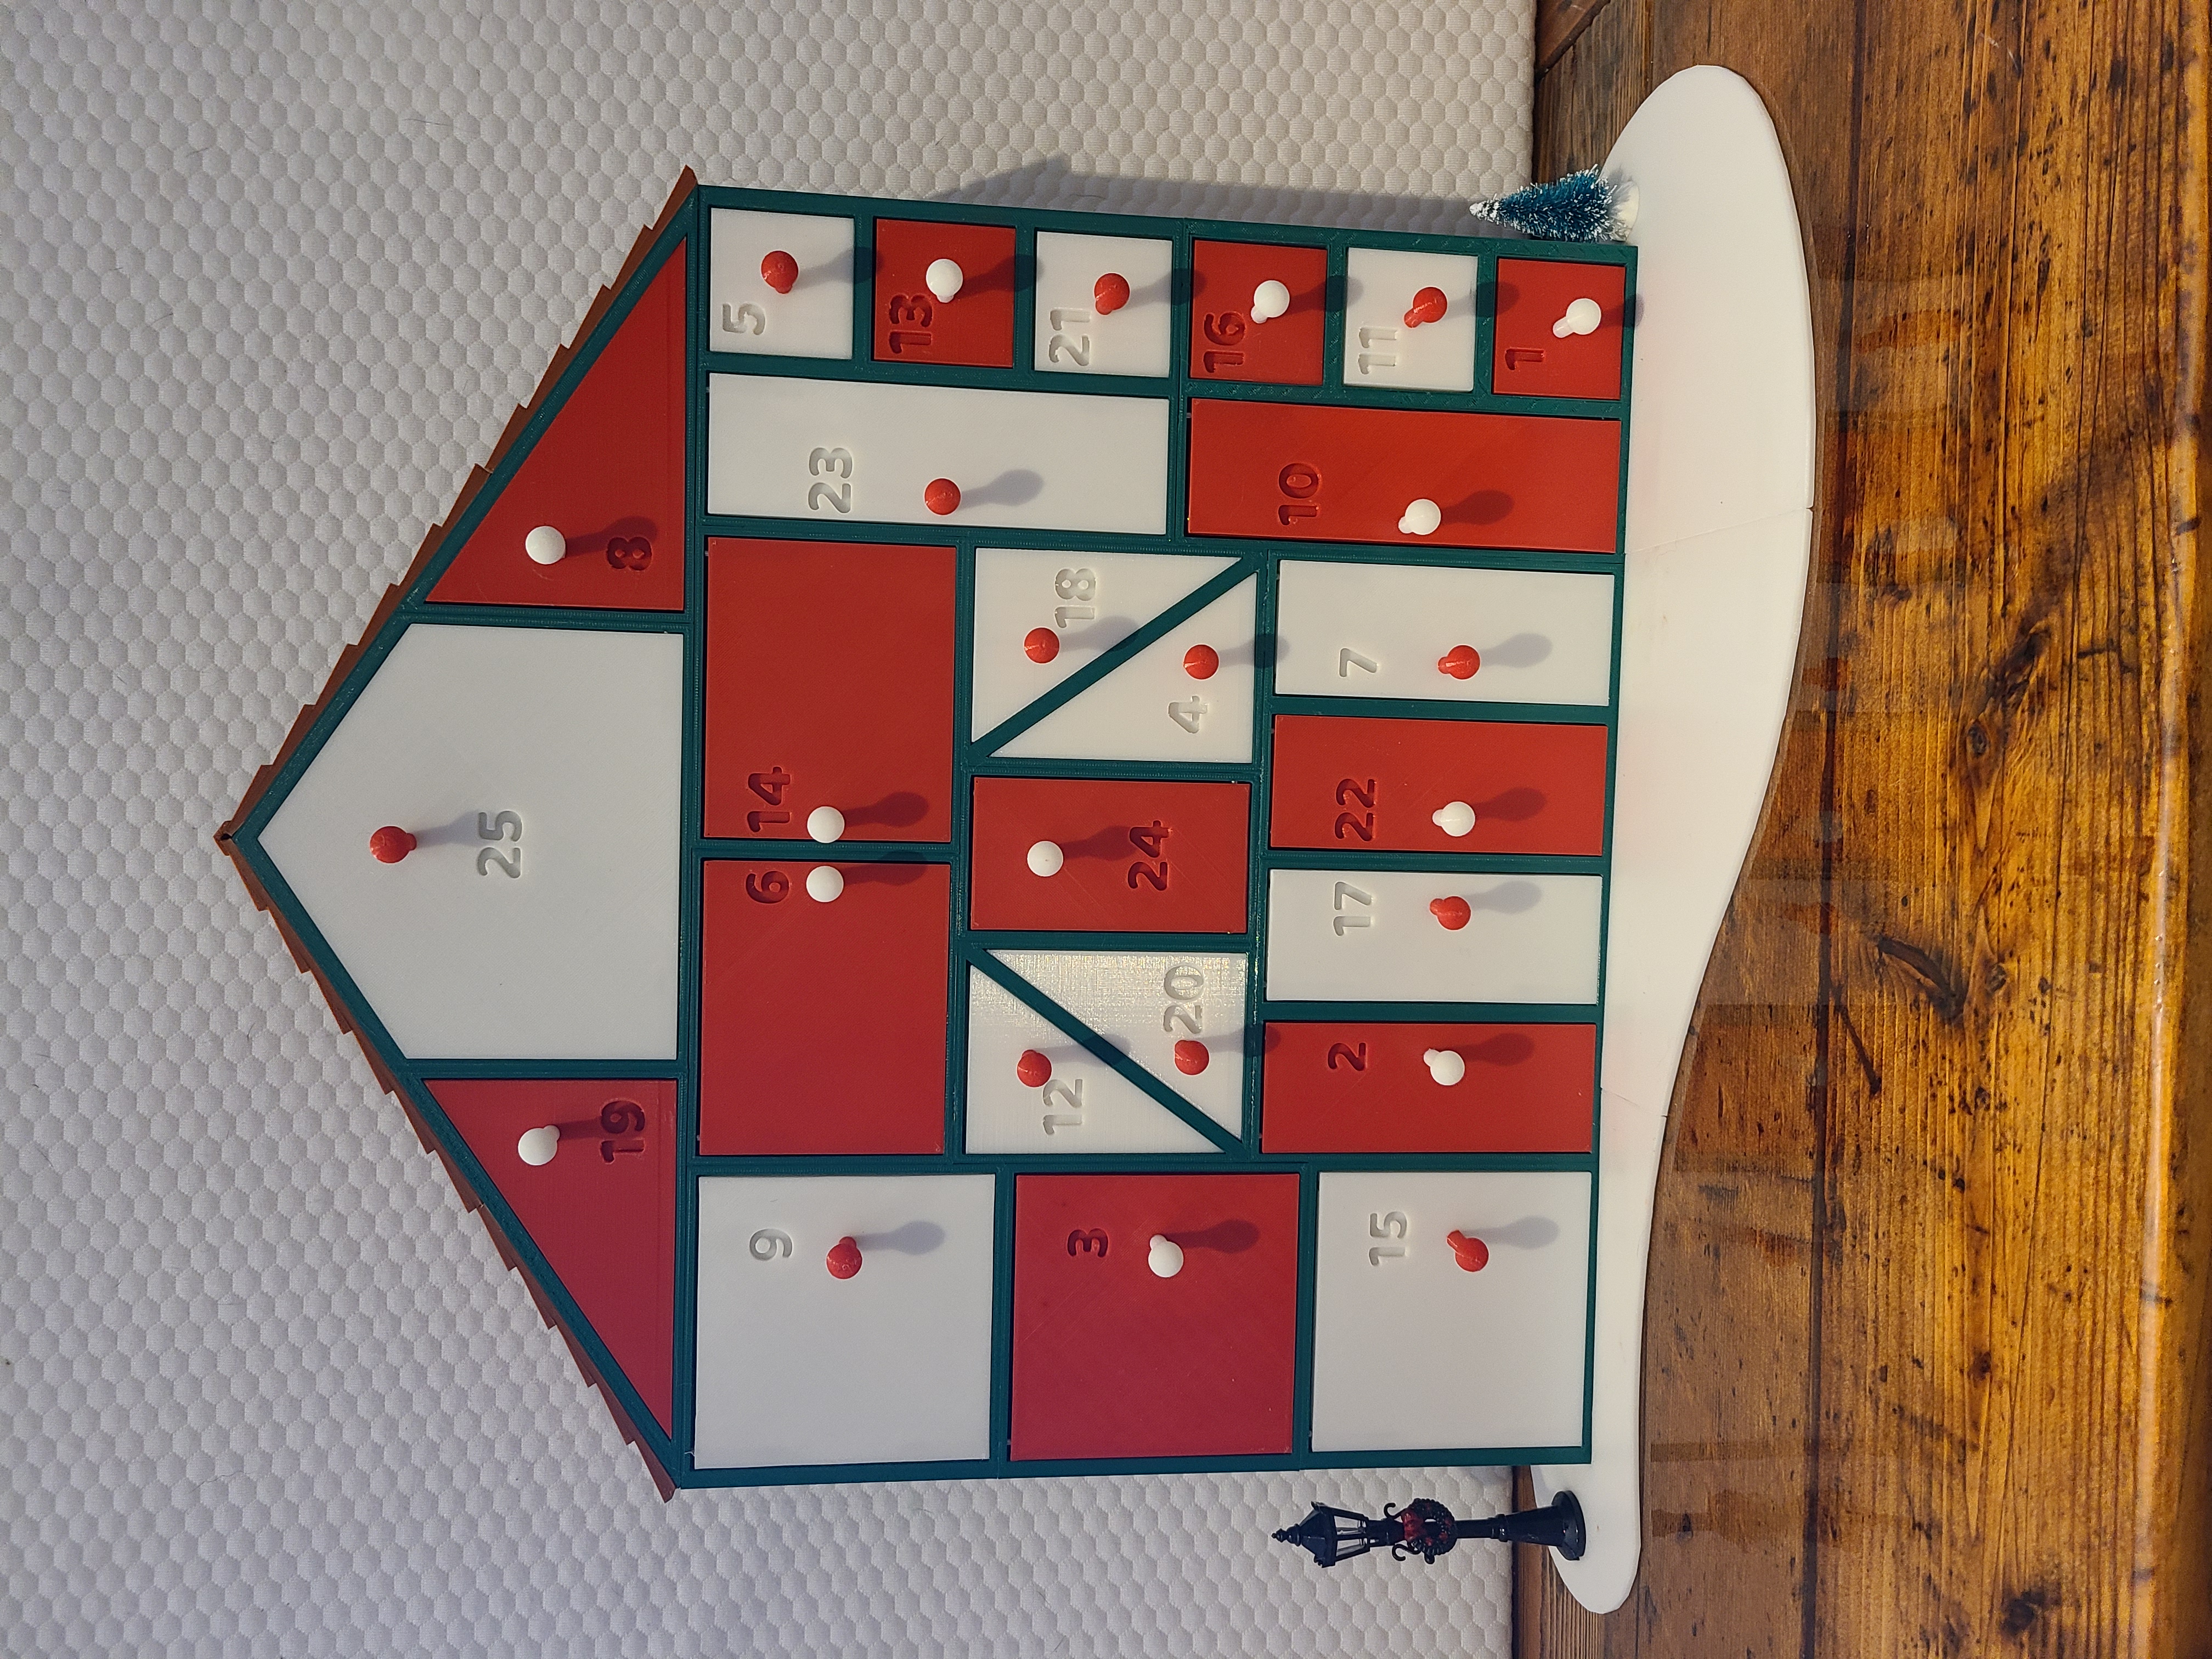
<p>The calendar can we customized with whatever color pattern you would like. I tried to go with a candy cane like coloring pattern. Some of the doors are interchangeable take note of the hinge side for doors 2, 17, 22, and 7. 3,9, and 15 are completely interchangeable. 10 and 23 can be put in either spot. The small drawers can go in any spot on the right side. </p><p>For print settings I went with .2 layer height, 3 perimeters (mostly because I wasn't sure on the fit for magnets and pins and having the extra helped to drill or cut out if it was tight), 2 would probably be plenty strong, for infill go with whatever gets you a smooth finish on the top I used 15% on rectilinear. Depending on the printer you may want to use brims to make sure it doesn't lift. One little thing, make sure the part is cooled off before pulling it off the printer. I pulled door 10 off too quickly and it is warped a little but still works fine. No supports are required but I did use them for the numbers on the drawers just to make sure they turned out.</p><p>I have included doors that are not number if you want to paint or have another idea for numbering the doors. </p><p>Materials</p><p>12 x Hidden hinge pins</p><p>12 x rods & springs</p><p>88 x 1/8” rare earth rod magnets</p><p>25 x M3 x 10mm socket cap screws</p><p>I used 1/8” hidden hinge pins from Lee Valley for the doors. To lower the overall cost of the calendar I bought 1/8” metal rods and springs from aliexpress and used one of those per door. The hidden hinge pin allow for pulling the pin out and removing the door. You can just use the pins and cut grooves in the pins yourself with a Dremel or hack saw. You only need one slot and just make sure its in the slot with the groove farther away from the edge of the door.</p><p>I used 1/8” by 1/8” rare earth rod magnets to hold the doors closed</p><p>Frame assembly</p><p>Step 1- Frame 2, 3, and 4 get glue together. With 2 on top, 3 in the middle, and 4 on the bottom. The doorstop should be on the right hand side</p><p>Step 2- Frame 6 & 7 get glued together with the door stops facing each other. </p><p>Step 3- Frame 8, 9, and 10 get glued together. 8 on the left, 9 in the middle, and 10 on the right. The stop on 8 should be on the top. The angles on 8 and 10 should be pointing up on the inside edge.</p><p>Step 4- Frame 11 & 12 get glued together with the stops facing each other.</p><p>Step 5- Frame 14 & 15 glued together with the door stops facing left. 14 on top and 15 on the bottom.</p><p>Step 6- The pieces created in step 2 and 3 could glued together in any order but the way I have it set up is 2 on top, 3 in the middle, and 4 on the bottom with the stops on top.</p><p> Step 7- Glue the piece from step 1 on the left side of the piece from step 6 and the piece from step 5 the right side with the door stops facing inward and at the top.</p><p>Step 8- Frame 1, 5, and 13 and get glued to the top of the piece from step 7. 1 on the left, 5 in the middle and 13 on the right.</p><p>Step 9 (optional) – Glue the roof on with part A at the top and part B at the bottom of the room. The glue the roof cap on top of that</p><p>Step 10 (optional) – Use the snow connection piece to glue the snow pieces together. The snow should be a snug fit at the bottom. It was meant to add stability, but I don’t think it does that much but helps with looks. </p><p> </p><p>Doors and drawers assembly</p><p>For the doors there will be a little bit of filament in the slot for the hinge pin that I cut out with a knife and/or use a 1/8” drill bit to remove it. For the magnets they should all go in with a little bit of encouragement. For the frames piece or anywhere you can I suggest you put the magnet on the pliers and then use them to press the magnets in. For the small drawer frame pieces and some other ones with magnets in the back you can use a flat screwdriver to press the magnet in. I highly recommend that you put one magnet in a frame piece then add a pile of magnets to that one and pull from there. This way you make sure that all the magnets have the same polarity, and you don’t end up with a door that won’t stay shut. I had to glue a couple of the magnets in, but that was in early prints and I fined tuned the hole size so you shouldn't have to. This will depend on your tolerance as well. If you want to keep the costs down you could try one magnet per door instead of two (top and bottom)</p><p>For the knobs I just choose to use some screws I had laying around to get them on. You could try to glue them but I don’t know if that will be strong enough. I have added holes in the back of the drawers to allow a hex head screwdriver in. I used pillars to hold the knob to tighten the screw but be careful as I did split a couple open by over tightening them.</p><p>For the hinges you can just put the spring in then the pin. If you go with only one pin with a slot in it I suggest putting it in the top of the door.</p><p>Both springs for door 24 need to be shortened to make sure that the pins go far enough in. Somewhere between 1/3 to 1/2 of the original length worked for me. </p>
With this file you will be able to print Advent Calendar with your 3D printer. Click on the button and save the file on your computer to work, edit or customize your design. You can also find more 3D designs for printers on Advent Calendar.