AFK Virtual Keyboard Dongle
prusaprinters
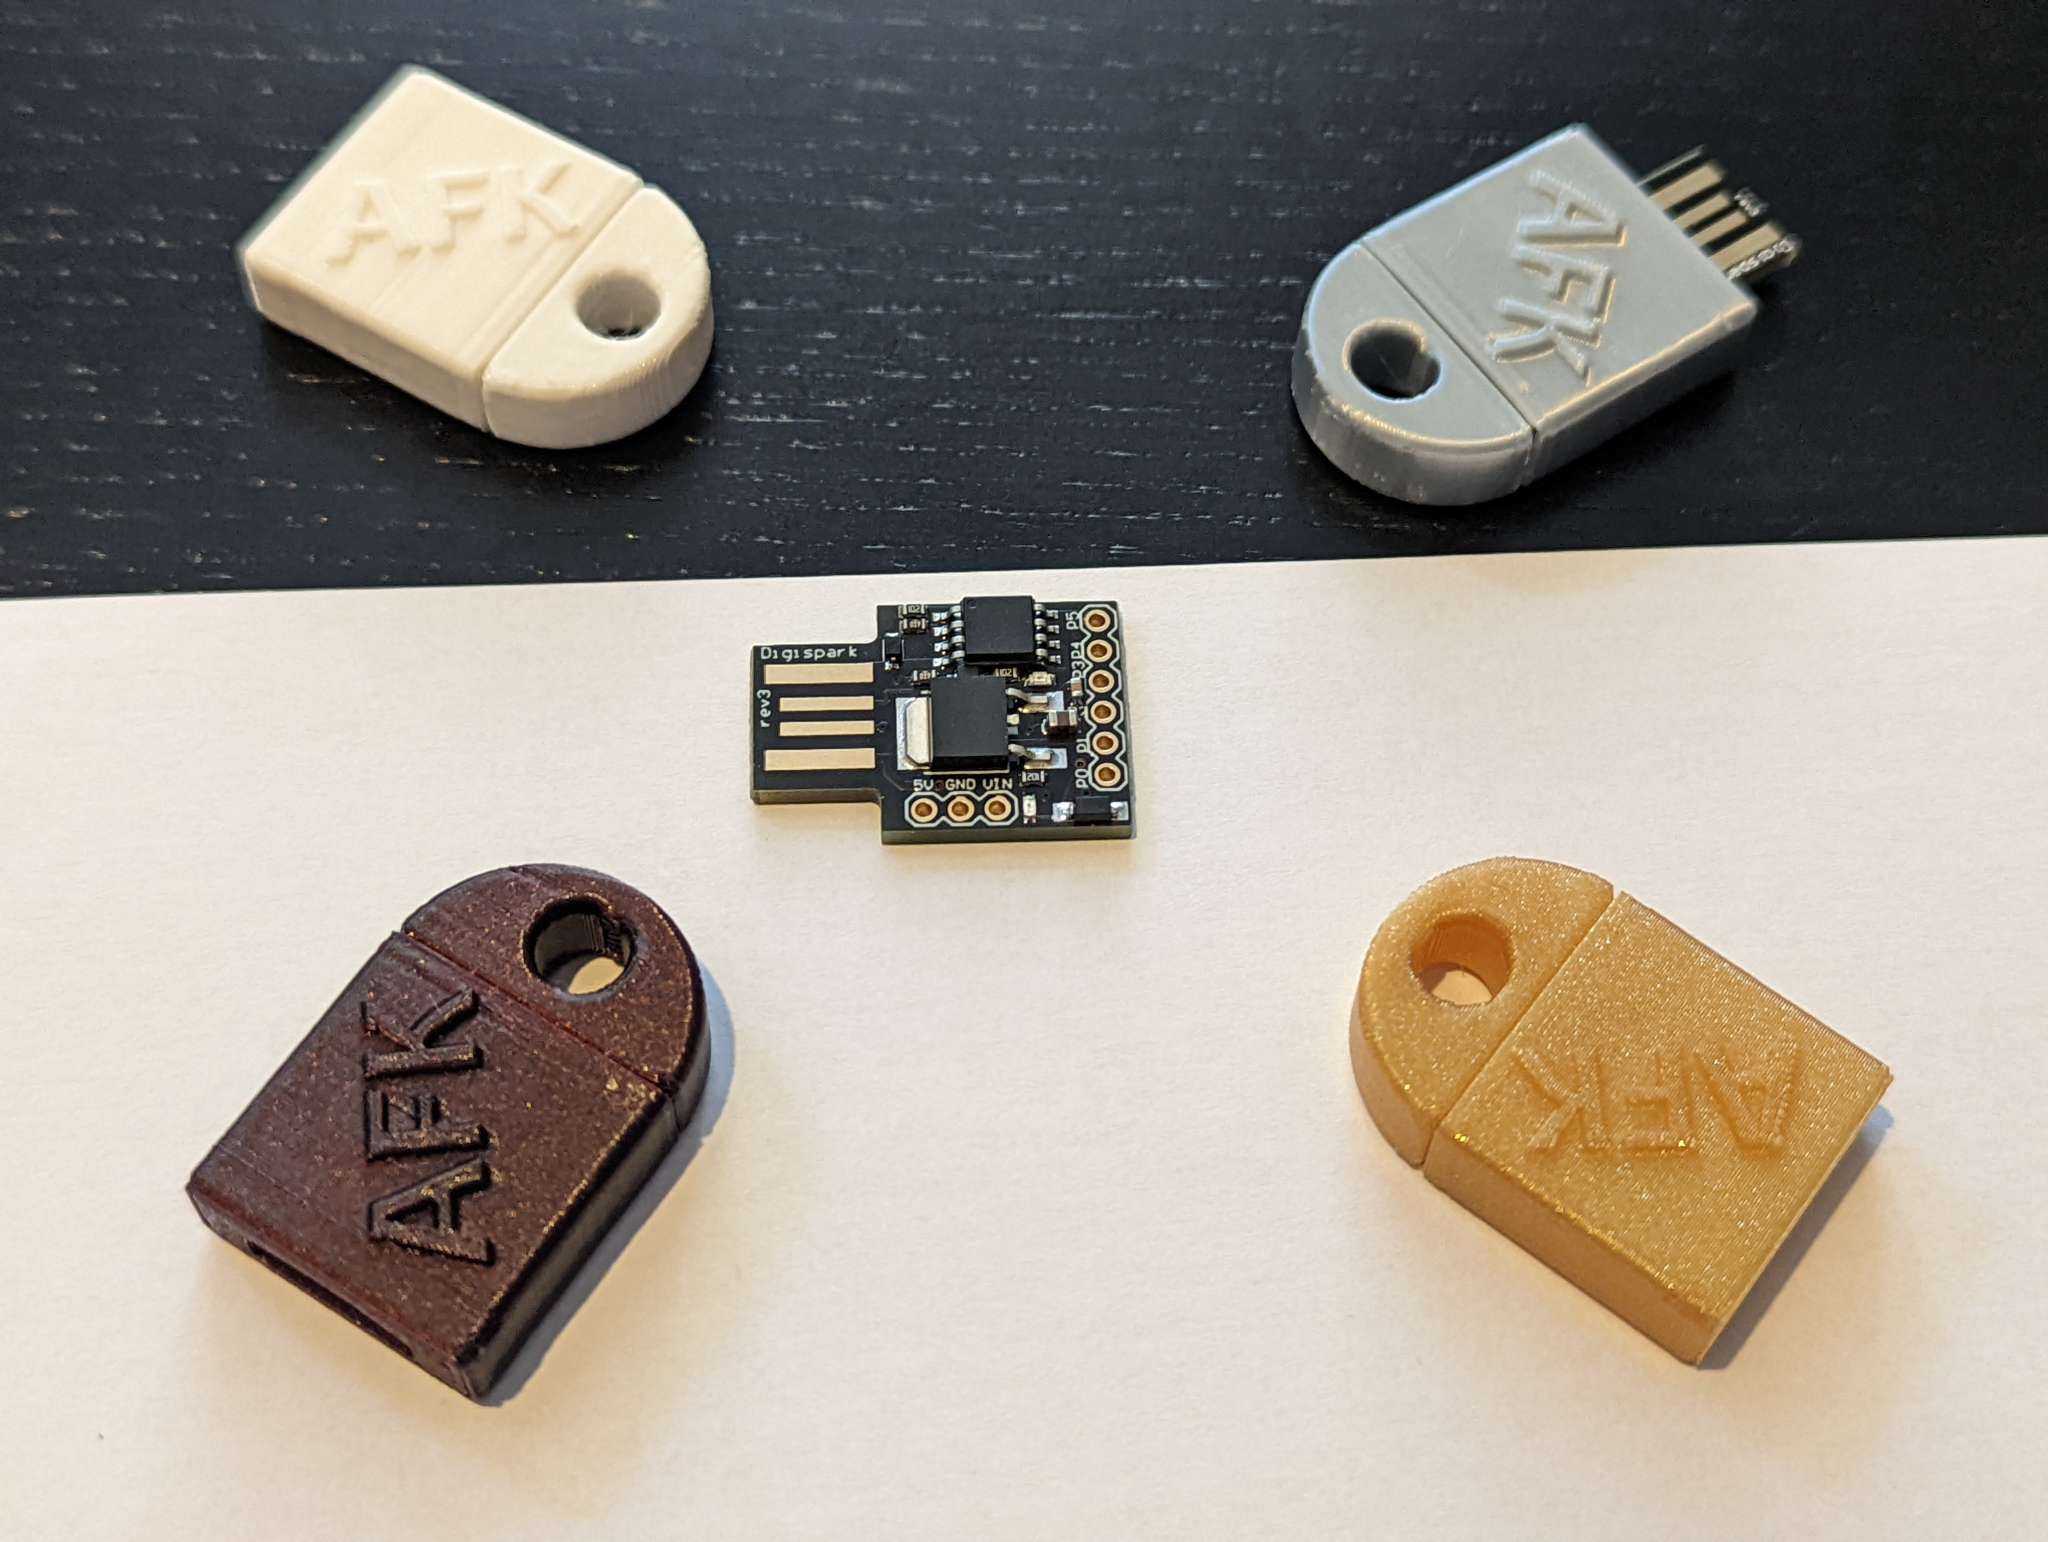
<h3>AFK Gadget</h3><p> </p><p><strong>When configured this device makes certain you are showing as always online. </strong></p><p>This little USB device will connect to your computer work an emulate a physical keyboard </p><p>It will press the tab button every N number of seconds to set your computer status as online. The choice of TAB key is because it will not trigger any actions, not close any windows, and can only interfere with open text editors. </p><h3>Hardware Required</h3><p>This design needs the following ultra cheap easily available board.</p><p>Digispark attiny85 USB.</p><figure class="image image_resized" style="width:50%;"><img src="https://media.prusaprinters.org/media/prints/89235/rich_content/fca6d3ed-70c1-49cd-a84c-2c676aae42c8/attiny.jpg#%7B%22uuid%22%3A%226b8e87bf-3e75-49d6-8aa0-b59ca4de09da%22%2C%22w%22%3A1500%2C%22h%22%3A1500%7D"></figure><p>lmgtfy App link: https://lmgtfy.app/?q=digispark+attiny85+buy</p><h3>Print Features</h3><p>The core challenge is that this PCB is not designed to be encased. The USB -+ data lines are shorter and even the slightest shell will make it not work. Also there is heavy variance in the quality of the PCB you source from various providers as such various tolerances are required.</p><ul><li>Prints in 30 minutes in quality mode</li><li>No supports required</li><li>No screws required</li><li>Clip on method to assemble it</li><li>Various clearance models included, to serve different fillament types. Recommended is 008 clearance for prusament PLA(Please try higher clearance for more funky filament types such as mystique )</li><li>Thick enough to be firm, but thin enough allow the LED to show.</li></ul><h3>Programming the digispark usb key</h3><p>Set up arduino build enviroment for your system here</p><p><a href="https://www.arduino.cc/en/software">https://www.arduino.cc/en/software</a></p><p>Follow the instructions to install the board & drivers for adudino here</p><p><a href="https://digistump.com/wiki/digispark/tutorials/connecting">https://digistump.com/wiki/digispark/tutorials/connecting</a></p><p>After this is done you just need to slightly modify the provided example by the manufacturers. Should you wish to just click and program, the program is attached in .ino format.</p><p>The arduino needs to be configured to program this board, so make certain it is selected as displayed</p><p> </p><figure class="image image-style-align-center image_resized" style="width:75%;"><img src="https://media.prusaprinters.org/media/prints/89235/rich_content/d9a6fdda-afdb-4a2c-b7dd-1b4875a6c704/01_set_the_board.png#%7B%22uuid%22%3A%221256a22d-e756-45d3-9060-9425491d96f7%22%2C%22w%22%3A947%2C%22h%22%3A560%7D"></figure><p>Then the programmer has to be configured to micronucleus ( It may be done automatically but please check )</p><figure class="image image-style-align-center image_resized" style="width:75%;"><img src="https://media.prusaprinters.org/media/prints/89235/rich_content/598bab32-47a9-48fd-9344-d22b241137f5/02_set_the_programmer.png#%7B%22uuid%22%3A%223b87c245-6426-48c0-b960-44a404dd541b%22%2C%22w%22%3A623%2C%22h%22%3A345%7D"></figure><p>Then the example can be located at the following path</p><figure class="image image-style-align-center image_resized" style="width:75%;"><img src="https://media.prusaprinters.org/media/prints/89235/rich_content/1290a0f5-f567-4bc2-904c-91bb6185626e/03_find_example_program.png#%7B%22uuid%22%3A%2286a196f3-1422-4475-bece-0d0a96e058f3%22%2C%22w%22%3A598%2C%22h%22%3A531%7D"></figure><p>The modifications required in the code are to change the keypress and optionally adjust the period of the keypress to your desired time frame in milliseconds.</p><figure class="image image_resized" style="width:75%;"><img src="https://media.prusaprinters.org/media/prints/89235/rich_content/01eeb52a-471e-40de-bf50-2a659922dbdc/04_adjust_example_upload.png#%7B%22uuid%22%3A%22ce9329cd-7d74-47ff-9524-2856c1d95aaa%22%2C%22w%22%3A614%2C%22h%22%3A577%7D"></figure><p> </p><p>Finally after pressing the upload button, the user will be asked to inserT the board into the USB port. If the drivers have been installed correctly, micronucleus will program it and display this message</p><p> </p><figure class="image image_resized" style="width:75%;"><img src="https://media.prusaprinters.org/media/prints/89235/rich_content/958ee246-9e42-45a6-94ae-b6883e7eeeee/05_complete.png#%7B%22uuid%22%3A%225dd08219-1faf-47a5-9b5b-f4b0888c38da%22%2C%22w%22%3A890%2C%22h%22%3A1037%7D"></figure><p> </p><h3>Celebrate</h3><p>After the device has been programmed, open a black text editor or word, insert it into the usb slot and verify that the cursor is moving every N seconds</p><figure class="image image-style-align-center image_resized" style="width:31.12%;"><img src="https://media.prusaprinters.org/media/prints/89235/rich_content/d6f4f2be-2905-4b7c-a28e-6e6a36aacc77/done.jpg#%7B%22uuid%22%3A%2227f16f6c-fa86-4757-ae38-7cbaff56ae91%22%2C%22w%22%3A1056%2C%22h%22%3A684%7D"></figure>
With this file you will be able to print AFK Virtual Keyboard Dongle with your 3D printer. Click on the button and save the file on your computer to work, edit or customize your design. You can also find more 3D designs for printers on AFK Virtual Keyboard Dongle.