Ahsoka Tano Lightsaber - Flashlight
thingiverse
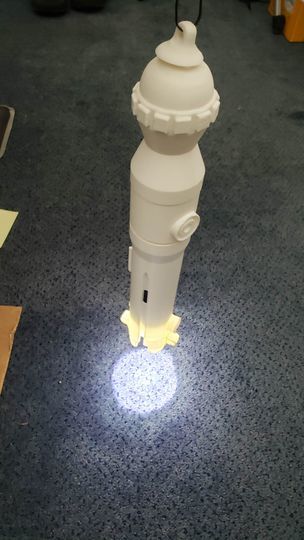
This is a lightsaber made to screw together and hold a generic rechargeable LED flashlight inside it. Also made to have a magnetic belt attachment. If I get a chance, I'm going to try to make the shorter one too. Modeled in Fusion360. 1) The top prints vertically with supports. 2) The base prints vertically with supports. (I'm printing in ABS, so you might not need supports if you printed PLA) First versions had a 38mm thread that's pretty tight but works. V4 has course threads and worked better. They are printed to have a hollow to hold a LED flashlight. https://www.amazon.com/dp/B07RZCP692 FlashlightFocusShim fits onto the flashlight's focus slider to prevent it changing length while inside. 3) V4 button slips in from inside, it works, but it's a little finicky. Opposite the button is a slot to insert the mini-USB to charge the flashlight. 4) Non-essential: The base has a 12mmx4mm hollow for putting in a stack of 2 magnets. I used neodymium ring magnets from HomeDepot by Magnet Source. A two stack is approximately 3mm x 10mm. The belt attachment has a 12mmx4mm hollow for a stack of 2 magnets. The base also has a ring on one side that I've recessed the center enough to hold a 2 stack, if someone wanted to make a magnetic belt attachment. In the alternative, the base as a 3mm hole for a hanger (I used a paper clip) for a belt hook made for keys. Using hollows: I embedded them in the print by inserting a pause comment in the Gcode at the layer height of the top of each hollow. a) find that layer height by looking in your slicer. b) Let the slicer make the Gcode, c) then edit the Gcode in Notepad++, find that layer, and insert pause code appropriate to your printer. I'm using a prusa mk3s, so this is the gcode that worked on my Prusa. ; comment AFTER_LAYER_CHANGE ; comment Pause instructions M300 ; Activate Beeper M1 ; user stop, effectively pauses the print until knob pressed ; comment End pause As always, be very careful. Gcode is specific and tricky, because you can accidently force your printer to do bad things with it's motors or heaters if you aren't careful. I do not recommend anyone try the code I used on their own printer. I'm just showing it for clarity. (Update on the magnetic attachment. It does work, but the magnets aren't large enough to hold with any reasonable movement or momentum. It needs a redesign for a larger magnet to be embedded for that to really work well. Because the base is rounded, then the magnets are separated by a 1-2mm, which doesn't seem like a lot of plastic, but significantly reduces the holding power. I tried sanding the plastic down to the barest covering and that helps. The correct solution is a larger magnet and a flat surface.
With this file you will be able to print Ahsoka Tano Lightsaber - Flashlight with your 3D printer. Click on the button and save the file on your computer to work, edit or customize your design. You can also find more 3D designs for printers on Ahsoka Tano Lightsaber - Flashlight.