Ai3M (Anycubic i3 Mega) + BIQU-H2 ADXL345 Accelerometer Mount for Klipper
thingiverse
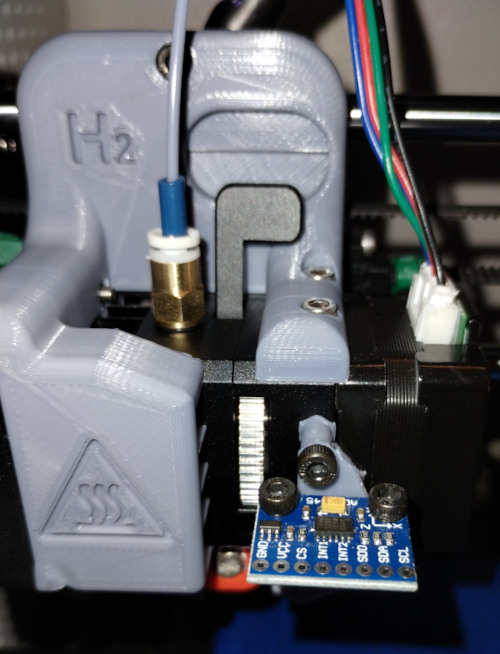
All updates and related components will be at printables. Please check there for updated designs, and complementary parts. https://www.printables.com/social/402878-account/models COMPANION PART: https://www.thingiverse.com/thing:5722475 This is useful only if you are running Klipper, and have an ADXL345 Accelerometer (or a pair of them, one for the toolhead and one for the bed). I don't know if this will fit any others. I made the part a while ago, so I am going off memory, but I'm fairly sure it is exactly a 15mm spacing between hole-centers for both the accelerometer and the BIQU H2, so you could check your accelerometer and figure out if it would fit. The screws are 2x 6mm M3, 2x 10mm M3. I skipped inserts because they would add weight, but it does need to hold secure enough that the accelerometer is firmly mounted (all vibration from the printer needs to transfer to the accelerometer to be measured). My printer is fairly well dialed in, so my tolerances were on point. You may need to adjust or drill out the screw holes if your printer is over-extruding on internal perimeters. Please ignore the ugly blue-tape. It is bad practice but TPU on glass had me worried. This is made to work with the X-Carriage system and this mount for it: https://www.thingiverse.com/thing:4950260 Included is the FreeCAD file. Also included are older designs. I changed it so that it sits oriented in such a way as to line up the printer's axis with that of the sensor. Not necessary, but I chose to do it that way so. Why would someone want to strap an accelerometer to their printbed: https://damlobster.github.io/klipper/Measuring_Resonances.html Regarding Filament choice. I used eSUN PLA+ because I had it in a nicely contrasting color I liked for the purpose. I have had zero issues with it getting too warm on long prints (causing it to soften), but you may have a very different experience. If you are running stock firmware on an Anycubic i3 Mega paired with a BIQU H2 when you print this part, your fans are likely only running at 5v instead of 12v, and you may wind up with a lot of heat-creep, so I'd hold off on printing this parts until you resolve that issue. IMPORTANT NOTE: If you use the v1-1 model, make sure you use a multimeter and make sure that the ground on the sensor is not connected through the screws to the body of the BIQU H2. If they are connected, it can cause problems. This is documented in Klipper's documentation, so you can find out more there.
With this file you will be able to print Ai3M (Anycubic i3 Mega) + BIQU-H2 ADXL345 Accelerometer Mount for Klipper with your 3D printer. Click on the button and save the file on your computer to work, edit or customize your design. You can also find more 3D designs for printers on Ai3M (Anycubic i3 Mega) + BIQU-H2 ADXL345 Accelerometer Mount for Klipper.