Air Engine
thingiverse
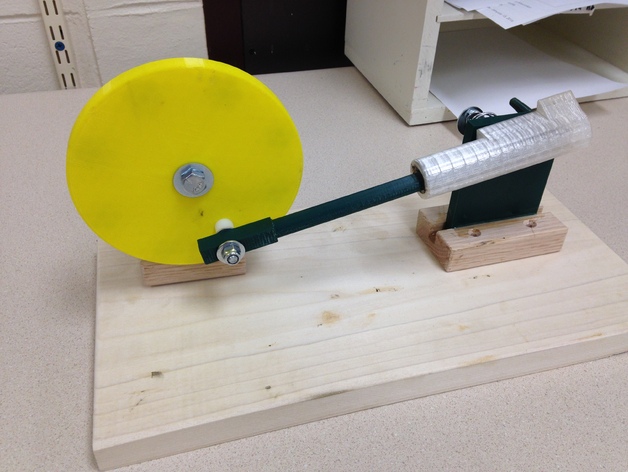
I am a Technology education teacher in Green Bay Wi. This is an engineering project I came up with to be done with a group of kids afterschool. Students are taught the fundamentals of designing with solid works. They then divide the work up, and work in teams of two to develop cylinder, piston flywheel, and supports with in parameters set up by the teacher. Students can finish their designs and assemble the parts in solidworks as a group. ( there is a fair amount of reworking/ problem solving at this phase). Once the designs are reworked approved the students save them as stl files and print all the parts. The can assemble the engine fitting parts and lubricating. Then its test time! Which then again leads back to problem solving and reworking some parts. Some instances frustration but hey that’s why they call it a prototype! If it’s easy you’re not learning! (In this case we Reworked the cylinder 3 times and its support twice) This is a great way to take students though the design process. They get to see an idea become a drawing and eventually using their problem solving skills, persistence and a little luck they see a product that works Print Settings Printer Brand: MakerBot Printer: MakerBot Replicator 2 Rafts: Yes Supports: No Resolution: 0.20mm Infill: 10% Notes: Standard settings printed well. I found the cylinder printed better when it was orintated front to back in the machine. Post-Printing Putting it all together The motor was assembled with about $2 dollars in hardware (list below). You may need to ream out bolt/cylinder holes with corresponding drill bits and lightly sand piston. I lubricated the engine with a light grease. We used some scrap wood for the base. I also used two part epoxy glue to glue the flywheel and Piston support into the anchor blocks (Again scrap pieces of wood with a groove and screw holes cut) To give the flywheel some weight it needs for inertia to do its thing I pressed 4 pennies into each of the flywheels 8 holes using a small c clamp. If you copy and paste this link you can see the motor running https://drive.google.com/file/d/0ByqQhIB1DIDDWUpRMzdRclRZUVk/view?usp=sharing Hardware List 6 wood screw x 1 1/4" 1/4" fender washer 3/4"x1" spring Hex bolt 3/8" x 2.5 3/8" lock nut (plastic insert kind) (3) 3/8" washer Hex bolt 1/4" x 2" 1/4" lock nut (2) 1/4" washers 1/4" x1/2" nylon spacer (this part could be printed if you designed it) 32 shiny copper pennies (They dont really have to be shiney) How I Designed This This motor was designed on solidworks, assembled in solidworks (pictured below), and converted to an STL. We then Printed each peice and assembled as described to "Post Printing". During this process there was alot of Problem solving as described in the summary. In the end this is an excellent project to take a small group of students though the design process. Custom Section Project: Air Engine o Objectives: Upon completion on this projects students will: Be able to work in a small group to accomplish a goal. Be able to identify, explain and experience the steps of the Design process. Be able to read a plan, design the part, and assemble the engine Be able to trouble shoot and brainstorm solutions if their engine doesn’t work. o Audiences: This would be an advanced 7-8 grade after-school small group activity. Or an entry level Engineering Coarse for 9-12 grade. o Preparation: Students should have good foundational knowledge in Solidworks (or like program i.e. Inventor). Students should have an understanding of how this air engine works. (power/exhaust stroke) o Steps! I would have lecture/discussion on the Design Process. After check of understanding I would break the students into sub groups (2-4) Students would receive Plans for the engine and break up the work evenly. When all parts are made on the computer students would assemble the separate parts as a group. As a group they would check clearances and position of the valves etc. They may have to do some brainstorming to fix any potential problems. Students would Print and assemble their Physical engine Test and evaluate. Depending on their outcome they may need to re-engineer some parts till it works. Enrichment #1 have student build the engine from a physical model previously made. They would have to measure the parts and then build them from their own measurements Enrichment #2 Students can build the motor off your plans but they need to change the bore and stroke. o Results: At the end of this project each group will have a motor that runs. Students can take a video of the running motor. They can then explain their experiences in the steps of the design process that lead them to success. This could be done in a typed or video format.
With this file you will be able to print Air Engine with your 3D printer. Click on the button and save the file on your computer to work, edit or customize your design. You can also find more 3D designs for printers on Air Engine.