Air Purifier (active carbon filter) for 80mm fan
thingiverse
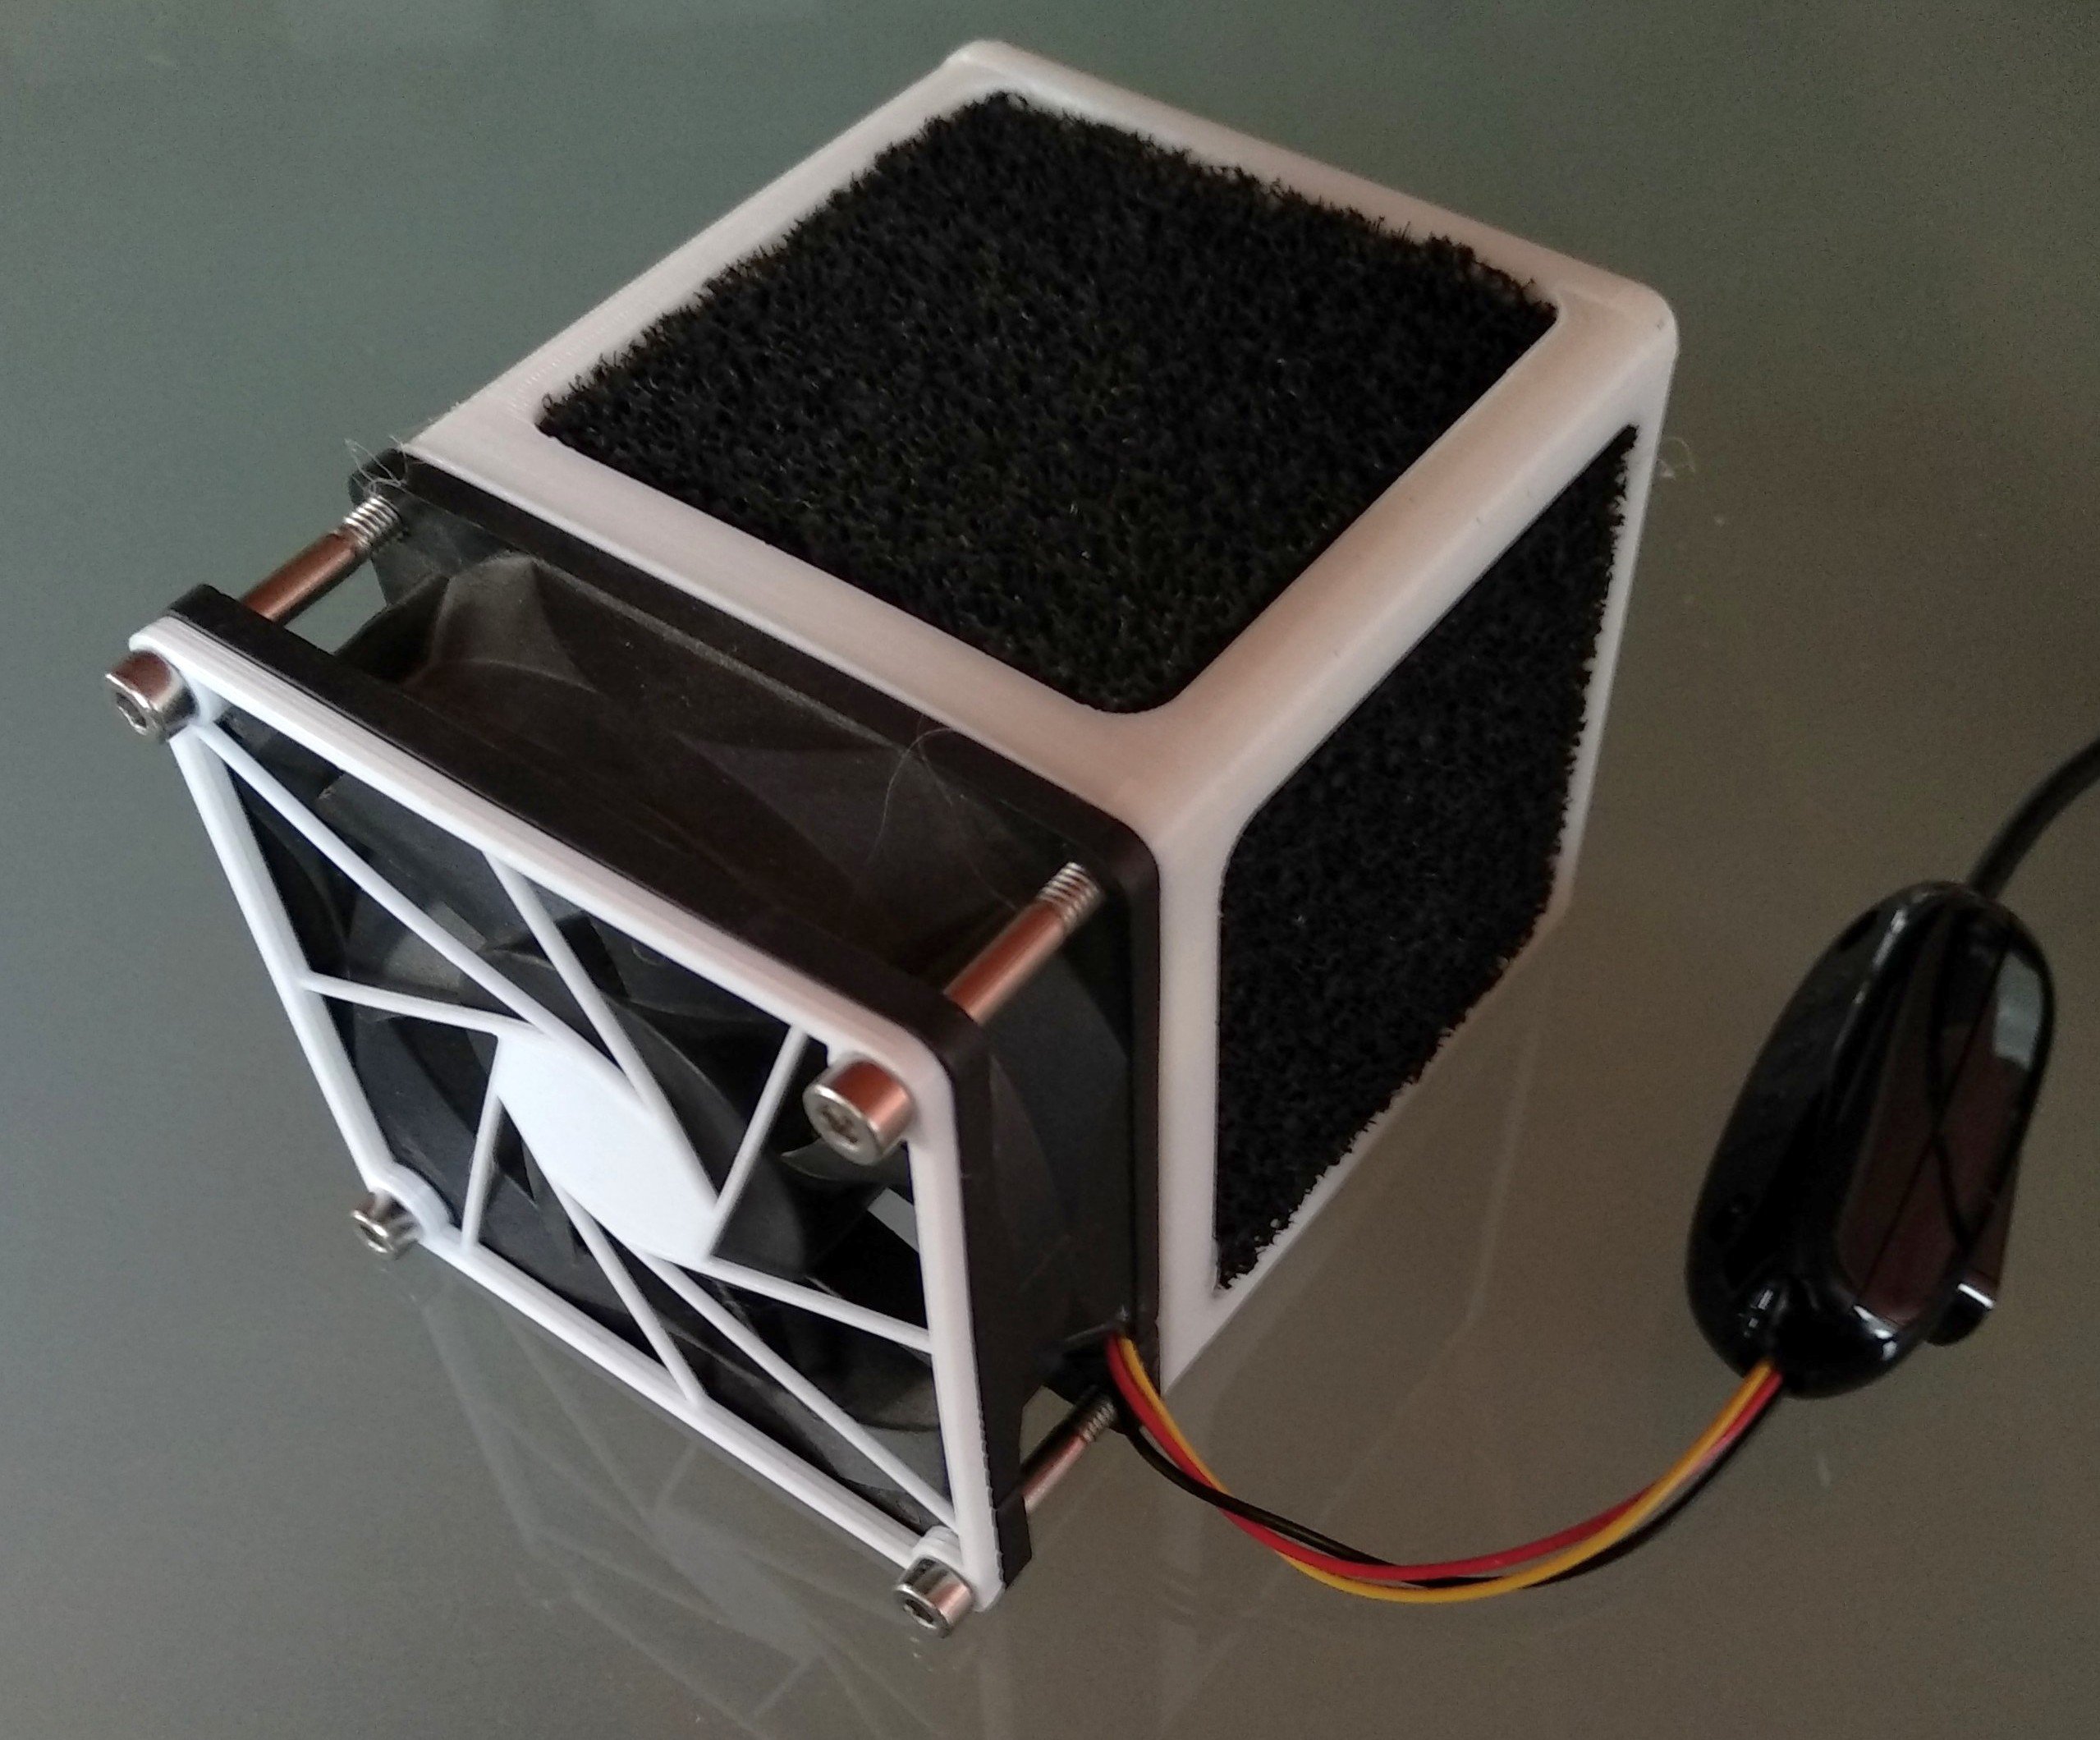
EN: I have decided that i wanted a better air quality in my house. In case of cats, dogs, smoke, little air circulation, whatever, an air purifier is always appreciable. I've purchased a bunch of active carbon sheet filters ([2 pieces](https://www.banggood.com/custlink/vDKD6mLFZz), [10 pieces](https://www.banggood.com/custlink/3KGmGuvnys)) for my solder fume extractor and 3D printer enclosure air filter. The active carbon filters are 13x13cm, and therefore they should be fed by a 120mmm fan, like the one i've used in my previous projects. Unuckily 120mm fan are not so common and aren't easy to scavenge, therefore i've decided to design something for [80mm fan](https://www.banggood.com/custlink/3DvDglCAr2), which are ubiquitous. I didn't want to print huge and unestetic adapter cone, then i came to the idea to keep the same filtering surface (130x130mm) but splitted on four 75x75mm surfaces, creating a "cubic" filter. This filter is compact and nice, you can simply place it on one side, or "vertical" using its feet. To power the fan i've used a reclaimed wall charger, 7.8V 1A, which is perfecly fine for the job. The fan is a standard 12V pc fan, and its (as usual) rated for 12V, but it can reasonably work down to 5V. Less voltage means less air flux but also less noise, i think that 8-9V are the sweet spot to reduce the fan noise by a lot without over-sacrificing the air flux. It depends on the specific fan you are using, but 3-400mA are usually more than enough. Since i've planned to have the filter working 16h/day i've choose a power supply that can provide twice as much current, so it doesn't even become warm. I've also added a simple switch, to stop the filter without removing the wall charger. The standard fan has 3 wire: positive (red), negative (black) and speed control (yellow). Just ignore the yellow, connect the negative from the wall charger to the black cable, and put the switch between the positive wire from the wall charger and the red cable. The screws are four M3x40mm (at least 40mm, the hole is actually more than 80mm deep), i've decided to put a small fan grid, wich i didn't designed because there are literally hundreds fan grid on thingiverse. That's all, now you have your really cheap air purifier, enjoy! IT: Ho deciso di avere una migliore qualità dell'aria in casa. In caso di gatti, cani, fumatori, poco ricambio di aria, eccetera, un filto per l'aria è sempre apprezzabile. Ho comprato un po' di filti ai carboni attivi in foglio ([2 pezzi](https://www.banggood.com/custlink/vDKD6mLFZz), [10 pezzi](https://www.banggood.com/custlink/3KGmGuvnys)), per il mio estrattore di fumo per il saldatore e per il filtro del box che ho fatto per la mia stampante 3D. Questi filtri sono 13x13cm, quindi dovrebbero essere usati con ventole da almeno 120mm, che sono appunto quelle che ho usato per i progetti precedenti. Sfortunatamente queste ventole non sono così diffuse e non sono semplici da trovare come materiale di recupero, a differenza delle [ventole da 80mm](https://www.banggood.com/custlink/3DvDglCAr2) che invece si trovano dappertutto. Non volevo dover stampare un grosso e inestetico cono adattatore, quindi ho pensato di mantenere la stessa superficie filtrante ma divisa su quattro pareti da 75x75mm, creando un filtro "cubico". Questo filtro è piccolo e carino, e puo essere semplicemente appoggiato su un lato o in "verticale" grazie ai suoi piedini. Per alimentare la ventola ho usato un caricabatterie di recupero da 7.8V e 1A, che è assolutamente adeguato al compito. La ventola è una classica ventola da 12V per PC, ma può ragionevolmente lavorare fino a 5V. Meno volt significa meno flusso d'aria ma anche meno rumore, penso che 8-9V siano il compromesso ideale per ridurre parecchio il rumore senza sacrificare troppo il flusso d'aria. L'assorbimento di corrente dipende dalla specifica ventola e dalla tensione a cui viene alimentata, ma generalmente 3-400mA sono più che sufficienti. Dal momento che il mio filtro lavorerà almeno 16h al giorno ho scelto un alimentatore che supportasse il doppio della corrente richiesta, così anche dopo ore e ore non si scalda nemmeno. Ho anche aggiunto un semplice interruttore per spegnere il filtro senza dover rimuovere l'alimentatore. Le ventole standard hanno tre fili: positivo (rosso), negativo (nero) e feedback della velocità (giallo). Ignorate il giallo, collegate il negativo dell'alimentatore col filo nero e mettete l'interruttore tra il positivo dell'alimentatore e il filo rosso. Le viti sono quattro M3x40mm (almeno 40mm, il foro è profondo più di 80mm, volendo). Ho deciso di mettere una piccola griglia per la ventola, griglia che non ho disegnato perchè ce ne sono letteralmente centinaia su thingiverse. Questo è tutto, ora ho il mio economico purificatore d'aria, enjoy!
With this file you will be able to print Air Purifier (active carbon filter) for 80mm fan with your 3D printer. Click on the button and save the file on your computer to work, edit or customize your design. You can also find more 3D designs for printers on Air Purifier (active carbon filter) for 80mm fan.