Air Scrubber for an Ikea (TINGBY) based enclosure
prusaprinters
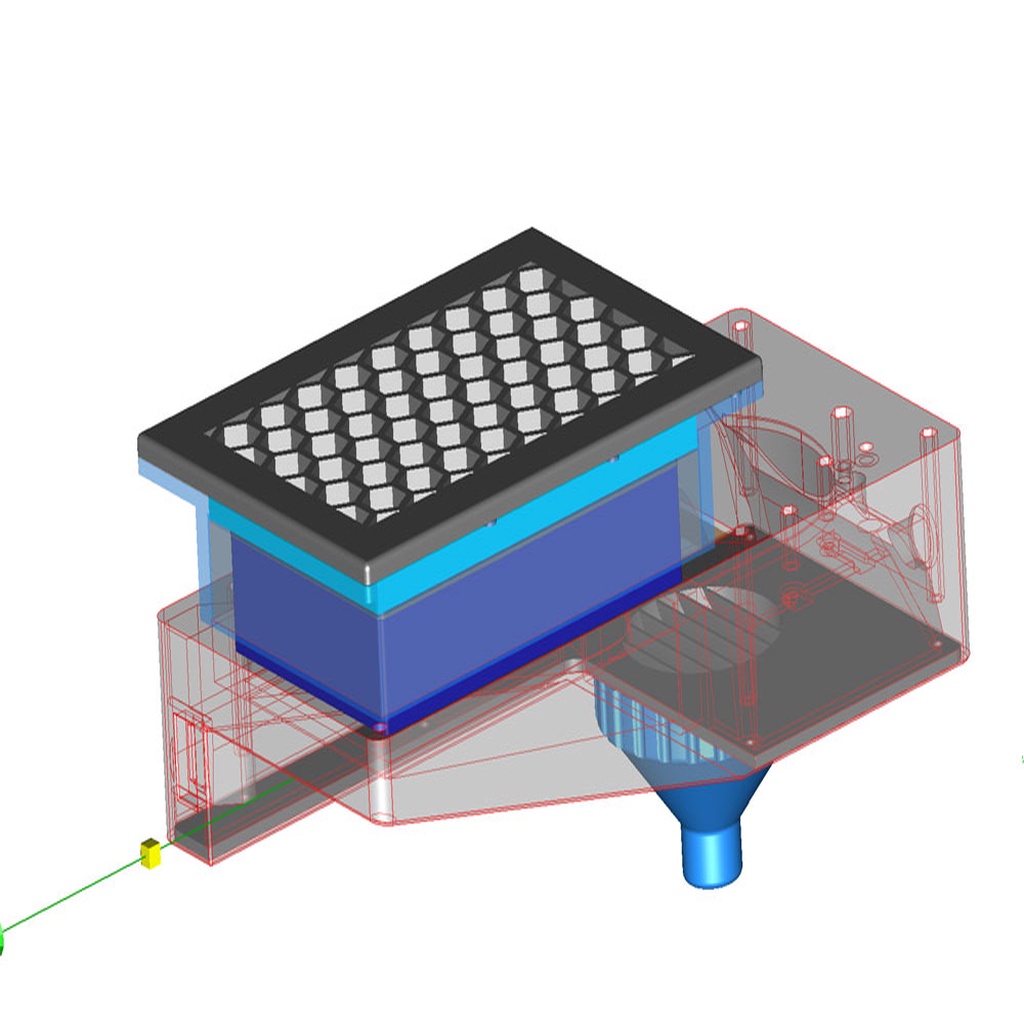
<p>This is an Air Cleaner / Scrubber for an enclosure I am building. The enclosure is based on an Ikea TINGBY so this is made to work with the table top from that product. I know that hardly anyone uses the TINGBY and the LACK tables are more popular for enclosures, but I have my reasons :D I may be able to modify this for LACK tables, but I would need some specific dimensions to do that (and time). The STEP files are included for easy Remixing though.</p> <p><strong>I have zero qualifications for designing a filter, so this is strictly an at your own risk deal, and I make no guarantees on if it will work in whatever application it may be used in.</strong> I printed an almost identical version of this (only difference is some mounting holes have been updated in the posted design), and have been running it for several months. It seems to be working, and my air quality meter which sits above the exhaust grill for this scrubber, shows zero for PM2.5 and is normally at 0.015 or lower for Total VOC's. I also have HEPA room filter in the same room as the printer as a backup to this scrubber.</p> <p>Since I printed this, I made some minor improvements to the design (moved some mounting holes), but nothing that change the function or assembly process. I moved the untested fuseholder version to a remix of this to avoid confusion (<a href="https://www.thingiverse.com/thing:4075295">https://www.thingiverse.com/thing:4075295</a>), please check that out as well. Be forewarned though, this is a big print (over a day with a 0.6mm nozzle at 0.26mm LH).</p> <p><strong>I posted 2 versions of the body here, one is without any integrated supports:</strong><br/> AIR-SCRUBBER-Z15-NO-FUSE.stl</p> <p><strong>And the other has some built in supports (this is made to be printed at 0.2mm layer height):</strong><br/> AIR-SCRUBBER-Z15-NO-FUSE-SUPPORTS.stl<br/> (see note in print settings)</p> <p>Bill of Materials:</p> <ul> <li>/#8 7/8" wood screws (a dozen should do it)</li> <li>M4 x 45mm (or 50mm) flat head screws (2 for mounting the fan)</li> <li>M3 x25-45mm round or flat head screws (6 for securing the lid)</li> <li>M3 x20mm round or flat head screws (5 for the carbon filter)</li> <li>M3 x10mm round or cap head screws (4 for mounting the filter grill)</li> <li>M3 x12mm round head screw (2 for mounting the fuse holder)</li> <li>M3 4mm x 4.3mm brass inserts (qty 5, get some extras though) for the carbon filter)<br/> https://www.amazon.com/Uxcell-a16041800ux0833-Knurled-Threaded-Embedded/dp/B01IYWUUH8/</li> <li>M3 nuts (20)</li> <li>M4 nuts (6)</li> <li>Wire, I think I used 18 or 20 gauge</li> <li>Fuse (I used a 2Amp standard fuse but use your best judgement)</li> <li>1x DC 2.1x5mm panel connectors, these can be found cheaper on Ebay (1) - they look like these https://www.amazon.com/10Pack-Adapter-Connector-Dustproof-Lsgoodcare/dp/B078YP4CP6</li> <li>Rocker switch (I used the smaller AC 250V/3A 125V/6A similar to the smaller ones shown in <a href="https://www.amazon.com?linkCode=ll2&tag=thingiverse09-20&linkId=e4759bff1fa9a55a0f897d801ce2d765&language=en_US&ref_=as_li_ss_tl"> </a><a href="https://www.amazon.com?linkCode=ll2&tag=thingiverse09-20&linkId=e4759bff1fa9a55a0f897d801ce2d765&language=en_US&ref_=as_li_ss_tl"> Amazon</a> item B07D7NCLKF). Note that these switches have no rating for DC, and I don't know what current they would take, but my fan runs at less than 1A normally and it has been OK so far. I suggest finding a better quality switch than the one linked though. Regardless, I'm not an expert and suggest that you make your own determination on if the switch used will meet the needs of the fan which is used.</li> <li>Delta BFB1012VH fan (I bought it at <a href="https://www.amazon.com?linkCode=ll2&tag=thingiverse09-20&linkId=e4759bff1fa9a55a0f897d801ce2d765&language=en_US&ref_=as_li_ss_tl"> </a><a href="https://www.amazon.com?linkCode=ll2&tag=thingiverse09-20&linkId=e4759bff1fa9a55a0f897d801ce2d765&language=en_US&ref_=as_li_ss_tl"> Amazon</a> but seems the link has changed since - no prime but it is cheaper) - note that red is +12V and black is ground, the pins are not in the standard 4 wire arrangement so don't connect this to a standard 4 wire header without checking the pinouts. This fan is a bit noisy but not as bad as I had thought. The fan is a 12V blower which is rated at 1.8A but when I measured it running off 12V (no PWM) it only pulled around 750mA and seemed to have sufficient output so I did not mess PWM control.</li> <li>HEPA Vacuum Filter for Kenmore EF-1</li> <li>4x8 mesh Activated Carbon from Coconut Shells (from EnviroSupply) The 1 Lb bag should last a long time, but it needs to be washed with RO or distilled water to remove the dust (and then I just dried it outside in a veggie bag for a few hours). </li> <li>1mm thick Black EVA Foam Tape (single sided) 1.5cm x 10M</li> <li><p>A 12V power supply with the correct connector to run the fan. Get one that is properly sized to the current requirement of the fan. The base is most easily printed in the vertical orientation (see pics).</p> <p>I will post build instructions at the link <a href="http://www.mystoopidstuff.com/air-scrubber-instructions.html">here</a> since I don't trust that Thingiverse will not blow out my hard work of updating this thing when I click "publish thing" (it has happened).</p> </li> </ul> <p><strong>If you make one, please post a make, and if you have a question or suggestion please post a comment.</strong></p> <p><strong>Parts are not oriented for printing.</strong></p> <p>Update 11/25/2019: Simplified the description and moved the untested fuseholder version to a remix so this could be removed from work in progress status.</p> <h3> Print Settings</h3> <p><strong>Notes:</strong></p> <p>I printed everything with a 0.6mm nozzle and at 0.26mm layer heights. Printing with a 0.4mm nozzle and 0.24mm layer height should also work fine. If the version with integrated supports is used, I suggest using 0.2mm layer heights.</p> <p>I suggest printing with 3 walls and 25% infill (I use Gyroid), but that is just my $0.02.</p> <p>There is a version of this model with integrated supports included, and that version should not require any other supports. The integrated supports are not perfect though and may take some effort to remove, but they worked for me. Use that version with 0.2mm layer height).</p> <p>The grates on the carbon filter will require some explanation. In a nutshell, the grate pattern on the box was printed as infill only in Cura.</p> <p>To make the grating, load up the 2 parts; the box and a 2nd part for the grates, then select them both, right click >"merge models" to align them, and then right click > "ungroup models" to get them separated again. Once aligned, the parts then need to be printed with different settings so the grating part needs to be selected with per model settings and then the following settings were selected for it:</p> <p>Mesh Type: Normal Model (I did not try the other settings but they may work better)<br/> Wall count = 0<br/> Top/Bottom Layers = 0<br/> Enable Ironing = off<br/> Infill Density = 50%<br/> Infill Pattern = Triangles<br/> Connect Infill Lines (enabled)</p> Category: 3D Printer Accessories
With this file you will be able to print Air Scrubber for an Ikea (TINGBY) based enclosure with your 3D printer. Click on the button and save the file on your computer to work, edit or customize your design. You can also find more 3D designs for printers on Air Scrubber for an Ikea (TINGBY) based enclosure.