Airsoft PPS XM26 - Bullpup Conversion Kit
thingiverse
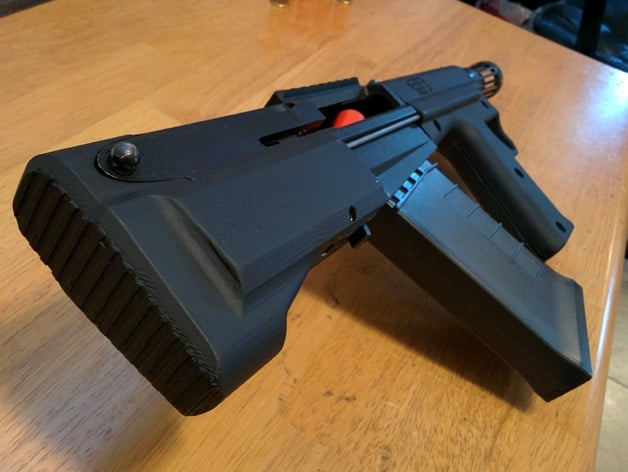
THIS IS NOT DESIGNED FOR USE WITH A REAL FIREARM. PICTURE DEPICTS AN AIRSOFT RIFLE, NOT A FIREARM This is my Bullpup conversion kit for Airsoft PPS XM26. The kit is designed to be mostly 'drop in' but some work is needed to make everything work smoothly. What you will need in addition to the printed parts; Six, 6-32 by 1'' Mechanical screws and matching hex nuts. (Close dimensions will also work, the slots have some play to them) One or two small springs, approx 4mm diam. x 20mm. These are optional and are to help with returning the trigger. Some electrical tape. About 500mm of steel round bar, 3mm diam. (or close, the channels should accommodate up to 4mm) Assembly; First of all, test-fit everything before painting and final assembly. Depending on your printer, some sanding might be required for smooth operation. Remove the locking pin that holds the stock in place and remove the stock+pistol grip assembly from the XM26. Keep the locking pin! Remove the trigger guard by removing the two flat head screws that holds it in place. Keep the screws! Remove the front and rear sight. You don't need to keep those. Extend the compensator to full lenght (twist and pull). Put one half of the foregrip along the barrel and align it correctly. Release the compensator to create some tension and hold the foregrip in place. Place and align the forward trigger This is the trickier part; you'll need to form the steel bar into a remote linkage that goes from the front trigger all the way to the back trigger. refer to the pictures to give you an idea. The bar should run along the provided channel in the foregrip, then along a groove on the XM26. I recommend only linking the trigger on the right-hand side (ejection port). Once the bar is formed, test the action. If it's not smooth you can either try to form the bar better, or add a spring on the forward trigger. If everything is done correctly, the spring should not be necessary. Once the trigger link is installed, install the other half of the foregrip and bolt everything tight. You might need to put some electrical tape on the barrel to make a snug fit, otherwise the foregrip might slip and slide forward when priming! Make sure the XM is not on safe (the safety is not acessible in bullpup form) Install the buttstock by sliding it over the frame. You might need to angle it down a bit to pass the trigger. Re-use the locking pin and the two flat-head screws to secure it in place. The locking pin hole is designed to be slightly off-center as to privide tension, but depending on your printer you might need a bit of drilling or filing so it's not too tight. There you go! bullpup XM26. It works exactly the same as the stock XM, except much smaller.
With this file you will be able to print Airsoft PPS XM26 - Bullpup Conversion Kit with your 3D printer. Click on the button and save the file on your computer to work, edit or customize your design. You can also find more 3D designs for printers on Airsoft PPS XM26 - Bullpup Conversion Kit.