Airtight Filament Canister
prusaprinters
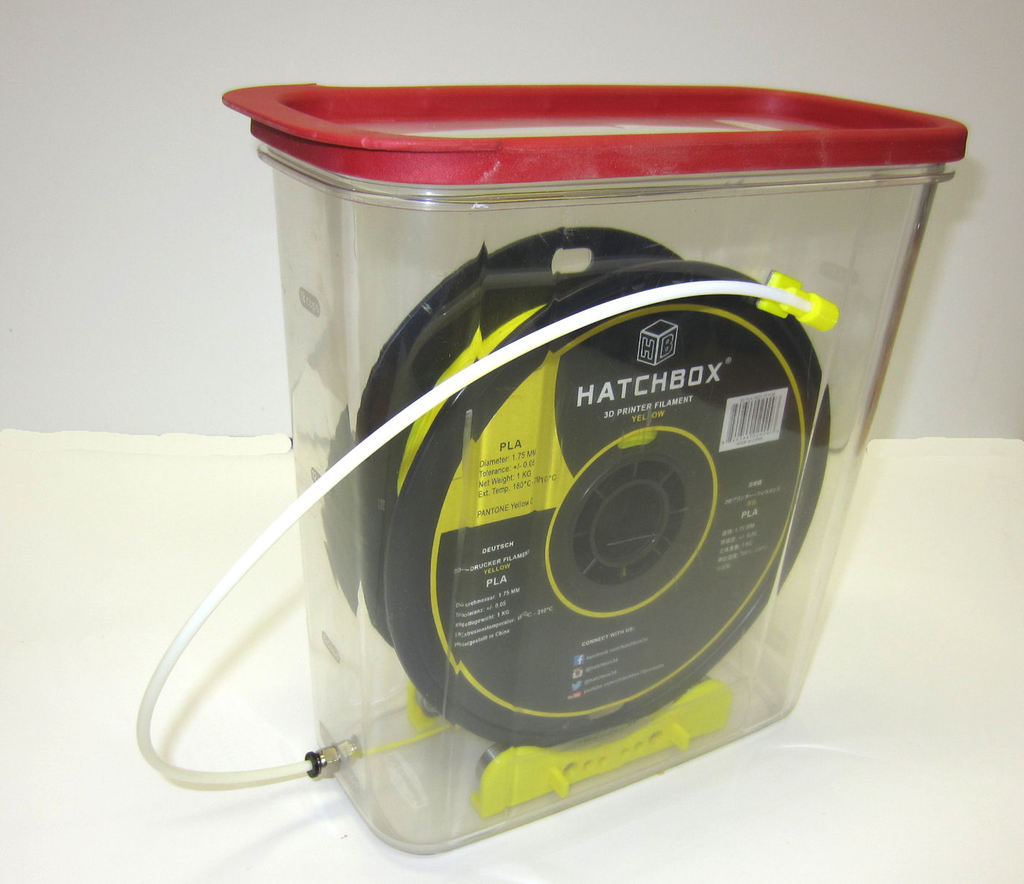
<p>I had problems with moisture getting into my filament and causing little pops on the side of my prints. I realized when the problem did not occur with a fresh spool of filament that my filament was absorbing moisture. This Airtight Filament Canister solves the moisture problem and provides convenient storage. It includes three cradle designs which allow the filament spool to move freely. The filament is fed through an airtight connection using either 1/4" PTFE or 4mm PTFE tubing. You may use either the 1/4" PTFE connection or the 4mm PTFE connection. The canister is completely airtight except for the small hole in the end of the tubing where the filament exits. The hole is plugged by pushing the end of the tubing into the matching cap. If you would like your canister on a shelf above the printer, you may install the filament port on the side of the canister near the bottom.</p> <p>There are three versions of the cradle, a one piece design for narrower spools 53 - 70 mm, a one piece design for wider spools 63 mm - 80 mm and the newer adjustable 3 piece design. The adjustable cradle is better than the previous one piece designs. I suggest going with the adjustable cradle. See Update 5 below. This cradle designs require only four 608 bearings and they print quickly.</p> <p>The Rubbermaid container is a 21 cup size and can be bought at <a href="https://www.amazon.com?linkCode=ll2&tag=thingiverse09-20&linkId=e4759bff1fa9a55a0f897d801ce2d765&language=en_US&ref_=as_li_ss_tl">Amazon</a>.com for $12. https://www.amazon.com/Rubbermaid-1776473-Racer-Storage-Containers/dp/B07QWDTZB6</p> <p>PTFE Ports for 4mm and 0.250" tubing https://www.amazon.com/BIQU-Straight-Pneumatic-Connector-Extruder/dp/B01IB81IHG https://www.amazon.com/PneumaticPlus-PC-1-Connect-Fitting-Straight/dp/B00AXAY47W</p> <p>The bearings can be bought anywhere including a skate shop and should cost around 75 cents each. The 1/4" PTFE is available from Home Depot. There is no other hardware for this design. 4mm PTFE is available on <a href="https://www.amazon.com?linkCode=ll2&tag=thingiverse09-20&linkId=e4759bff1fa9a55a0f897d801ce2d765&language=en_US&ref_=as_li_ss_tl">Amazon</a>.com</p> <p>I've also included designs for 4mm and 0.250" PTFE tubing supports.</p> <p>Update 4-26-2017: Thanks to all who reported the pins being too tight. The cradle holes were 8 mm and the pins were also 8 mm (no clearance). I opened up the cradle holes to 8.3 mm and reduced the pins to 7.8 mm which should make the pins fit more easily. If yours are still tight, I suggest a bit of sanding of the pins. The new cradle and pin designs are V3. The filament port is the the same as before at version V2.</p> <p>Update 2-16-2017: I have added an alternate design for the PTFE port to support 4 mm tubing. The new design uses a cap and a clip rather than an integrate cap port. It uses the same spool cradles. I did this redesign so that I could better support CoreXY and HyperCube printers with a port mounted low on the container. You will need a 10mm PTFE connector and will need to drill a hole to mount the connector. See the photo.</p> <p>Update1: I have been using my new canister quite a bit this week and noticed that it feeds better if you face the canister and PTFE so it follows the natural curve of the filament coming off of the spool. (Makes sense doesn't it :)</p> <p>Update2: I printed another one of these setups and I am keeping my favorite filaments in these canisters. It is much easier to hook them to my printer and it is easier to seal them off rather than zip lock bags which is how I store my other spools of filament. This canister has eliminated any problems I was having with moisture getting into my filament.</p> <p>Update3: I received a spool of Hatchbox filament that did not fit the smaller of the two cradle designs so I narrowed the smaller one by 10mm. Between the two cradles, this canister design will support spools from 56mm through 80mm wide.</p> <p>Update 4: I added a filament guide that mounts on the printer and receives the 0.25" PTFE guiding it to the middle of the top of the printer. This makes it easy to connect and to swap out canisters. You clip the filament, unplug the tubing and plug in another canister.</p> <p>Update 5: I have a new adjustable spool cradle which is better than my original one piece cradle also presented here. I have left the old cradle for those that like it. The new cradle is the yellow one and the STL files have "adjustable" in the name.</p> <p>The complete information is here: <a href="https://www.thingiverse.com/thing:2394480">https://www.thingiverse.com/thing:2394480</a></p> <p>Update 6: I removed the printed port for 0.250" PTFE. I think the purchased ports are better and they are easier to install.</p> <p>Update 7: The original clear 21 cup hard plastic Rubbermaid container has gone way up in price ($70!!!!). There is still a soft plastic 21 cup version available for $11 each. I have supplied the link for that container. The new container has a one piece lid and is slightly opaque.</p> <h3>Print Settings</h3> <p><strong>Printer Brand:</strong></p> <p>RepRap</p> <p><strong>Printer:</strong></p> <p>Prusa i3</p> <p><strong>Rafts:</strong></p> <p>No</p> <p><strong>Supports:</strong></p> <p>No</p> <p><strong>Resolution:</strong></p> <p>0.1 or 0.2mm</p> <p><strong>Infill:</strong></p> <p>40%</p> <p><strong>Notes:</strong></p> <p>PLA</p> <p>Extruder 200C</p> <p>Bed 60C on Kapton</p> <p>Drill a 3/8" hole if you are using the 10mm PTFE connector and use two layers of Teflon tape to seal the connection. The fitting self threads into the soft plastic. You could probably leave off the Teflon tape and it would also seal fine.</p> <h3>Post-Printing</h3> <p><strong>Cleanup and Setup</strong></p> <p>After printing the spool cradle, you may have to clean the holes with an 8 mm drill or a file.</p> <p>The pins have a very small expansion on the end to retain them. If they can't be pushed in, you may have to sand them a small amount. My pins click into place firmly.</p> <p>The 21 cup Rubbermaid Container is part number 1840750. You will need to drill a 1/4" hole to one end of the cap and then use a step drill as shown to open it to 1/2". The step drill gives a clean not ragged hole. Glue both the filament port and the retaining bushing to the canister cap using Super Glue (for PLA). Clamp it in a vise or other method to create an airtight glue joint. Push 14-16" of 1/4" PTFE tubing into the open port. Set the cradle in the bottom of the canister and feed the filament from under the spool up through the port, tubing, and to your printer. When you're not using the filament, remove it from the printer and plug the open end of the feed tube into the sealed secondary port. You can also throw a couple bags of desiccant into the bottom of the canister. Your filament will stay nice and dry. You'll be surprised how many print problems are solved by eliminating moisture in the filament.</p> Category: 3D Printer Accessories
With this file you will be able to print Airtight Filament Canister with your 3D printer. Click on the button and save the file on your computer to work, edit or customize your design. You can also find more 3D designs for printers on Airtight Filament Canister.