AJGW Alain-Jonas-Greg-Wade's Extruder
thingiverse
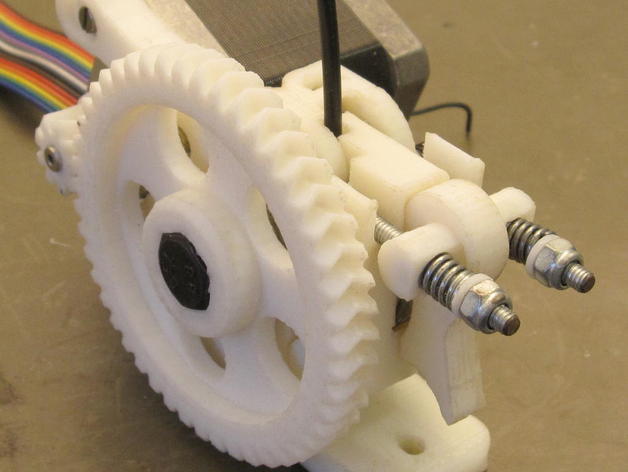
A few things annoyed me when I built a new Extruder, so this project started to be just a few fixes but then I ended up fixing a lot of small issues. This is just one more in a long line of extruders derived one from the other. I named it AJGW to reflect contributors in the main line, but I did add all interesting accessories like the heringbone gears and fast release lever. Here are some of the new features: ) new concept split filament guide, fixes better and allows easier access.) Idler hinge doesn't touch the gear anymore.) option (default) to use 5/32" screw for the idler which is easy to find) longer oblong hole for the motor screws. This eliminates the need to remove the motor when testing or adjusting the heringbone gears.) Top access to screws with ball end allen wrench. This allows for much easier attaching and removing, specially when there is a fan duct. Optional without nut fitting in base.) Heringbone gears a little thiner and nicer looking. Better fit of the screw) Open access to the insides for cleaning and inspection, just like Greg's) Redesigned Fast Release Lever but keeping the same concept) reinforcement to the upper idler screw attaching point, this was a frequent point of breakage) reinforcement behind the tractor screw's bearing, to avoid frequent breakage) reinforcement on the top with a little extra height) Idler printing sideways, this avoids weakness in the hinge screw) thicker motor mounting base so that M3x10 screws can be used without extra spacers) Various external support structures, prints better without automatic support and it is easy to clean.) Parametric, various simplified optins including 1.75 filament) Many small things that you will not even notice that they aren't there anymore to annoy you... All metric screws, except for the long idler screws that are not available as metric. A few extras are included, like washers that you can print instead of going out to buy them. It was originaly thought to be used for 0.25mm layers, but it has been tested by some friends with 0.4mm too. I am releasing a few options that make sense to me and to some friends. If you need a different option and are having trouble with the .scad files, please post a comment and I will be glad to include other options. 2013/feb/17: there is an adapter for the Prusa i3 here http://www.thingiverse.com/thing:29795 please let me know if it works! 2013/mar/17: I found another nice support here: http://www.thingiverse.com/thing:57668 Version 1.1: small reinforcement in the Idler, included STL files for both 4mm and 3/32" (very usefull only in Brazil) Instructions This thing needs a well calibrated 3D printer, but not a high precision one. Please see Slicer parameter at the end of these instructions. Be carefull not to use Brim for the big gear and washers. Some parts have optimizations for layer height/width, please check the files names carefully After printing all parts, clean the brim and all support material. === List of printed parts: 1 Extruder body 1 Idler 1 big gear 1 small gear n M8 washers, stl for 1.2 and 2 mm are included 2 4mm (5/32") washer, to be inserted between the screw and the spring. === BOM, vitamins needed: 3pc 608 bearing 1pc 8mm axis for the idler, length=19mm (or 5/16") 1pc M8 tractor screw 2pc M8 nuts 3pc M3x10 screw for the motor 1pc M3x8 set screw for small gear 1pc M3 nut 3pc M3 washer 2pc screw 5/32 x 2 1/2" this is 62mm long (or optional: M4x60) 2pc nut 5/32" (or optional: 4mm) 2pc M4x 25 hex screw for fixing the base, YMMV 2pc M4 nuts 4pc M4 washers 2ps cloth peg springs, these are cheap and just perfect for the idler 1pc Nema 17 stepper... === Adjustements: The most important adjustmaent is the aligment of the heringbone gears or they will wear out very fast. The EXTERNAL SURFACE of both gears have to be even for correct operations, beware that the small gear is bigger on the inside to allow for some printing variations. The motor should be fixed so that there is no slash but WITHOUT PRESSING the gears toghether. Adjust with filament inserted and springs tensioned fo avoid surprises. ======================================================= ==== Recomended Slic3r settings ==== from Slic3r 0.9.7 up there are no (big) fill problems But this has generaly been optimized for these parameters Print Idler first to see if all goes well Allways use RepetierHost to check if Gcode is ok !!! File extensions:.stl no optimization for layer height/width.25.stl for printing with 0.25 layer height.40.stl for printing with 0.40 layer height.2550.stl .25 layer height, but width must be 0.50 (see bellow).4060.stl .40 layer height, but width must be 0.60 (see bellow).scad files is not dependant on layers height gears should allways be 0.25 height, but can be 0.4 on a good printer NOTE: all parts have their own built-in support (except one idler file) Print settings > Layers and perimeters Perimeter (minimum) = 2 Generate extra perimeters= NO Print settings > Skirt and brim Don't use BRIM for big-gear and washers!!! Brim essencial for Idler, recomended for the rest ==>> For 0.25mm layers: Print settings > Layers and perimeters Layer height = 0.25 mm Horizontal shells, Solid layers = 4 (aprox 1mm) Print settings > Advanced > Extrusion width Default extrusion width = 0.50 mm First layer = 0.48 mm Perimeters = 0.48 mm Infill = 0.48 mm ==>> For 0.40mm layers: Print settings > Layers and perimeters Layer height = 0.40 mm Horizontal shells, Solid layers = 3 Print settings > Advanced > Extrusion width Default extrusion width = 0.60 mm First layer = 0.58 mm Perimeters = 0.58 mm Infill = 0.58 mm There is some rounding problems and 0.48 or 0.58 allows for better thin walls
With this file you will be able to print AJGW Alain-Jonas-Greg-Wade's Extruder with your 3D printer. Click on the button and save the file on your computer to work, edit or customize your design. You can also find more 3D designs for printers on AJGW Alain-Jonas-Greg-Wade's Extruder.