AKIRA motorcycle
myminifactory
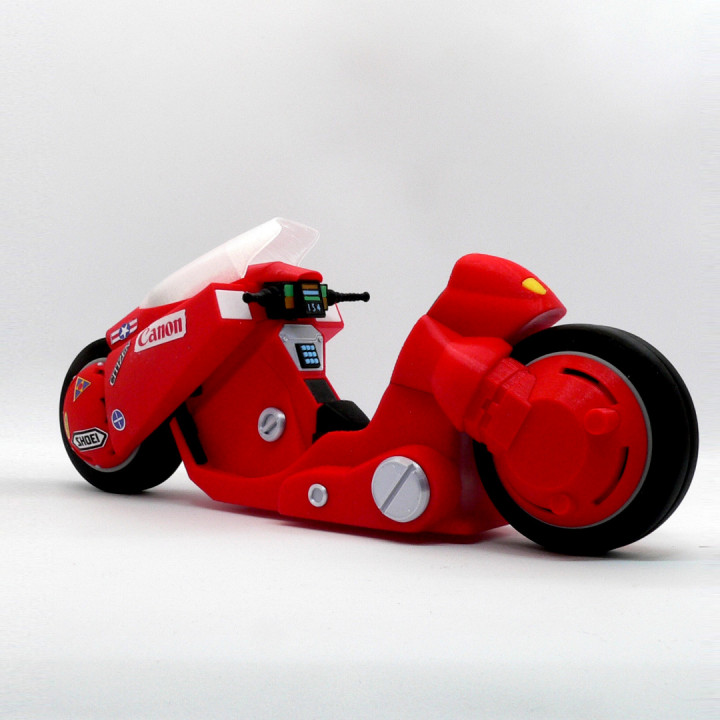
Kaneda’s bike - Akira motorcycle. Akira is a 1988 Japanese animated post-apocalyptic cyberpunk action film directed by Katsuhiro Otomo, produced by Ryōhei Suzuki and Shunzō Katō, and written by Otomo and Izo Hashimoto, based on Otomo's 1982 manga of the same name. It is widely regarded by critics as one of the greatest animated and science fiction films ever made. No supports are required. If you have the proper filament colors, no painting is needed.See below notes for information about the optional decals. The assembled model is 290mm long. Enjoy! FYI-If you are a real fan of the movie, you would understand the speed reference on the model. ........................................................................................................... **Print Instructions:**Supports: NoResolution: .2mmInfill: 10% Notes:** Refer to the notes below for a few helpful printing and assembly instructions. ........................................................................................................... **Building the model** Colors Black: (Paramount3D PLA - Black)tire_front (contains two identical pieces)tire_back (contains two identical pieces)axles (contains two identical pieces)front_wheel_attachment_leftfront_wheel_attachment_rightpeddle_leftpeddle_righthood_light_blackhandlebar_lefthandlebar_righthandlebar_middlespeed_blackconsole_insertconsole_panel_button_frame.. Matte Black: (Paramount3D PLA - Matte Black)seat.. Gray: (Paramount3D PLA - Prototype Gray)**I did not have enough silver and used the gray I hadrim_front (contains two identical pieces)rim_back (contains two identical pieces).. Silver: (PolyAlchemy Elixer - Silver)front_hub_bolts (contains sixteen identical pieces)bolts_side_big (contains two identical pieces)bolts_side_small (contains two identical pieces)console_panelgas_cap.. Red: (Hachbox PLA - True Red)hubcap_front_lefthubcap_front_righthubcap_back_lefthubcap_back_rightfront_glow_red (contains eight identical pieces)back_glow_red (contains eight identical pieces)back_wheel_bolt_tall (contains two identical pieces)back_wheel_bolt_short (contains two identical pieces)chassis_side_leftchassis_side_rightfront_sidebar_leftfront_sidebar_rightchassis_mainback_wheel_attachment_leftback_wheel_attachment_rightchassis_back_attachment_leftchassis_back_attachment_rightconsolechassis_middlehood_bottomhood_top.. Blue: (Paramount3D PLA- Autobot Blue)front_glow_blue (contains two identical pieces)back_glow_blue (contains two identical pieces).. Light Blue: (Solutech PLA - Aqua Blue)speed_blueconsole_panel_buttons.. Yellow: (Paramount3D PLA - Simpson Yellow)hood_light_yellowback_light_rightback_light_left Green: (Hatchbox PLA - True Green)handlebars_green (contains two identical pieces)speed_green.. Orange: (Paramount3D PLA - McLaren Orange)handlebars_orange (contains two identical pieces)speed_orange .. White: (Overture PLA - White)front_light_white .. Transparent: (ProtoParadigm, out of business, PLA - Crystal Clear)windsheildbase (optional for display purposes, bike stands nicely without it).. Decals: (found in the pictures section)akira decals.jpg ........................................................................................................... **Printing and assembly tips** Printing tips1 - No supports are required. 2 - Parts that are named left and right may at times look the same but are at least slightly different. It's easier to keep track of the parts while printing them to avoid misjudging them when assembling the model. 3 - Some parts are specifically designed for a .4mm (or smaller) nozzle. The windshield is designed to print as one shell and some of the smaller parts contain walls that are one shell thick. For a larger model, all parts can be sized up without issue. 4-There are some pieces that may need brims or rafts, use your discretion. When setting up my prints I prefer to be conservative, especially since the base of many parts are hidden when inserted into another part. For the smaller parts, a good first layer is helpful. *I used brims on: windshield front_hub_bolts front_glow_red back_glow_red axles 5 - The windshield prints well, however depending on your slicer settings/filament/printer, one edge may suffer from overextrusion. If this happens on your print, do not worry about this edge since it is hidden in the extra, extra wide slot in the hood_bottom part. To get the cleanest transparent print and least amount of problem with the edge, I printed the windshield at the lowest temp possible for the filament I used. 6 - The front_hub_bolts print upside down (as presented). The curved part is inserted in the hub and the flat part that was on the bed is visible. 7 - All items in the console are 3D printed, optional decals are attached to the sides of the model. A JPG file containing the decals is included in the pictures section. 8 - Small note: the back_wheel_attachment/left/right might have a few small artifacts in the hidden bottom part. Brush or dislodge them out to avoid interference with the wheel turning. ..Assembly tips: 1 - Take your time gluing the model together and enjoy the process. Personally, I had a lot of fun assembling this model. 2 - I used E6000 sticky craft glue to put this model together. The sticky glue allows more time to position the parts than a fast drying superglue. I have 'fat fingers' and a shaky hand, so the sticky glue works out best for me, especially with small pieces. Just remember to leave enough time for the glue to set before combining too many parts. 3 - All parts should fit together quite well, do not force anything. If something does not fit quite right you may have a left/right issue or a bit too much of a first layer squish. 4 - I was able to test fit almost the full model before gluing. I then assembled the model in basically three major components (see the three assembly diagrams) and then joined those together: -complete front/back wheel assembly including the connectors -main chassis with seat, console, middle chassis and chassis_back_attachment -hood with sidebars, completed handlebars and windshield 5 - When completely assembled, the wheels are able to turn with some red and blue 'flashing' like the movie. Note that the wheels have a bit more friction than I had planned on and the 'flashing' is not as pronounced as I had hoped. Maybe a different filament would come through better. 6 - The included stand is optional, the bike stands by itself but sometimes a stand is nice for display purposes. 7 - A JPG file with the decals is included. The decals are sized for this model. I included a registration size box in the JPG to verify print size. Decals can be made with plain paper and cut out. I used decal paper for a cleaner, finished look. 6 - Refer to the multiple assembly diagrams in the pictures section as well as the uploaded pictures for putting the model together. The model is meant to be glued. Do not hesitate to ask questions, feedback is essential to making better models.
With this file you will be able to print AKIRA motorcycle with your 3D printer. Click on the button and save the file on your computer to work, edit or customize your design. You can also find more 3D designs for printers on AKIRA motorcycle.