Alfawise W10 Socket (Fan Update + Full-Size SD Card)
thingiverse
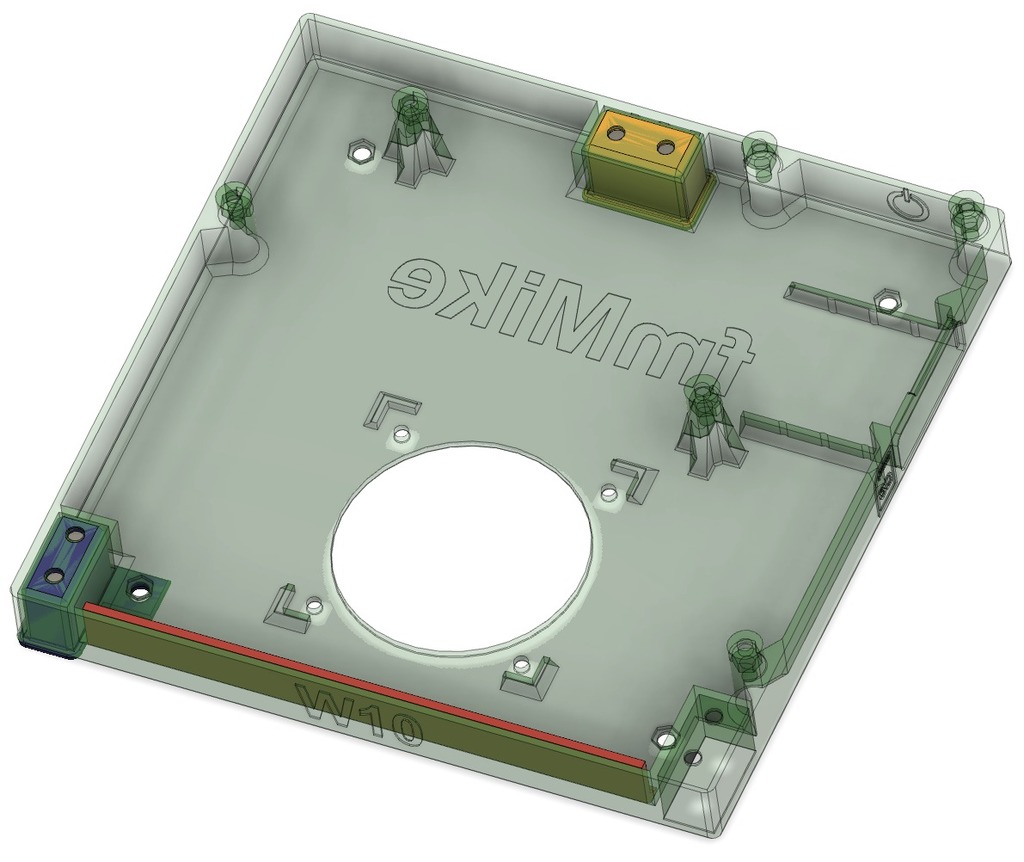
Absolutely Impressive: a Layer Thickness of 0.05mm or Even Better, But Absolutely Annoying: You're Trying to Start a Jet Plane Every Time You Run a Print... Even Vacuuming the Room is More Silent than This Box! Knowing the Guys from Noctua Do Very Good (But Expensive!) Fans I've Decided to Update the Box - and Once Open, to Add a Proper Full Size SD Card Slot, to Avoid Handling of MicroSD Cards (BTW, Tolerances are Bad, So a MicroSD Card Can Vanish Easily Inside the Box... and Opening is the Only Way to Get it Back). Tools You Need: Torx T10 or M2.5 Allen Key (for Most of the M3 Screws Around the Box) Torx T8 or M2 Allen Key (for the Side Housing Walls) Fine Tweezers Soldering Iron (Optional) 2.5mm JST Crimp Tool (Optional) Parts You Will Need: 10x M3 Nut 12x M3x12 Screws 4x M3x15 Screws 6x M3 Washer 1x Full-Size SD Card Adapter (Got Mine from Amazon) 1x 12V Fan with Noise Reduction (Used the Noctua NF-A6x25 from Amazon) Parts You Might Need: 2.5mm JST Crimp Connectors (Fan) Shrinking Tube (In Case You're Soldering) Fan Fixation Screws or Rubber Feet The Socket Was Designed to Replace the Original Metal Socket Featuring Fixations for Both PCBs, Fan and a Full Size SD Card Socket (Pictures for Details). Files Attached: W10 Socket V4 => Replacement Socket for the Alfawise W10 SLA Printer W10 Stabi + Spacer => Stabilizer Components, See Below for Details Update 13/06/2019: Added W10 Grid 58 as Front Cover for the Fan on the Bottom Update 19/06/2019: Added Socket V6 with Square Nut Sockets and Some Added Support on the Walls to Improve Stability. Distance Fan to Heatsink Was Increased to 5mm to Get a More Smooth Airflow Around the Heatsink Since V4 Showed Some Printer Hang-up During 5h Prints... Disassembly: Opening the Box is Straight Forward but a Bit Tricky: Use the T8 Driver and Remove the 8 M3 Screws That Fix the Side Walls and Store Them Somewhere. Start on the Right Side, on the Small PCB. Remove the Red Stuff (Rubber Glue?) So the Connectors Can Be Unplugged. Move to the Left Side and Unplug the NEMA Stepper Motor. Go Further Left, Check Which Cables Are Not Lose Yet and Remove the Red Stuff Fixing Them. Then Remove Them Carefully. Now, Use the Tweezers to Unlock the ZIF Socket on the Board - or - on the UV Lamp Housing (My Selection) and Remove the Flat Cable - and You're Done! There's One Shielded Cable Left - This Can Remain Attached as the Length is Quite Decent. Bend the Box to the Front, So the Build Platform Arm is Touching the Table and Unscrew 6x M3 Screws Fixing the Metal Socket Using the T10 Driver. The Sheet Metal Should Wiggle a Bit, as the Construction is Put Under Tension. Done This, the Metal Socket Can Be Flipped to the Table and the PCBs Can be Unscrunched (the Small One Can be Moved Easily - the Big One is Still Attached to the Display I Think... so Move it Carefully). Once Finished - Use the T10 Driver to Remove the 4 Feet - They're Screwed Directly into the Metal Socket. A Slight Push Will Release Them in Case They're Sticked.
With this file you will be able to print Alfawise W10 Socket (Fan Update + Full-Size SD Card) with your 3D printer. Click on the button and save the file on your computer to work, edit or customize your design. You can also find more 3D designs for printers on Alfawise W10 Socket (Fan Update + Full-Size SD Card).