Alice in Wonderland Cameos for Silhouette Set
thingiverse
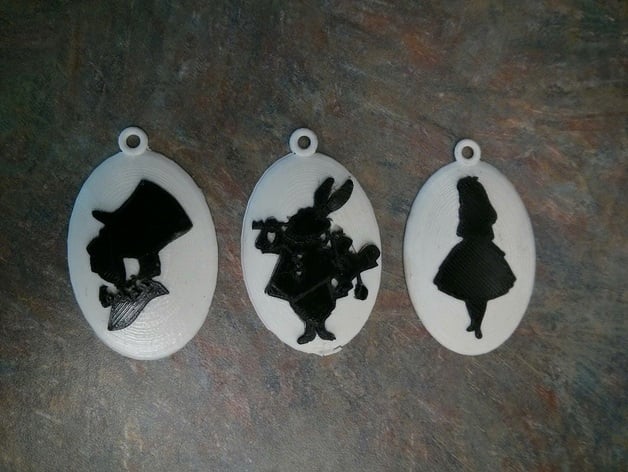
I wanted to be able to do a black on white cameo for these even though my Ultimaker only prints in one colour at a time. I created this THING to do it! The whole project is two prints: The white cameo files in this post, and @FelixMcallister's "Alice in Wonderland Silhouette Set". With a little bit of extra help (mallet) those sillhouettes should pop right into the slots in the cameo creating a great piece of jewellery for anyone who loves Disney's Alice in Wonderland. Print Settings Printer Brand: Ultimaker Printer: Ultimaker 2 Rafts: No Supports: No Resolution: Normal Notes: Most importantly: The Alice_Sillohuet.stl file from the Alice in Wonderland download (for the remix) must be set to 21.34mm x 40.39mm. The two other files should fit based on the default sizes downloaded. Alice works best (in my opinion) Post-Printing Putting Together A little bit of super glue on the inside of the white cameo should stick a black silhouette permanently. The fit will be tight (which I like) I eased them together with a little bit of tamping with a hammer. Once they were together I ran a file around the edges to smooth things out and presented them to our school director as a memento for her cast of Alice in Wonderland. How I Designed This Iterations The virtual model was easy: Create an amulet about the size of the silhouette files using a hemisphere and tube shape in Tinkercad. Drop the silhouette file into Tinkercad as a hole and raise up a mm above the base. Thicken to 4mm so it covers the amulet and you should be good to go. First Print This revealed that only Alice really fit properly, the fine details of the other two images interfered between the positive and negative relief, and so I chose to doctor the Hatter and the Rabbit so that only the outline of those two images would be carved in as the relief on the amulet. Second Print Went into the Tinkercad files and took out any detail inside of the outline with the hope that this would help the Hatter and the Rabbit fit nicely in the shape. Also restored the silhouette files to their default sizes. For some reason I skewed Alice (accidently) and so when she printed she was much too skinny. Third Print The third print went well. The silhouettes were tighter than I expected but went together with a hammer fairly well. The rabbit's small parts were a more risky endeavour and didn't work out as well as I had hoped. Even though the silhouette of the Hatter was aligned to the center of the medallion it strikes me as off center in the final print. Reflection This process could be repeated for any number of symbols. I can see people adding Shakespeare, Dr. Who, Pi, or any number of recognizable characters. I'd also like to look at the project again down the road and replace the eyelet with a frame that the whole cameo snaps into This was the first test print. Alice's dimensions are great, and the piece fits snugly. This was done on a fast print with the default settings. On fast print, and with the fine detail resolved here you can see that it would be tough to slot the top piece into the bottom. I went in to the original cameo file and took out everything leaving only the outline of the head. This is the second prototype (where the dimensions were skewed) so Alice doesn't fit snugly just yet, however it shows the intention nicely. Print 3 - snapped together before filing. Hatter, Print three, before filing edges. White Rabbit before clean up.
With this file you will be able to print Alice in Wonderland Cameos for Silhouette Set with your 3D printer. Click on the button and save the file on your computer to work, edit or customize your design. You can also find more 3D designs for printers on Alice in Wonderland Cameos for Silhouette Set.