Alu reprap
thingiverse
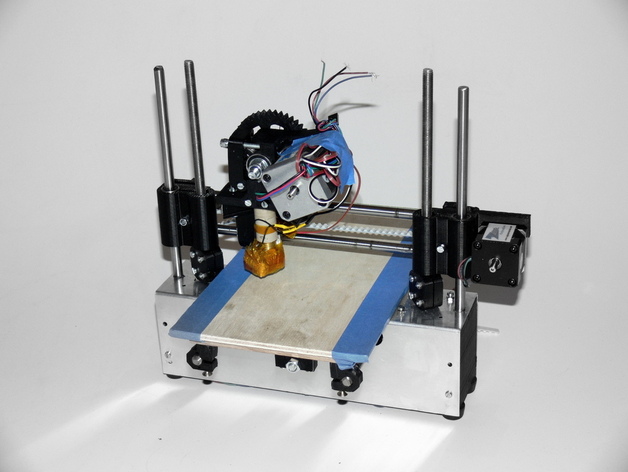
This is partly a derivative of http://www.thingiverse.com/thing:14208 (which is a variant of the printrbot). I recommend the printrbot variant on Thingiverse (the link above), as it's a nice and compact design. The files required from the above design are slightly modified and are provided here http://www.thingiverse.com/thing:15634 (separately due to GPL licensing of the original parts). The x-carriage can be used straight from the original design, but change the rod size to 8mm. On this design, the smooth rod has been changed to be on the outside, and the frame uses an aluminium sheet instead of rods. I'm still calling it a reprap, as it relies on lots of printed parts to be operational. The z-belt has been replaced by a printed rack, which partly based on http://www.thingiverse.com/thing:11642 and inspired by http://www.thingiverse.com/thing:6011 and http://www.thingiverse.com/thing:14537. The x-axis still uses a belt, and a printed pulley. I doubt the Y-axis rack is better than a belt, but it remains to be seen. The design supports a printrbot-type Y-belt if you want to use that instead. I've tried to make this printer really small, and the print area is too small right now to be usable. I either have to mount the extruder 90 degrees to what it is now (might be the simplest), use a bowden extruder, or use an entirely new not yet invented extruder, I'm aiming for a print area of about 120 mm, which should be possible. This is the main thing I have to fix before this printer is good enough. I haven't printed with it yet, but it feels very stable and I think it'll do well. The bot is 250 mm wide, but could of course be made wider. The stepper for the x-axis (printrbot-variant design) goes outside 'the box' (alu sheet). I've been toying with the idea of making a different x-axis end which keeps the extruder inside 'the box', for example by turning it 90 degrees and having it upside down like this: http://www.thingiverse.com/image:96329 The bars are 8mm. I use NEMA17 for the z-axis and NEMA17 for the extruder, and NEMA14 for the X and Y axis. The printrbot variant files can be edited to use NEMA17 all over instead if you wish. If you use his files, you'll need to fix the distance between the smooth and threaded Z rods also. Mine are 27 mm apart, between the centers. It uses LM8UU bearings. The base that holds the bearings for the Y-rods is a bit weak around the bearings and needs a redesign. But I lost the source file and haven't had time to fix it yet. Will do if there is demand. The rack-gear made using http://www.thingiverse.com/thing:3575. Note that this library is LGPL, but I have taken the liberty of posting the part here. Consider it distributed under LGPL. As a coupling for the z-axis I'm using http://www.thingiverse.com/thing:11220 without any changes. I also use it on my prusa, and it works great, reducing z-wobble. One possible improvement to this design is to not print the full height of plastic for the z-height, allowing the x-end to go a bit further down (it's being stopped when the nut-holder hits the coupling). I've made various other test designs, including one without the alu sheet that uses plastic instead: http://www.thingiverse.com/image:95169 . I have also made one with two bars on each side of the z-stepper instead of on the outside, but dropped that idea. http://www.thingiverse.com/image:98180 (I don't really need two bars on each end. One should have been enough.) I'm looking at it now and think I could add another 2 cm build area (1 cm each side) by doing this. The reason I didn't was I then had to design the top parts myself instead of using the printrbot variant. There is a video of it moving at: http://youtu.be/IaLl8jtqlT8 You can of course use other things than an aluminium sheet. Other metals, but you can probably use a wooden structure also. The printrbot concept seems ok for making a repstrap without many plastic parts, if you don't have a friend who can help you with printing the plastic. Instructions I haven't yet provided the plans for the aluminium, but it's easy to make based on the below instructions. Get hold of a sheet of aluminium (1-2 mm thick) that is about 250 mm wide and 200 mm long. If you use a wider aluminium sheet, you get a wider printer ;-) Then bend it twice, so that it's a square shape as seen on the photo, with a 60mm top (measured inside). It should fit the alu-reprap-base in each side. You can then put the alu-reprap-base on top of the aluminium shape and mark where you want to drill the holes. I use a 4 mm drill for the screw holes and 8 mm holes for the bars. Print the alu-reprap-y-stepper-holder also and make holes for it. Then drill holes on the side for the Y-rod and make a slot for the Y-rack, as seen on the picture. I made the slot using a dremel, but I guess you can saw it somehow also. Most of the screws need a nut on the other side. The 8mm smooth rod just slots in through the aluminium and into the plastic base. I don't have any screws etc holding it. You need to print two of the makerbottable rack and fasten them using a 6mm threaded rod with nuts on both sides. Then fasten this rod below the base by using the alu-reprap-y-rod-holder. Refer to the printrbot variant page for instructions on the top part. I have to make some changes to it though, to get a larger print area. Screw everything together...
With this file you will be able to print Alu reprap with your 3D printer. Click on the button and save the file on your computer to work, edit or customize your design. You can also find more 3D designs for printers on Alu reprap.