Aluminum Extrusion 3D Printer Carriage
thingiverse
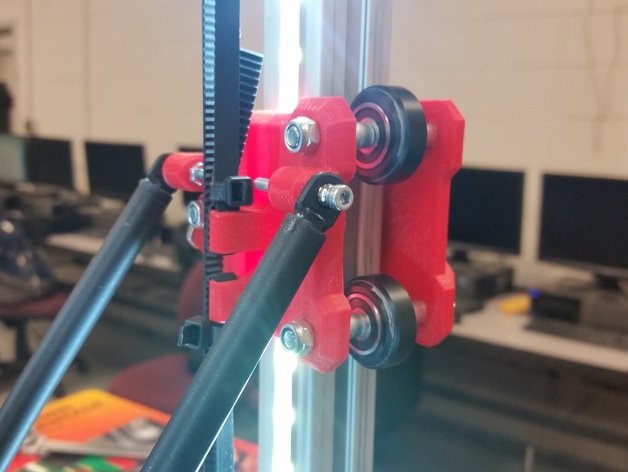
This is a Carriage designed to glide smoothly on 25mm 80-20 Aluminum extrusion, which is commonly used to build 3D Printers. The model uses Openbuilds Carriage wheels and 10mm spacers, but included are all of the files needed to make the carriage. If you would like optimal results though i would definitely recommend using the Openbuilds wheels instead of printing them. The carriages also have set screw adjustment to tighten the wheel against the extrusion, this is essential for tuning. The part was originally designed to work for my Delta 3D Printer as its main source of linear movement, and has worked flawlessly for every part so far:) Links are below to the whole printer. Here is a short teaser video of the Delta 3D Printer- https://www.youtube.com/watch?v=EX2o5emcHi4 http://www.thingiverse.com/thing:1266969 UPDATE 1-23-17 --------------------------------- Hello everyone, Over the past many months and thousands of hours of design time I am nearly ready to release the final version of my consumer version of the Dimension 3 MultiMachine Delta 3D Printer. Check it out at http://www.Dimension3fab.com Print Settings Printer: Custom Delta 3D Printer Rafts: Yes Supports: Yes Resolution: .1 or .2 Infill: 40% Notes: Make sure it is well adhered to the plate:) Post-Printing Cleaning up the prints After the prints are done simply remove all supports and pop it together. Gathering Materials To build the carriages you will need a few bits of hardware. 3 50mm m5 bolts with matching Nyloc nuts 6 Printed 10mm Spacers 3 Openbuilds Solid V Wheel Kit (http://openbuildspartstore.com/solid-v-wheel-kit/) 2 25mm m3 Bolts with matching nut for delta arm connection 2 1" long 6/32" screw (for wheel tightening) Assembly First you are going to add the set screw in the side of the plates for tightening the wheel. Then slide one of the 50mm m5 bolts and slide it through the back plate. After that slide on a 10mil spacer then an openbuilds wheel, then another 10mil spacer. Finally slide on the front plate and bolt it all together. Do the same thing for the other two wheels. Mounting to the extrusion After two wheels are mounted then connect it to the printer by attaching the third wheel and spacers. Once it is bolted together and sitting on the extrusion you can tighten the set screws to bring the third wheel closer to the extrusion and thus tightening up the whole system. Delta Setup Once they are mounted you can use the 2 25mm m3 screws to mount the arms of the delta printer to the carriage plates. There are also two slots perfectly fitted for a G2 2mm pitch 6mm wide belt, which is pictured above. I used Traxxas ball joints for my arms, so that is what i designed this to use, but you can adapt it to work with lots of different arm designs.
With this file you will be able to print Aluminum Extrusion 3D Printer Carriage with your 3D printer. Click on the button and save the file on your computer to work, edit or customize your design. You can also find more 3D designs for printers on Aluminum Extrusion 3D Printer Carriage.