AM6 2040 Aluminum Extrusion Profiles
thingiverse
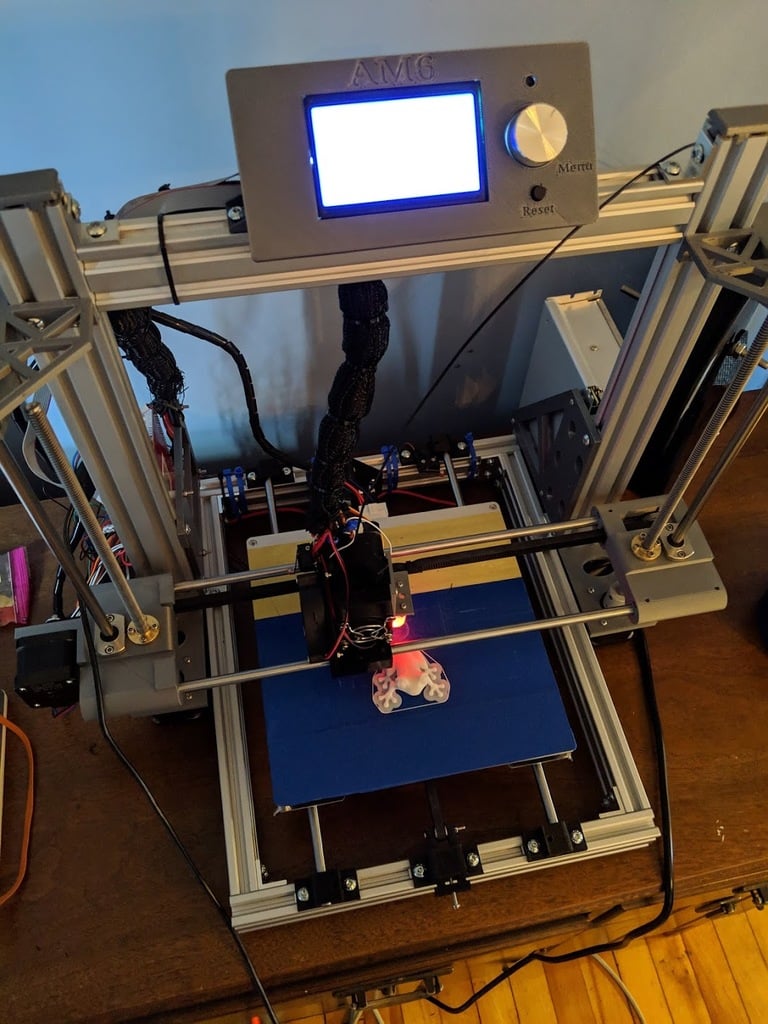
AM6 ==================== I turned my Anet into the AM6 over the course of a couple weeks. The black filament parts in the photos were printed on the A6, the silver PLA photos on my Prusa MK3S. The most noticeable differences are, no more ghosting and I can print quite a bit faster. Marlin 1.9 --------------------- In addition to the Am6 frame, I've updated to Marlin 1.9. On Marlin, I've enabled linear advance 1.5 (this is huge for print quality), turned on s-curve, and junction deviation. I also turned on babystepping to live adjust the Z on the first layer of a print. I turned on babystepping the z probe offset so I could easily find the distance between my probe (bltouch) and the nozzle. These combined settings have made a HUGE difference. Bltouch --------------------- The Bltouch works great. Before each print I do a home (G28) and Bilinear Bed Leveling (3 points each row for 9 points total). I am ordering a steal spring sheet to replace the tape on the bed with something more manageable. To make installing the BLtouch easy, I used this board I found on (a well known online auction site) - see image of the board. It is called a Anet Pin 29 board and lets you install the Bltouch without any soldering by plugging it into your LCD port. I found it [here](https://www.ebay.com/itm/Anet-12864-A2-A6-E10-and-E12-Pin-29-Board-for-BLTouch-or-filament-sensor/202569234114?ssPageName=STRK%3AMEBIDX%3AIT&_trksid=p2057872.m2749.l2649) You can't see it in the photos, but to get the Pin 29 board to fit the build, I had to bend the three prongs up. This is easy and won't hurt anything, but do it slowly and at your own risk (and NOT while plugged in). This ensures you have room between the pin board and the profile to plug in the BLTouch. Issues solved during this build --------------------- I pulled files from Am8 project, Am6 Alunar, Am6 Iron, and from the Prusa Mk3s. So thanks to all those projects. Having belt tensioning on y and x has also made a huge difference. I always had a problem getting the bed to slide smoothly when it was on the original frame. With this setup, I don't have that issue anymore. This is because the threaded rods for the bed are no longer needed in this build and the profiles are MUCH stronger, and easier to make square. I always had an issue with the belt going up to meet the bed instead of being level (even with the plate correctly installed). I don't have that issue any longer. I did not lose any Z height with this build. My prints are not as good as on my Prusa MK2S. However, they are getting really close. The main thing holding it back is the tape on the bed. Something as uneven as tape can be can hurt the quality of the print. Glass or spring steel will fix this in the next few weeks. Build Tips --------------------- Spend the time to make sure the frame is level and it doesn't rock back and forth when you gently move the top of the frame. If it rocks, its not level. Fix it before finishing the build. Get rubber feet. They help with other issues and also help level the frame. When you are building and trying to get the Z level, use the LCD to move the X axis all the way to the top of the rods. This will ensure they are the exact same level. You will probably notice that one hits the top before the other. That's how off they are from each other. Use zip ties everywhere. I used maybe 50 zip ties in this build for cable management. I ran the cables through the extrusion profiles and then zip tied them in place. All the cables from the extruder ru through a single mesh fabric wrap that is held in place with zipties. I used a 1.5 inch mesh which is way too big. I will be replacing is with .75 inch. I put a folded 1.75 (3.0 total) length of filament in with the wires (inside the wrap) to help hold them without putting strain on the wires themselves. To get the X axis endstop to continue to work with the new left X axis, I only needed to turn the endstop sensor upside down! In marlin Y home offset = -5, X = -8, Z = 0. I removed the wing nuts from back of the heatbed and replaced them with regular nuts. I also replaced those screws with a couple that are slightly shorter. This makes it so these don't hit the rod holders on the back. I keep the bed above the Y Motor holder so it doesn't hit when sliding. I will be adding 9 adhesive earth magnets on the underside for the new surface. Misc --------------------- I have added 2 custom menu items in Marlin under a menu called calibration. I added first layer calibration (copied from Prusa layer calibration gcode but modified for the AM6), and Linear Advance 1.5 Calibration to set the K value properly (.22 is correct for me). Between these two and the babystepping and the bilinear bed leveling, the first layer is always just perfect. I run the first layer calibration which draws rectangles on the bed while adjusting the Z with baby stepping to make sure its set properly. You can also just use the babystepping on the first layer of your print if you want. I had to drop SD card support to get the above customizations / custom scripts / babystepping / bilinear bed leveling, however, I use Octoprint so its not a loss for me. You can if you need, turn off other features instead. You can change whatever text you see in Marlin by editing the Language file for your language. To get OSX (I am on High Sierra) to recognize that a printer is plugged in (to flash Marlin 1.9), I had to install drivers. You can find those drivers if you have the same issue [here](https://github.com/adrianmihalko/ch340g-ch34g-ch34x-mac-os-x-driver). I don't think you need drivers on linux or Windows. I had initially used the Marlin configurator to modify the settings but it ended up being more trouble then its worth. Tip: If you change the build version to 1.8 you will be able to select your board. If you choose the default 1.9 build, it disappears. Instead, I ended up making the changes and flashing right from Arduino IDE. You can find instructions about this online. Lastly, I could mount the top profile level with the others instead of it being lower. I don't do this however because I want that frame as level / square as possible. I feel that having it square at the same height as the top rod holders makes more sense but is not as aesthetically pleasing. Either way should work fine.
With this file you will be able to print AM6 2040 Aluminum Extrusion Profiles with your 3D printer. Click on the button and save the file on your computer to work, edit or customize your design. You can also find more 3D designs for printers on AM6 2040 Aluminum Extrusion Profiles.