Amazing Siren Whistle (fun, loud, and fast to print)
thingiverse
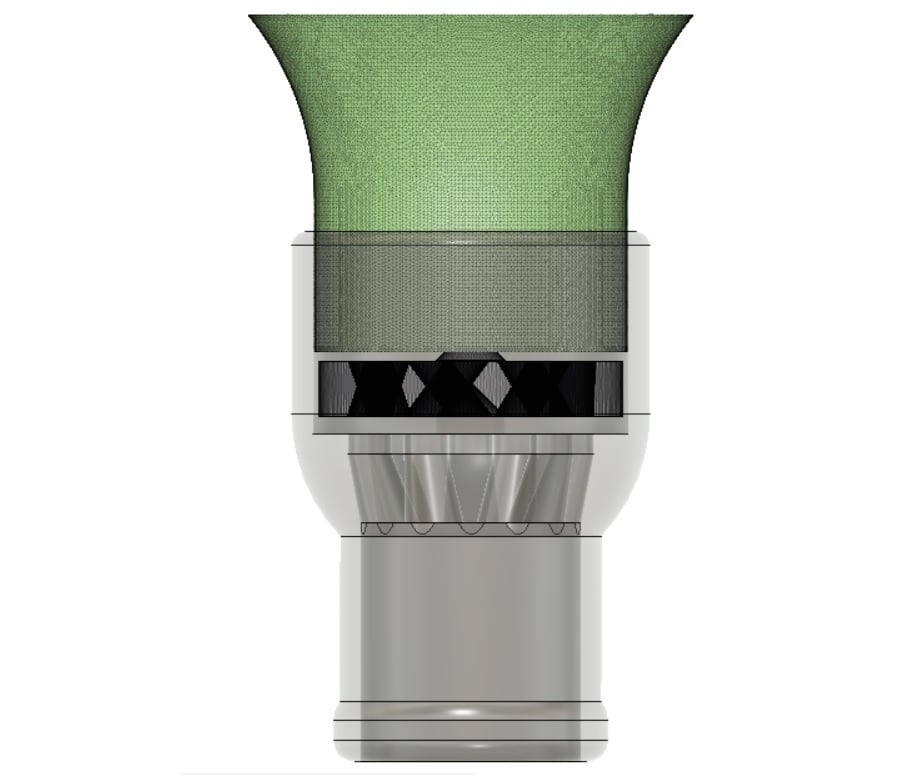
Update 7 and 8: 11/16/2021 and 11/17/2021 These are still my recommendations: Siren_Whistle_Mouthpiece v50.stl Siren_Whistle_Horn_Alternate_shallower_indented_cone.stl Rotor_Modification_4p6.stl For some additional experimenting fun with other good parts, try out these to pick a favorite: Rotor_Modification_5p6.stl Siren_Whistle_Rotor.stl (which has a 5.1mm inner cone diameter) Siren_Whistle_Chopped_Original_Horn.stl Everything prints with a brim. -- I wanted to see the Siren Whistle horn by BbrnKyle working with my mouthpiece and rotor. I found that I could chop the bottom off to reduce the inner cone diameter to the same depth as my alternate horn (which works very well but may or may not be optimal but if not, I bet it is very close to optimal). The modified STL is not closed but it prints in Cura fine anyway. (when I closed the mesh the inner cone closed up flat and I didn't feel like fixing it). It still prints fine (use a brim because I think that extra layer is important) and it works when matched with my recommended mouthpiece and rotor (also printed with a brim). It has a little bit more of a siren-like sound because of the eight holes the air must flow through and get chopped but the sound is similar to my horn. It is called "Siren_Whistle_Chopped_Original_Horn.stl" and took me about 50 minutes to print. Remove the brim and about 30 seconds of sanding around the barrel (I use 150 grit sandpaper) makes this horn fit tight. I like the sound of this horn as it is more mellow and quieter, similar in frequency to my ear but not quite as shrill as as my recommended horn: Siren_Whistle_Horn_Alternate_shallower_indented_cone.stl Try out both horns and decide for yourself (print both with a brim)! I'm not really certain what happens if you print the rotors and the horns without a brim since I didn't try however I suspect there would be problems on the horn side (or maybe it will be amazing... I really don't know but I think a brim on the horn is probably the way to go). I anticipate that there is a distinct possibility that the 5.1mm rotor printed without a brim would function well and very similarly to the 4.6mm version with a brim but be one layer thinner. I also suspect you may hurt the horn's performance without a brim... I'm not really sure. It warrants an experiment but in the meantime, I recommend a brim on everything. After testing, I had the best luck with the same three rotors that worked best when paired with the other horn also. These were the 5.6, 5.1, and 4.6mm inner cone diameter rotors (also printed with a brim): Rotor_Modification_5p6.stl Siren_Whistle_Rotor.stl (which has a 5.1mm inner cone diameter) Rotor_Modification_4p6.stl The performance was close for all three rotors but for me I think the 5.6mm rotor was my favorite with "Siren_Whistle_Chopped_Original_Horn.stl". I started to have trouble going larger and smaller than those three rotor inner cone diameters where the rotor would stall and/or wobble, perhaps due to lateral movement. All three were very good so maybe you'll have a different favorite. Performance is perhaps more dependent on exact horn placement (to the first layer line where the rotor is not pinched between the mouthpiece and horn and is free to spin. Another future test is to drop the 1mm cylinder holding the mouthpiece cone that engages the rotor down by a layer or two. Definitely don't remove it all together as raising that mouthpiece cone up certainly does help but 1mm may prove to be taller than is optimal. Maybe reduce that 1mm tall cylinder height in the mouthpiece down to 0.4 or 0.7mm and see what happens (drop one or two layer) if you are in the mood to experiment further. You could also go up a little higher than 1mm and I'm confident the rotor would spin but I think that direction makes less sense, especially for the open horn since the air chopping interface is between the mouthpiece and the open horn. -- Update 6: 11/15/2021 Let me cut right to the chase and tell you I am updating my recommendation regarding what works best now after exhaustive testing. Print these three files all with a brim and support (needed on the mouthpiece only) at 0.28 layer height and 100% infill: Siren_Whistle_Mouthpiece v50.stl Siren_Whistle_Horn_Alternate_shallower_indented_cone.stl Rotor_Modification_4p6.stl Printing all three pieces took me about 1.5 hours. Remove the mouthpiece support (I used the diagonal cutters to grab and pull which was easy). Then sand of any Z-seams on the inside of the wide end of the mouthpiece cylinder, as well as any seam the outside cylinder of the horn, and on the side of the rotor. I lightly went around the rotors with sandpaper to knock off any high spots and take off any sharp edges around the circumference of the rotor. In total, it is about a minute or two of sanding to make things smooth. Then place the rotor in the mouthpiece so that it can revolve with a finger without getting caught on the mouthpiece cylinder wall. Lightly pinch the rotor into the mouthpiece with the horn which should go in to the mouthpiece tight yet still remain adjustable. then back the horn out very little by rocking and pulling to allow the rotor to not be pinched and able to spin. Try to not move the horn out more than one print layer at a time and blow to test. The siren should should start working as soon as the rotor is no longer pinched. The new mouthpiece (v50) raises the cone that the rotor rides on by 1mm (and less relevantly also eliminates the inverted cone in the underside of the mouthpiece) and is MOST DEFINITELY AN IMPROVEMENT. I found that all the rotors across the gamut worked OK with the v50 mouthpiece but the sweet spot seems to be around the default 5.1mm rotor (Siren_Whistle_Rotor.stl) so try that if you have any trouble with Rotor_Modification_4p6.stl which I could hear by the higher frequency that the rotor was spiining faster. If still having trouble (which I wouldn't expect) try Rotor_Modification_5p6.stl I found the siren was reliable and even louder with the 4.6mm rotor. Although the 4.1mm and smaller rotors work, they start to get wobbly as they engage the post in the mouthpiece less and seem to work less reliably. It seems to me that the height between the mouthpiece and the rotor is not so relevant in general as all the rotors did spin. There may be one exception though: Briefly, I heard a super high frequency like I've never heard with any other rotor with the 8.1mm inner cone rotor (lightest weight and essentially sits flat to the mouthpiece floor) when matched with the v50 mouthpiece and the alternate horn. (I had glued together the next two smallest ones that also sat flat on the mouthpiece floor earlier so didn't test those again... but when glued together do spin at a lower frequency together as well...) It was a loud, very high frequency approaching dog whistle territory. It was not sustainable though I believe because of the rotor wobble from not being supported at all in the middle. Know that it is technically feasible though! I'm not sure your ears would really want it that loud or high pitched so if you happen to decide to mess with lowering the rotor further into the mouthpiece, you may want to make it the rotor more massive to lower the maximum frequency and I suspect you likely would need to adjust the axle design to fit around the mouthpiece post to keep it from wobbling... I suspect you could also try adjusting the height of the 1mm tall cylinder that raises up the mouthpiece cone to a height somewhere between 0 and 1 mm in order to drop the rotor closer to the mouthpiece (I know the height of that mouthpiece cylinder that raises the cone of 1mm is most definitely better than 0mm but there may be a sweet spot between 0 and 1mm for the mouthpiece cylinder that would allow the rotor to drop lower into the mouthpiece... There is room for more experimentation. I've come to the conclusion now that my first horn part, Siren_Whistle_Horn.stl, doesn't work as well or as reliably as the alternative horn with the sallower cone so just print Siren_Whistle_Horn_Alternate_shallower_indented_cone.stl instead. I did not go through exhaustive testing to see if there is a more optimal horn inner cone diameter. There is more room here for experimentation. I can assure you that my v50 mouthpiece is an improvement over my original mouthpiece as well. I added an updated Fusion 360 file and a step file for the v50 mouthpiece. Fusion 360 automatically increased the version to v51 when i saved but the v50 mouthpiece is the latest. The V51 Fusion 360 project includes the original rotor with the 5.1mm inner cone diameter (the sweet spot I think) and also now includes my alternate horn remix which works better than my original horn remix (my pics show it in green). Don't damage your hearing or anybody else's and enjoy! -- Update 5: 11/15/2021 I have now printed and tested the six rotors with the smaller inner cone diameters than the default rotor of 5.1mm. After testing these rotors I found that they all work and they worked best when paired with the alternate horn instead of the default horn, I think my current recommendation will change to the rotor with the 3.6mm cone diameter paired with the alternative horn which also has a smaller cone diameter. (update: use the updated v50 mouthpiece and the rotor with the 4.6mm inner cone diameter with the alternate horn) My test started with the 4.6mm inner cone diameter rotor and worked my way down all the way to the 2.1mm inner cone diameter (which when printed at 0.28 layer height was virtually flat bottomed). These rotors all worked however I noticed that they preferred being paired with the alternate horn that also has the smaller inner cone diameter. The siren was smooth without as much rattle, loud, and high pitched. As the bottom cone on the rotor got progressively smaller during testing, the rotor sat higher and higher on the mouthpiece cone. The horn could be pressed up closer to the rotor with the 2.1mm horn being just one layer backed away from the rotor. In that case, the rotor basically sat on the tip of the mouthpiece cone. It was smooth and loud but got wobbly every now and then. I think it is because the 2.1mm rotor is contained only by the mouthpiece cylinder and the mouthpiece cone is becomes nothing more than a spacer the rotor is balancing on the tip of. These results are surprising to me because I was under the impression that a good siren needed to chop the airstream and it made sense to me that it would do that best when the rotor was closest to the mouthpiece to ride on a cushion of air and chop the airstreams coming out of the mouthpiece tubes... With the rotor sitting so high above the mouthpiece, perhaps the air that is getting chopped is really between the rotor and the bar that goes across the center of the horn... The next step will be to raise the mouthpiece cone up by 1mm and retest the smaller rotor cone diameters over again. I believe the smaller rotors will prefer the alternate horn as well. This will allow testing at a higher rotor height than the mouthpiece cone currently allows. My suspicion is one of the smaller rotors in the middle of the pack will be well matched and have enough of a small inner cone diameter to provide some lateral stability to the rotor without adding much friction. I have uploaded this mouthpiece I am about to test as: Siren_Whistle_Mouthpiece v50.stl which raises the mouthpiece cone by 1mm and I also eliminated the inverte cone on the narrow part of the mouthpiece since that inverted cone wasn't being supported well in Cura and came out bad a couple times. Everything I have tested has been printed at 0.28 layer height with a brim and 100% infill. -- Update 4: 11/15/2021 I decided to make another group of six rotors but this time with the inner cone going smaller than the default of 5.1mm. I made the inner cone diameters 4.6, 4.1, 3.6, 3.1, 2.6, and 2.1mm in diameter. I have not tested them but intend to. I expect these will allow the horn to get closer to the rotor and reduce rotor friction on the mouthpiece cone as well as eliminate potential rotor wobble as the bottom of the rotor gets supported better. Currently the recommendation is to print the default rotor which has a 5.1mm inner cone diameter and does work. I am just trying to make it work better with these experiments! -- Update 3: 11/15/2021 I couldn't help myself and I reprinted the my complete original siren whistle (which has the three parts including the default 5.1mm rotor and is still recommended) as well as all six new rotors and found that they all worked but I think the default rotor worked the best. The rotors with the largest three inner cones sat flush against the mouthpiece and not on the mouthpiece cone at all. It is the horn placement that sets the air gap under the rotor which is why the horn placement is so critical (ideal horn placement in the mouthpiece seems to be particular on the order of a layer height). When the rotor is spinning it is pushed forward into the horn's inner cone and so the cone on the mouthpiece doesn't do much except prevent some lateral movements of the rotor. You could hear that in frequency variation in the sound sometimes as the rotors with the larger inner cones sometimes wobbled. The inner cone on the rotor does serve to keep the rotor from wobbling in the mouthpiece so a smaller inner cone on the rotor I believe now is actually better! It stands to reason that increasing the mouthpiece cone diameter (or elevating the mouthpiece cone for the same effect) might add additional stability to the rotor by reducing possible wobbling of the rotor when it is pushed forward into the horn inner cone and the tip of the mouthpiece cone, might provide a better axle on the underside of the rotor that way... Alternatively, making a rotor with an inner cone diameter smaller than 5.1mm may work better for the same reason and additionally reduce friction as well... This theory has not been tested yet but seems like it should be! After testing all the various combinations with both horns, I will (no longer) stick with my original recommendations to use the default 5.1mm rotor and default horn. What makes the most notable difference in siren performance however is the depth of the inner cone on the horn. I had mixed results testing both the default horn and my alternate horn which has a more shallow inner cone that engages the rotor. The alternate horn with the shallower cone let the rotor achieve a slightly higher frequency indicating that the rotor could spin faster presumably due to less friction however the original horn with the deeper cone seemed to work easier suggesting that the depth is perhaps better on the default horn than the alternate horn. My advice is to print the complete design and also print the alternate horn to see which horn works best. The horn does make a difference! (update: after much comparison, the alternate horn definitely works better!) For another experiment, I super glued two of the larger inner cone diameter rotors together and aligned their slots properly with a couple pieces of filament while the glue set. The double stacked rotor being twice as tall and twice as heavy spun as well but at a lower frequency and took a little more air pressure. I think the default rotor is likely a better choice versus a thicker rotor unless perhaps you are trying to reduce the maximum frequency. -- Update 2: 11/14/2021 It was clear to me (update: I was wrong, the mouthpiece cone needed to be raised 1mm) from testing earlier today that the default rotor which has an inner cone diameter of 5.1mm was not deep enough since the performance of the siren whistle went up dramatically when I removed a tiny amount of material by hand with a drill bit from the inner cone of the rotor (update: the alternate horn with a more shallow cone for the rotor works better than than my original horn. It is true that it may not be optimal still though but it is close). To identify the ideal distance between the rotor and the mouthpiece without needing a drill, I created a collection of new rotors with various inner cone diameters. I did this to try to identify the optimum air-gap between the rotor and the mouthpiece so that the default 5.1mm rotor inner cone diameter does not need to be drilled out slightly to improve performance. I included a Fusion 360 file where I modified the rotor stl to create the brand new set of rotors. I uploaded stl files for a subset of this new rotor collection for testing that incrementally increase the inner cone diameter of the rotor in increments of 0.5mm. Larger inner cone diameters will allow the rotor to sit progressively lower on the mouthpiece cone and decrease the air gap between the mouthpiece and rotor which I am now confident after testing will be an improvement. The first new rotor stl file has a 5.6mm inner cone diameter will drop the rotor on the mouthpiece cone in 0.25mm increments which narrow the air gap between the rotor and the mouthpiece in increments close to one layer height. Although there are more files in the Fusion 360 project, I am uploading six new rotor stl files that increase the inner cone diameter from the default of 5.1mm to 5.6, 6.1, 6.6, 7.1, 7.6, and 8.1mm respectively. I suspect the optimal rotor will be one of the first three (5.6, 6.1, or 6.6 mm inner cone diameter) but they must be tested to be sure. The larger inner cone diameters may close the air gap completely so that the rotor would then be resting on the surface of the mouthpiece and the cones between the mouthpiece and the rotor no longer engage. I'm not sure yet. Certainly, the larger inner cone diameters will result in a lower rotor weight in the center which may also help it to spin easier... Assuming the default 5.1mm inner cone rotor diameter was already tested, I would next test the 5.6mm inner rotor diameter stl file to see if there is a noticeable improvement and move forward with the other rotors with incrementally increasing inner cone diameters from there to see which rotor causes the siren to get the loudest! The Fusion 360 project file has even more rotor stl files ready to go that range from 5.2mm up to 6.1mm respectively in increments of 0.1mm to further dial in the air gap if needed (i.e if printing at a smaller layer height and really want to dial in the air gap between the mouthpiece and the rotor perfectly) -- Update 1: 11/14/2021: This turned into one of my favorite designs ever. The (no longer) strongly recommended three parts can be printed individually via: Siren_Whistle_Mouthpiece.stl Siren_Whistle_Rotor.stl Siren_Whistle_Horn.stl I ran some additional tests. I checked both the alternate horn and and BbrnKyle's original rotor stl file that I posted here to compare their performance and while they do work, they do not work as well so I do not recommend them. I may even remove them in the future. The two files that I DO NOT recommend printing by default are: Siren_Whistle_Horn_Alternate_shallower_indented_cone.stl Siren_Whistle_Original_BbrnKyle_Rotor.stl I had FANTASTIC SUCCESS with the original three recommended parts. This turned out to be an REALLY AWESOME design. While these parts will work off the print bed after they are cleaned up with minimal sanding (i.e. removing the Z seams and eliminate any sharp brim remnants) (update: the advice here is obsolete since I released the v50 mouthpiece. New recommended parts no longer require modification) I did identify ONE KEY MODIFICATION to the bottom of the rotor to make it work EXTRORDINARILY WELL which makes it EAR PIERCINGLY LOUD! The key modification is to remove a tiny amount of material from the inner cone on the underside of the rotor so it spins freely and is a little closer down on the mouthpiece cone. This is the key modification! I did this by rolling a couple drill bits in my fingers by only a couple of revolutions in the inner cone on the rotor. The two drill bits I happened to have used measure 4.75mm and 3.5mm in diameter. I removed a very small amount of material from the inner cone in the rotor and the siren whistle now WORKS INCREDIBLE! Secondly, be aware that the placement of the horn in the mouthpiece is critical as well (on the order of a layer height makes a difference so press the horn in to lightly pinch the rotor and then back the horn out by rocking back and forth making tiny movements and blow each time to test! I am VERY HAPPY that it can work EXTREMELY WELL with a simple rotor modification! Thinking about how to make the one rotor modification permanent without requiring a drill to open up the rotor, one could either modify the rotor stl to enlarge the inner cone or slightly shrink the size of the cone that the rotor rides on in the mouthpiece (eliminating the mouthpiece cone the rotor rides on all together I think that might make the siren more difficult to get spinning). I'm not sure if it is the extra clearance, or the lower height of the rotor in the mouthpiece, or both, that really makes the difference but there is most definitely a significant difference in performance by opening up the rotor's inner cone very slightly! My best guess is that it is the slightly lowered height of the rotor within the mouthpiece that makes it work so well! (update my guess is mostly incorrect however there may be some truth to it based on some testing but the rotor probably needs to have a better axle support) I used a cell Android app called DATuner Pro to try to detect the whistle frequencies. The whistle becomes softly audible with a light breath at around 100 Hz and a very hard blow spikes it up briefly to a loud 4100 Hz as far as I could tell. A reasonably strong blow is briefly at 3700 Hz before rolling back down as it slows. An average blow will be less than that. Perhaps around 500 Hz to 3200 Hz depending on how much air is blown into it. Please be careful with it and use it safely like with any loud whistle! I am very happy with how well it is working especially with the modification to open up the inner cone on the rotor slightly. (update: rotor modification with a drill bit is not really needed except perhaps to smooth out any imperfections that may have happeded to it from printing) Good Luck and Enjoy! -- This is a amazing little little siren whistle based on the Siren Whistle by BbrnKyle at https://www.thingiverse.com/thing:1082844 There are just three pieces required that print in under 1.5 hours total at 0.28 layer height with a brim. The mouthpiece is the only part to require support which is easy to remove with standard diagonal cutter pliers. The .stl files are already oriented correctly for FDM printing. I have printed this and it works well when assembled correctly! This design changes the functionality of the original horn piece to improve the print time and enhance the loudness of the siren and allow the rotor to spin more reliably. I did get the original horn by BbrnKyle to work after a little scaling (it is in the Fusion project for reference) but I think the new horn here makes the siren whistle work better. I also changed the original rotor design by BbrnKyle very slightly by reducing the height of protruding cone and made the diameter very slightly larger for a tighter fit in the mouthpiece. The rotors are otherwise identical. I included the stl file for BbrnKyle's rotor here as well for reference. I designed the mouthpiece here from scratch in Fusion 360 and included the Fusion 360 project I used. It took many iterations and experiments to get to this point. I am satisfied with it but careful attention is needed to assemble the siren whistle for optimal performance. I will provide some guidance based on my findings below: -- First, Remove the brims from the three parts as well as the support from the mouthpiece. Lightly sand any sharp brim remnants from the bottom edges of the parts if needed. Second, The rotor must spin freely without getting caught on anything when revolved by hand in the mouthpiece and may require minimal sanding around the circumference of the rotor to remove any left over brim that may be attached. Remove Z axis seam that may be on the circumference of the rotor as well as the Z axis seam inside of the wide end of the Mouthpiece so the surfaces are smooth and round. A toothpick can be used to pop out a stuck rotor in the mouthpiece through the small end if it gets caught as it is being fitted. The cone indentation on one side of the rotor fits on the cone in the wide end of the mouthpiece. The rotor will sit high and rock back and forth on the mouthpiece cone. I have experimented with adjusting this gap by rolling a few different sizes small drill bits in my fingers to carefully remove some material from the cone indentation on the rotor to smooth it out and make the rotor sit lower on the mouthpiece cone. I think the rotor ideally will be able to rock back and forth on the mouthpiece cone by about the thickness of a piece of paper without bottoming out flat on the mouthpiece but am not 100% certain if that is optimum spacing but it works well and a tight gap helps keep the rotor from rattling while reducing friction and allows the rotor to start spinning easier. Too tight a gap against the mouthpiece though may make it more difficult for the rotor to start spinning depending on how the holes align with the mouthpiece holes. The rotor will spin backwards if you blow into the horn end or you might shake it if the rotor is not starting to spin. It should operate reliably though if the gaps are correct on the top and bottom of the rotor. Additionally, the gap between the rotor and the horn is critically important as too little will prevent the rotor from spinning. If you think the gap between the rotor and the horn is too small, you could try my alternate horn that will widen that gap or even try BbrnKyle's original rotor to widen that gap. I left the original rotor modelled in the Fusion 360 project and included an stl file of BbrnKyle's rotor also if interested in trying it) Third, The narrow end of the horn should fit tightly in the mouthpiece cylinder so it holds itself in place by friction but can still be adjusted with some force in and out by rocking back and forth a layer or two at a time. Sanding may be required to get a tight fitment that can still be adjusted with some force. It should be tight enough to not allow air to escape between the circumference of the horn and mouthpiece. I recommend removing any Z seam on the horn as well with sandpaper to help with fitment into the mouthpiece. Fourth, Do not remove any material from the inner cone on the horn. It is possible that it may be optimal or too deep. I have included an alternate horn with a shallower inner cone for the rotor (leaving a wider gap between horn and rotor and found that the siren I tested and produced a loud siren. I added that alternate horn with the shallower inner cone here as well to experiment with which one works best (let me know as the alternate horn may work even better possibly). If any material is removed from the horn and the rotor bottoms out on the horn, it is unlikely that the rotor will spin at all. It only takes me 20 minutes to print a horn so don't be afraid to try them both and see which works better for you. I will be comparing them myself to see which horn works better shortly also. Fifth, Assemble by placing the rotor into the mouthpiece and then the horn into the mouthpiece. Carefully press the horn into the mouthpiece enough to lightly pinch the rotor into the mouthpiece. Next loosen up the rotor by pulling the horn out of the mouthpiece as little as possible. Just backing the horn out by a few layer lines is enough to free up the rotor to spin. The rotor should rattle slightly when the assembly is shaken. Blow to test as the horn and adjust to tune the performance accordingly. If it doesn't spin, back the horn out a little further and test again. -- If you followed the assembly guidance above, then there is a good chance your siren will work and be loud. If it does not spin, pull the horn out of the mouthpiece further by rocking back and forth by another layer line or two. Ensure the rotor spins freely in the mouthpiece. If that fails, the inner cone on the horn might be too deep so try the alternate horn with a shallower inner cone. Blow air into the mouthpiece to test and adjust by moving the horn in the mouthpiece. Continue to adjust until the rotor spins freely and the loudest sound is achieved. If the performance is good and the rotor starts spinning reliably, consider running some thin super glue along the seam between the horn and the mouthpiece to make sure it never moves from that optimum position. Printers are calibrated differently so if necessary, the horn can be scaled independently of the other parts for proper tight fitment. Keep any scaling of the mouthpiece and rotor the same if they are changed so the holes will still align between them. Good luck, be safe, and enjoy!
With this file you will be able to print Amazing Siren Whistle (fun, loud, and fast to print) with your 3D printer. Click on the button and save the file on your computer to work, edit or customize your design. You can also find more 3D designs for printers on Amazing Siren Whistle (fun, loud, and fast to print).