Amplifier
thingiverse
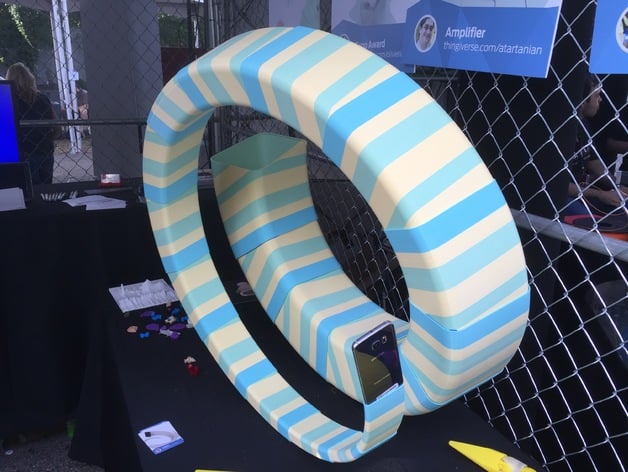
This telescoping print is designed to amplify an iPhone 6 internal speaker's audio. It prints all in one piece which starts off around a cubic foot large and then spirals out to be about 3' x 3' x 1.5' (1m x 1m x 500cm) large! This is a monster print. It was designed for printing on a MakerBot Z18 and uses a large portion of the total print volume (12"x12"x18"). The print takes about 13 days of continuous printing with standard settings and consumes close to 10 lbs of filament! If you should choose to attempt this behemoth, check out my notes in the print settings section Print Settings Rafts: Yes Supports: No Resolution: .2 Infill: 0% Notes: This takes a reaaaaaaally long time and is easily the most punishing stress test I've ever attempted. Make sure you get excellent adhesion between your raft and build plate and between the print and your raft. I reduced the spacing between the print and the raft to ensure a solid adhesion, at the risk of having to do more post processing work to remove the raft. Try to keep any zippers (seams) away from the overhanging corners of the print as they will tend to blob and cause curling which over time can result in the extruder pulling the print off of the build plate. I printed this with .2 layer height and 2 shells with a .4 mm nozzle. It is probably possible to print it with .3 layer height, which should allow it to print substantially faster, but as I've not actually tried it I can't assure that it will work. I suggest testing your setup out with the three inner segments before attempting the full print since you really want to make sure it can print before you commit all that plastic to it. I've included an .stl of the 3 innermost segments for this purpose. I always made sure to swap filament before the spool ran out. I was basically checking on this print at least once a day for two weeks and often more like once an hour. That's all I can think of for advice. Good luck! How I Designed This Built with OpenSCAD 2015.03 This was designed using the latest stable release of OpenSCAD (2015.03). It takes advantage of the new features in that version, specifically the concat() function and the new list comprehension syntax. You may be wondering why I've not included the .scad code, or even released this as a Customizable design. The answer is that the library that I used is causing some issues that prevent me from exporting this as a complete object from OpenSCAD. As soon as it's a fully working script (when the library issues are resolved), I plan to upload the full script so that anyone can create telescopes of any cross sectional shape and size! The finished script should allow the creation of telescopes to fit any kind of phone or really any shape. Wait, if I didn't export this from openscad, how did I get the final stl? Blender 3D to the rescue The answer is that I exported each of the 36 simple volumes as individual .STLs from openscad one at a time (using a bash script) and then I imported them into Blender 3D to perform the final boolean operations and the final export to a single .STL . At this point I also added some support structures to help the print adhere to the raft better. My design process often involves going back and forth between OpenSCAD and Blender, since OpenSCAD is a brilliant tool for building parametrically and Blender is a very capable swiss army knife.
With this file you will be able to print Amplifier with your 3D printer. Click on the button and save the file on your computer to work, edit or customize your design. You can also find more 3D designs for printers on Amplifier.