Analog USB Handbrake for Playseat Challenge
thingiverse
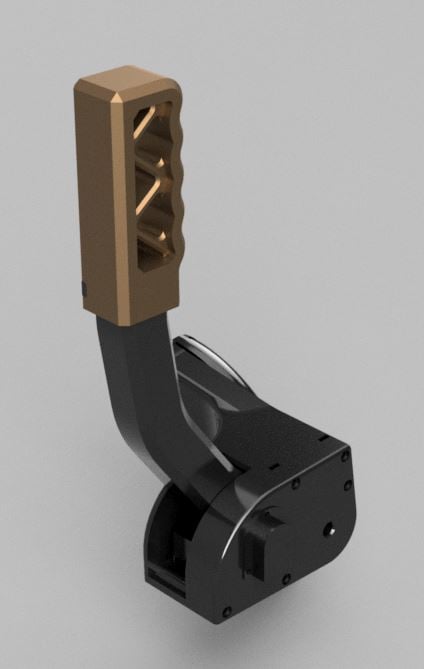
Update 22.07.2021: Added a few more pictures ___________________________ Update 21.07.2021: Uploaded .f3z file. Now you can easily modify it with fusion360 Have Fun! ___________________________ I designed this handbrake specifically for the Playseat Challenge to be mounted next to the steering wheel on the bent tube. I saw this video on YouTube: https://www.youtube.com/watch?v=QWc6EbQdUjE&t=182s Then I thought that i could design all the mechanical parts myself and do the soldering and setting up the arduino just like in the video. I use the Logitech G27 Racing Wheen and this Handbrake is compatible with this Shifter Mount: https://www.thingiverse.com/thing:3569302 I included an assembled .stl file of the whole handbrake for previewing. Parts you´ll need: 2x 608 Ball Bearing 1x 10K Wh148 Linear Potentiometer 3x M3x4mm screws 11x M4 Nuts 11x M4x16mm Allen Bolts 1x M8 Nut 1x M8x70mm Bolt 1x Arduino Pro Micro / leonardo 1x 35-45mm long spring with a max outer diameter of 15mm. Wire diameter can be 0.8 - 1.6mm. Thicker wire means stronger pull force. How to assemble: 1. push the two bearings into the lever`s bottom part. 2. put the M8 Nut into the cutout in the main body. make sure the nut is all the way in. 3. mount the potentiometer on the MainBodyCover. Make sure that it sits flush and doesnt wiggle. The pins should face down. 4. push the SmallGear onto the potentiometer. 5. choose one of the 3 LeverStop parts (I chose LeverStop15Degree) and push it into the MainBody. Secure it with the LeverStopSpline from the bottom side. 6. slide the Lever into position and put in the spring into the cutouts in the lever and LeverStop part. (The SpringSpacer is optional. It helps to keep springs with outer diameter thats less than 15mm centered.) 7. push the M8x70mm Bolt through the MainBodyCover first, then through the two bearings in the Lever and then into the MainBody and screw it snuggly into the M8 Nut. 8. make sure that the potentiomerer has full range of motion and doesnt hit its limit when you pull the lever. 9. secure the MainBodyCover with 5 M4 Nuts and Bolts. The M4 nuts have to be pressed in first. 10. Mount the MainBody assembly together with the Clamp part to the Playseat using 6 M4 Nuts and Bolts. 11. screw in HandleMountScrew into the Lever. 12. push the Handle onto the HandleMountScrew and secure it with the HandleLockSpline. 13. follow the tutorial in the youtube video on how to solder the potentiometer to the arduino and hook it up to your computer. 14. Put the arduino into the ArduinoLeonardoCase1 & 2 to protect it. 15. cover the potentiometer with the PotentiometerCover using 3 short M3 screws. (optional) 16. Use superglue to secure the arduino to the MainBodyCover as shown in one of the pictures This Handbrake is pretty simple as it only took me 4 days from start to finish. (designing, printing, assembling) There are quite a few things that could be optimized a bit more.
With this file you will be able to print Analog USB Handbrake for Playseat Challenge with your 3D printer. Click on the button and save the file on your computer to work, edit or customize your design. You can also find more 3D designs for printers on Analog USB Handbrake for Playseat Challenge.